The Ultimate French Crepes Recipe Thin Lacy and Flawless Every Time
Few breakfast items evoke the same sense of elegance and cozy indulgence as a platter of freshly made French crêpes. Incredibly thin, delicately lacy, and remarkably tender, a proper crêpe is a versatile culinary canvas. Unlike thick American pancakes, a authentic French crêpe relies on a high ratio of liquid to flour, creating a velvety batter that spreads effortlessly across a hot skillet to form a paper-thin pastry.
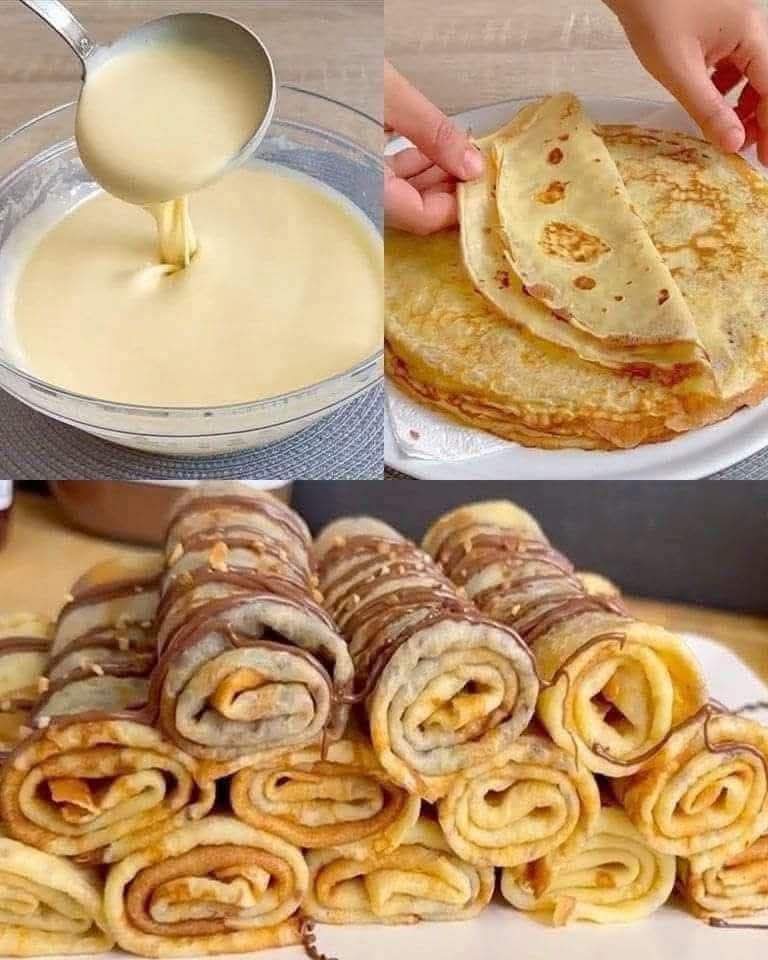
Whether you fold them into neat triangles with a simple squeeze of fresh lemon juice and a dusting of granulated sugar, or spread them with rich hazelnut spread, roll them into elegant cylinders, and stack them high on a serving platter as beautifully captured in 1000006044.jpg, mastering the art of the crêpe is a transformative skill for any home baker. While they have a reputation for being finicky, achieving bakery-level results simply requires understanding the science behind the batter and mastering a few basic hand movements in the kitchen. In this comprehensive guide, we will dismantle the myths and walk you through every step needed to create a flawless stack of golden, delicate crêpes.
Why This Authentic French Crepe Recipe Works
The secret behind the perfectly smooth, elastic, yet incredibly soft crêpes shown in 1000006054.jpg comes down to two major factors: proper hydration of the flour and temperature control. Many home cooks struggle with crêpes that turn out rubbery, full of lumps, or tear apart the moment they are flipped. This recipe fixes those common pitfalls by utilizing a mandatory resting period for the blended batter.
When you allow crêpe batter to rest at room temperature or in the refrigerator, it gives the starch granules in the flour ample time to fully absorb the milk and eggs, expanding uniformly. At the same time, any gluten developed during the mixing process relaxes completely. This results in a silky, pourable emulsion that produces a melt-in-your-mouth texture rather than a tough, bready bite. Additionally, the specific ratio of melted butter directly inside the batter ensures the crêpes slide freely across your skillet, naturally preventing sticking while creating those gorgeous, mottled golden-brown spots known as “leoparding.”
Essential Ingredients for the Perfect Silky Batter
To achieve a thin consistency that pours beautifully from a ladle—just like the step illustrated in the top-left quadrant of 1000006054.jpg—you must select your ingredients precisely and ensure they are at the correct temperature.
- All-Purpose Flour: Provides the necessary structural base. A moderate-protein all-purpose flour offers the ideal balance of strength to hold a paper-thin shape without making the pastry tough.
- Whole Milk: Adds moisture and a rich, creamy flavor profile. For an exceptionally light and lacy edge, you can substitute a quarter-cup of the milk with standard water or sparkling water.
- Large Eggs: Work as the vital binder and provide structure. Eggs trap air and lift the batter slightly during baking, contributing to that soft, flexible, and rollable nature.
- Melted Unsalted Butter: Clarifies the batter and browns beautifully under heat, imparting a rich, nutty aroma throughout the pastry.
- Granulated Sugar: A single tablespoon enhances the browning process through caramelization and adds a very subtle hint of sweetness that works perfectly for sweet variations. Omit the sugar if you plan to make savory galettes filled with ham and cheese.
- Vanilla Extract and a Pinch of Salt: The salt sharpens the flavors of the dairy and eggs, while a dash of high-quality vanilla extract creates that comforting, traditional French bistro aroma.
Step-by-Step Instructions for Flawless Execution
Creating flawless crêpes is a rhythmic, satisfying process. Follow these detailed steps to mix your batter, fry each layer to a delicate finish, and construct a stunning dessert presentation.
Mixing and Hydrating the Silky Batter
To ensure a completely lump-free consistency like the batter pouring from the ladle in 1000006054.jpg, a standard kitchen blender is your absolute best friend. Add your liquid ingredients first: the whole milk, room-temperature eggs, melted unsalted butter, and vanilla extract. Adding liquids first prevents the flour from getting trapped in the dry corners of the blender jar. Next, add the sifted all-purpose flour, granulated sugar, and salt.
Pulse the blender on high speed for roughly 20 to 30 seconds until the mixture is completely homogeneous, smooth, and frothy on top. If you don’t have a blender, sift the flour into a large bowl, create a deep well in the center, whisk the eggs and a splash of milk inside the well, and gradually draw the flour inward while slowly streaming in the remaining milk to avoid clumps. Once mixed, pour the batter through a fine-mesh strainer into a clean glass bowl. Cover the bowl with plastic wrap and let it rest on your counter for at least 30 minutes, or inside your refrigerator overnight. After resting, the batter should have the exact consistency of heavy heavy cream, pouring smoothly in a continuous ribbon as shown in 1000006054.jpg.
Swirling and Frying to Golden Perfection
Place an 8-inch or 9-inch non-stick skillet or a traditional flat cast-iron crêpe pan over medium heat. Lightly brush the surface with a tiny amount of melted butter or neutral vegetable oil using a paper towel; you want a microscopic film of fat, not a greasy pool. Once the pan is hot enough that a drop of water sizzles instantly upon contact, lift the pan completely off the heat source with your non-dominant hand.
Hold your ladle in your dominant hand, scoop up roughly 2 to 3 tablespoons of batter (about a quarter-cup), and pour it directly into the center of the tilted pan. Immediately begin tilting and rotating your wrist in a fluid, circular motion to spread the batter quickly into a thin, even circle that completely covers the bottom of the pan. Work quickly, as the batter sets within seconds of hitting the hot surface. Place the pan back onto the burner and lower the heat slightly to medium-low. Cook for about 60 to 90 seconds until the edges turn a delicate golden-brown and begin to curl away slightly from the sides of the pan, and the top surface looks entirely dry and matte.
Flipping and Stacking the Pastry Layers
To flip the crêpe without tearing it, use a thin silicone spatula or a long offset palette knife to gently loosen the edges all the way around the pan. Slide the spatula carefully under the center of the crêpe, lift it up swiftly, and flip it over onto the second side. Alternatively, if you feel adventurous, you can use your fingertips to grab the dried edges gently and flip it over in one quick motion, as demonstrated in the top-right panel of 1000006054.jpg.
Cook the second side for a mere 20 to 30 seconds. The second side cooks much faster and will never develop the same uniform golden appearance as the first side; instead, it will display a beautiful, rustic speckled pattern. Slide the finished crêpe onto a large plate lined with a sheet of paper towel. Repeat this process with the remaining batter, stacking the finished crêpes directly on top of one another as pictured in the top-right of 1000006054.jpg. The trapped steam inside the growing stack keeps the crêpes remarkably soft, pliable, and easy to roll.
Creative Filling, Rolling, and Presentation Dynamics
Once you have created a magnificent stack of delicate, warm crêpes, you can customize them with an array of sweet fillings. While folding them into quarters is traditional, rolling them into neat cylinders creates an exceptionally beautiful presentation for entertaining.
The Sweet Hazelnut Roll and Stack Technique
To replicate the decadent dessert pyramid featured in the bottom half of 1000006054.jpg, lay a single crêpe flat on a clean cutting board or plate with the prettiest, uniformly golden side facing downward. Spread a thin, even layer of chocolate hazelnut spread, cookie butter, or fresh berry jam across the entire upper surface, leaving a thin border around the outer edges so the filling doesn’t squeeze out during the rolling process.
Starting from the edge closest to you, roll the crêpe up tightly into a uniform, neat log. Repeat this process for several crêpes. Arrange the rolled cylinders side-by-side in rows on a serving platter, building upward into a neat pyramid shape. To finish the presentation with a professional flare, warm a few tablespoons of chocolate hazelnut spread in the microwave for 10 seconds until it becomes fluid, transfer it to a small piping bag or use a fork, and drizzle it back and forth over the entire stack in elegant zig-zag patterns. Scatter a handful of finely crushed toasted hazelnuts or sliced almonds over the top—exactly like the presentation in 1000006054.jpg—to introduce an incredible, crunchy texture contrast to the soft, velvety pastry layers.
Pro-Tips for Overcoming Common Crepe Problems
- The Infamous First Crepe Failure: Do not get discouraged if your absolute first crêpe turns out messy, oily, or breaks apart during the flip. Chefs around the world openly accept that the first crêpe is almost always a sacrifice item. It serves to season the pan, regulate the residual surface heat, and absorb any excess fat. By the time you pour your second ladle, the pan will be perfectly primed.
- Preventing a Thick, Leathery Texture: If your crêpes turn out thick, heavy, or rubbery like standard pancakes, your batter is likely too thick, or you are pouring too much into the pan. Whisk a tablespoon or two of extra milk into the remaining batter to thin it out to the consistency of melted ice cream, and ensure you tilt the pan immediately upon pouring to stretch the batter as thin as humanly possible.
- Managing High Heat and Tearing: If the batter clumps up instantly into a thick ball before you can even finish swirling the pan, your skillet is running far too hot. Remove the pan from the burner entirely, let it cool down for a full minute, lower your stove dial, and try again. Cooking on steady medium-to-medium-low heat ensures an even, golden coloration without shocking the delicate egg proteins.
Frequently Asked Questions
Can I make the crêpe batter ahead of time?
Absolutely. In fact, prepping the batter the evening before you want to serve them makes your morning completely stress-free and yields an even more tender texture. You can safely store the blended crêpe batter in a tightly sealed airtight container or a covered pitcher in the refrigerator for up to 48 hours. When you are ready to cook, give the chilled batter a gentle stir with a whisk to re-incorporate any flour that may have settled down to the bottom of the container while sitting overnight.
How should I store and reheat leftover crêpes?
If you have leftover cooked crêpes, let the stack cool down completely to room temperature. Wrap the entire stack tightly in plastic wrap or slide them into a large resealable freezer bag, placing a square of parchment paper between every few crêpes to guarantee they don’t stick together. They will keep beautifully in the refrigerator for up to 3 days, or in the freezer for up to 2 months. To reheat them, simply warm a dry non-stick skillet over medium-low heat and place an individual crêpe in the pan for 20 seconds per side until warmed through and soft once more.