The Ultimate Guide to Quick Pickled Beets Earthy Sweet and Tangy
Pickled beets are one of the most polarizing items in the pantry aisle. While some people associate them with soggy, metallic-tasting canned varieties from childhood, a properly made, small-batch refrigerator pickled beet is an absolute revelation. When prepared at home with fresh ingredients, beets lose their overly muddy undertones and transform into a crisp, deeply vibrant condiment that offers a flawless balance of natural sweetness, sharp acidity, and warm aromatic spice.
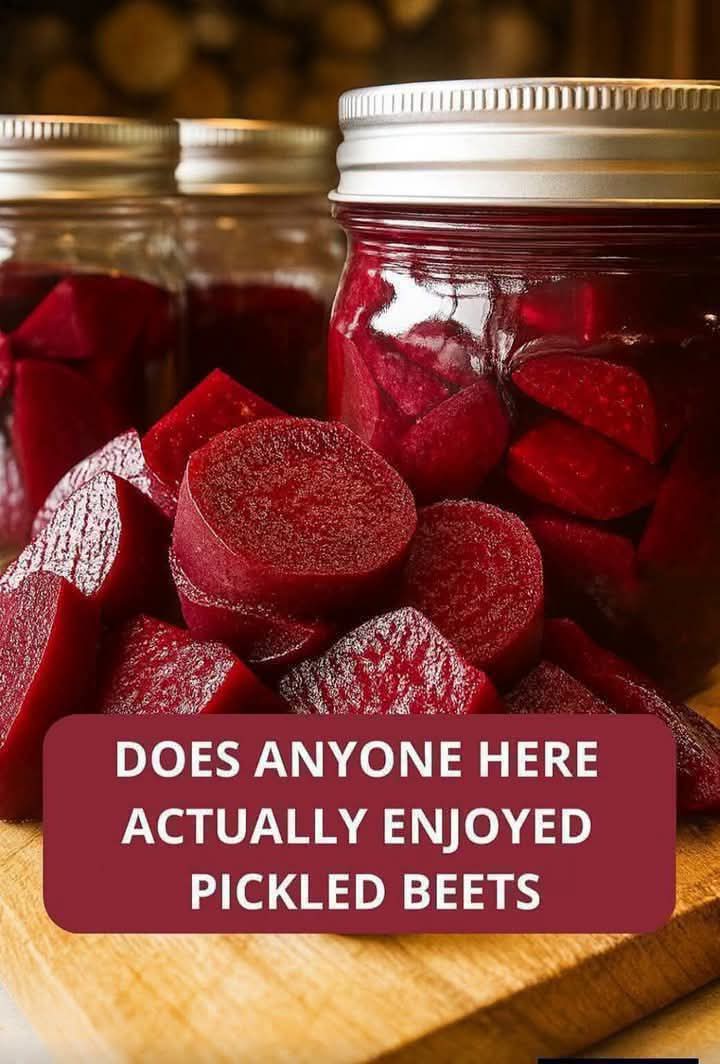
If you have ever found yourself scrolling through culinary forums asking “does anyone here actually enjoy pickled beets,” as highlighted by the text in 1000006052.jpg, the answer is a resounding yes. Food enthusiasts, chefs, and home preservationists celebrate them for their ability to instantly cut through rich fats, brighten up earthy grain bowls, and add a stunning pop of magenta color to any plate. In this definitive guide, we will explore the straightforward chemistry of quick-pickling, ensuring your homemade jars look every bit as gorgeous and appetizing as the ones showcased in 1000006052.jpg.
Why This Quick Pickled Beets Recipe Works
The secret to making pickled beets that people genuinely love lies in controlling the texture and balancing the brine solution. Many recipes fail because the beets are either boiled into a mushy paste or left so raw that they feel unpleasantly woody to bite into. This recipe utilizes a gentle par-boiling technique that softens the root vegetable just enough to let the flavorful vinegar solution penetrate to the core while retaining a satisfying, clean structural snap.
Furthermore, this is a quick-pickle—or refrigerator pickle—recipe. This means you do not have to break out heavy water-bath canning equipment, sterilize jars for hours, or worry about long-term pantry storage logistics. By focusing on a highly optimized, small-batch ratio of vinegar, water, sugar, and salt, we create an environment where the flavors mature rapidly within just 24 hours. This efficient method preserves the bright, clean characteristics of the fresh root vegetable without the cooked-down, muted flavors common in mass-produced commercial canning.
Essential Ingredients for Vibrant Refrigerator Pickles
To achieve the intense, jewel-toned color and glossy finish visible in the jars of 1000006052.jpg, you must select high-quality, whole ingredients. Because the brine relies on basic pantry staples, subtle variations in your ingredient choices will shape the final flavor profile.
- Fresh Beets: Look for firm, heavy beets with smooth skins and no soft spots. If the green tops are still attached, ensure they look fresh and turgid, which indicates the roots were recently harvested. Red beets give you that classic, deep ruby hue seen in 1000006052.jpg, though you can also use golden or striped Chioggia beets for a unique presentation.
- Vinegar Base: A 50/50 blend of distilled white vinegar and apple cider vinegar provides the perfect foundation. The white vinegar offers a clean, sharp, traditional acidic bite, while the apple cider vinegar introduces a subtle fruity sweetness that rounds out the sharp edges.
- Water: Dilutes the acidity of the vinegar to ensure the brine is pleasantly tangy rather than completely overpowering.
- Granulated Sugar: Beets are naturally high in sugar, but adding a modest amount to the brine is essential to counteract the harshness of the vinegar and enhance the natural, earthy sweetness of the root.
- Pickling Salt or Sea Salt: Use pure non-iodized salt. Standard table salt contains anti-caking agents and iodine, which can cloud the pickling liquid and alter the vibrant color of the beets over time.
- Aromatic Spices: A classic combination of whole black peppercorns, mustard seeds, whole cloves, and a fresh bay leaf adds a sophisticated, warming background note that elevates the entire flavor profile.
Step-by-Step Instructions for Flawless Preparation
Preparing quick pickled beets is a clean, orderly process when you approach the steps methodically. Follow this workflow to create beautifully sliced, uniform pieces ready for the brine.
Cooking and Peeling the Fresh Beets
Begin by trimming the leafy greens off your beets, leaving about an inch of the stem attached, and leave the long taproot intact at the bottom. Keeping the skins, stems, and roots on during the initial cooking stage is an essential trick—it prevents the beets from “bleeding” out their precious juices and vibrant pigments into the boiling water, preserving the deep, rich color profile illustrated in 1000006052.jpg. Wash the dirt from the skins gently under cold running water.
Place the scrubbed beets into a large saucepan and cover them with at least an inch of cold water. Add a pinch of salt and bring the water to a rolling boil over high heat. Once boiling, reduce the heat to medium-low, cover the pan, and simmer for roughly 25 to 35 minutes. The exact time depends entirely on the size of your beets; they are ready when a sharp knife slides easily into the center of the largest beet with just a minor hint of resistance. Drain the hot water and immediately submerge the cooked beets in a large bowl filled with ice water to halt the cooking process. Once cool enough to handle, use your fingers to rub the skins; the outer layer will slide off effortlessly under the water.
Slicing and Packing the Jars
Once your beets are perfectly peeled and smooth, place them on a cutting board. To replicate the beautiful, versatile cuts displayed in 1000006052.jpg, cut the beets into uniform rounds or thick wedges. Keeping the slices roughly 1/4-inch to 1/2-inch thick ensures they maintain an excellent structural bite and absorb the pickling liquid evenly without disintegrating.
Gather two clean, wide-mouth 16-ounce glass Mason jars. Divide your whole aromatic spices—the peppercorns, mustard seeds, and cloves—evenly between the bottoms of the empty jars, adding a bay leaf to each. Carefully pack the sliced beets into the jars, stacking them neatly as shown in 1000006052.jpg. Leave about a half-inch of empty headspace at the absolute top of the jar rims so the liquid can completely submerge the pieces without overflowing when you seal them.
Crafting and Pouring the Brine
In a small stainless steel or glass saucepan, combine your distilled white vinegar, apple cider vinegar, water, granulated sugar, and pickling salt. Avoid using reactive metal pans like aluminum or unlined copper, as the high acid content of the vinegar will react with the metal, imparting an unpleasant, tinny taste to your brine.
Bring the mixture to a simmer over medium heat, stirring continuously with a spoon until the sugar and salt crystals are completely dissolved. Once the liquid reaches a brief boil, remove the pan from the heat. Carefully pour the hot brine directly over the packed beets in each jar, ensuring the liquid flows into all the crevices and completely covers the top layer of beet slices. Run a clean plastic chopstick or silicone spatula down the inside walls of the jars to release any trapped air bubbles. Wipe the glass rims dry with a clean paper towel, screw the lids on firmly, and let the jars sit undisturbed on your countertop until they cool down entirely to room temperature before moving them into the refrigerator.
Creative Ways to Use Pickled Beets in Daily Meals
Once your refrigerator beets have cured for at least 24 hours, they are ready to be integrated into a wide variety of savory culinary applications. Their complex profile makes them much more than a simple side dish.
Elevating Vibrant Salads and Grain Bowls
One of the most classic pairings for pickled beets is a traditional goat cheese salad. The sharp, acidic tang of the pickled beet cuts beautifully through the rich, creamy, and earthy profile of soft goat cheese or feta. Toss them with wild arugula, toasted walnuts, and a simple olive oil dressing for an elegant starter. They also make an exceptional addition to modern grain bowls, providing a stark texture and flavor contrast when layered alongside quinoa, roasted sweet potatoes, shredded kale, and a creamy tahini dressing.
Enhancing Sandwiches, Burgers, and Charcuterie
In Australian culinary traditions, a thick slice of pickled beet is considered a mandatory component of a classic gourmet burger, adding an incredible juicy crunch that balances savory grilled beef. You can also dice them finely to create a vibrant relish for turkey sandwiches or avocado toast. Furthermore, as illustrated by the stunning visual texture in 1000006052.jpg, these glossy, deep-red slices make a spectacular addition to an entertaining charcuterie board, pairing wonderfully with sharp cheddars, cured meats, crusty sourdough bread, and grainy mustards.
Pro-Tips for Managing and Storing Your Pickles
- Preventing the Dreaded “Earthless” Muddy Taste: If you find the natural flavor of beets too dirt-like, the issue is a completely harmless organic compound called geosmin. The acidic environment of a vinegar brine actively breaks down geosmin, which is why pickling is one of the absolute best ways to transform beet skeptics into enthusiasts.
- Handling the Intense Pigment Responsibly: The deep betalain pigments that give beets their rich look will easily stain porous wooden cutting boards, light-colored countertops, and skin. To minimize clean-up, slice your beets on a plastic or glass cutting board, or lay down a sheet of parchment paper first. If your fingers turn pink, rubbing them with a little lemon juice and coarse salt will lift the color quickly.
- Allowing Ample Time to Cure: While it can be tempting to pop a jar open immediately, patience pays off significantly with quick pickles. Letting the jars sit undisturbed in the refrigerator for at least 24 to 48 hours allows the core flavors to fully develop, mellowing out the raw vinegar bite into a smooth, cohesive glaze.
Frequently Asked Questions
How long do quick pickled beets last in the refrigerator?
Because these are refrigerator pickles and have not undergone a traditional hot-water-bath sterilization process for long-term shelf storage, they must be kept chilled at all times. When stored properly in clean, tightly sealed glass jars inside the refrigerator, they will remain exceptionally fresh, crisp, and delicious for up to 6 to 8 weeks. Always use a clean fork or tongs to remove slices from the jar to avoid introducing unwanted bacteria that could spoil the brine prematurely.
Can I reuse the leftover beet pickling juice?
Absolutely. The vibrant purple brine left behind after you finish eating the beets is an incredibly valuable culinary asset. You can hard-boil some peeled eggs and drop them directly into the remaining chilled brine for 24 hours to create stunning, classic purple pickled eggs. Alternatively, you can use a splash of the vibrant juice to substitute for standard vinegar in homemade vinaigrettes, mix it into barbecue sauces for a unique depth of flavor, or use it as a bright marinade base for grilled chicken and roasted vegetables.