The Ultimate Guide to Perfect Japanese Souffle Cheesecake
Japanese soufflé cheesecake is the ultimate dream dessert for bakers and dessert lovers alike. Often described as a cotton cheesecake or jiggly cake, this magnificent dessert combines the rich, comforting flavor of traditional cream cheese with the airy, melt-in-your-mouth texture of a French soufflé. Unlike its dense, heavy Western counterpart, a true Japanese cotton cheesecake bounces when gently tapped and dissolves on your tongue like a sweet cloud. If you have ever seen videos of these incredibly tall, golden-topped pastries gently wobbling straight out of the oven, you know exactly how mesmerizing they are. Achieving that perfect, crack-free, sky-high rise requires a blend of precise technique, proper kitchen chemistry, and patience. In this comprehensive guide, we will break down the entire process step by step, ensuring your homemade version looks just like a professional bakery creation.
Why This Japanese Souffle Cheesecake Recipe Works
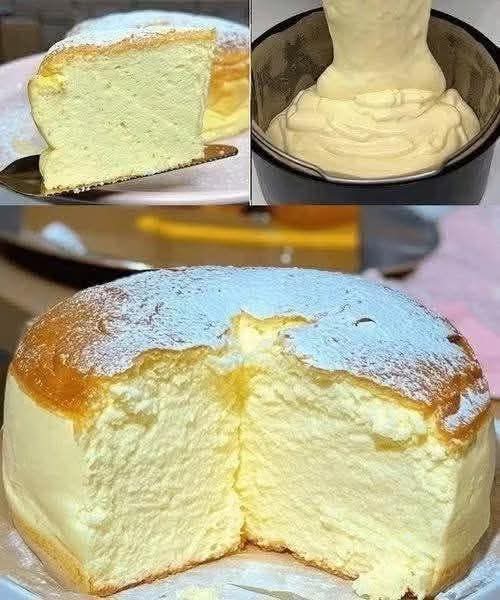
The secret behind the legendary texture shown in 1000006046.jpg lies in the careful balance of a rich custard base and a perfectly whipped meringue. Many home bakers struggle with deflation, dense layers at the bottom, or unsightly surface cracks. This recipe addresses those common pain points by optimizing the moisture levels and controlling the baking temperature through a strict water bath method. By slowly baking the batter at lower temperatures, we allow the delicate egg whites to expand evenly without snapping under sudden, intense heat. Furthermore, the ratio of cream cheese to flour is meticulously calculated to provide enough structural integrity to hold the cake’s impressive height while maintaining that signature cloud-like tenderness.
Essential Ingredients for the Perfect Cotton Cheesecake
To create a masterpiece that matches the breathtaking slice featured in 1000006046.jpg, you must start with high-quality, precise ingredients. Baking is an exact science, and this is especially true for delicate egg-based desserts. Make sure all your cold dairy ingredients are brought to room temperature before you begin, as this ensures a smooth, lump-free batter.
- Cream Cheese: Use full-fat, brick-style cream cheese for the best flavor and structural stability. Avoid spreadable cream cheese tubs or low-fat varieties, as they contain higher water content and stabilizers that will ruin the texture.
- Unsalted Butter: Adds a rich, velvety mouthfeel to the custard base.
- Whole Milk: Thins out the cream cheese paste to the perfect consistency for incorporating the flour.
- Egg Yolks and Egg Whites: Carefully separated while cold. Eggs are easier to separate when straight from the fridge, but the whites must be whipped closer to room temperature for optimal volume.
- Cake Flour: Low-protein cake flour is absolutely essential. It provides just enough structure without developing excess gluten, keeping the crumb incredibly soft and tender.
- Cornstarch: Works in tandem with the cake flour to stabilize the delicate crumb structure and retain essential moisture.
- Granulated Sugar: Sweetens the cake and stabilizes the meringue structure during the whipping process.
- Lemon Juice and Cream of Tartar: The mild acid helps strengthen the egg white proteins, creating a highly stable meringue that resists collapsing.
- Vanilla Extract: Enhances the overall flavor profile, cutting through the richness of the dairy.
Comprehensive Step-by-Step Instructions
Creating the perfect batter requires a gentle hand and precise sequencing. Follow these structured steps carefully to ensure your cake turns out light, airy, and beautifully uniform.
Preparing the Cream Cheese Custard Base
Start by setting up a double boiler system to melt your dairy smoothly. Place your full-fat cream cheese, unsalted butter, and whole milk into a large, heatproof glass or stainless steel bowl. Set the bowl over a saucepan filled with an inch of gently simmering water, ensuring the bottom of the bowl does not touch the hot water. Use a balloon whisk to stir the mixture continuously as it heats. Within a few minutes, the ingredients will melt together into a completely smooth, velvety liquid without any lumps. Remove the bowl from the heat and let it cool down slightly until it is warm to the touch but not scorching hot.
Once the cream cheese mixture has cooled slightly, whisk in the egg yolks one at a time, ensuring each yolk is fully incorporated before adding the next. Stir in the vanilla extract and a splash of fresh lemon juice. Next, sift the cake flour and cornstarch directly over the warm cream cheese mixture. Sifting is non-negotiable here, as it breaks up any compact flour clumps and aerates the dry ingredients. Use your whisk to gently fold and combine the flour into the liquid using a figure-eight motion until you have a smooth, glossy, and thick custard base. Pass this base through a fine-mesh strainer into a clean bowl to catch any microscopic lumps, guaranteeing a flawless texture like the one in 1000006046.jpg.
Mastering the Stable Meringue
The meringue is the engine that drives the rise of your Japanese soufflé cheesecake. Pour your room-temperature egg whites into a meticulously cleaned, grease-free mixing bowl. Add a pinch of cream of tartar or a few drops of lemon juice to the whites. Whip the egg whites on medium-low speed using a hand mixer or stand mixer until they become completely frothy and covered in uniform bubbles.
Once frothy, begin adding the granulated sugar gradually, roughly one tablespoon at a time, while keeping the mixer running on medium speed. Do not rush this step, as adding the sugar slowly allows it to dissolve completely into the egg white proteins, creating a shiny, resilient structure. Continue whipping until the meringue reaches stable soft-to-medium peaks. When you lift the beaters, the meringue should form a gentle hook or a soft peak that holds its shape but curves over slightly at the tip. Avoid whipping to stiff peaks; over-whipped meringue becomes dry and clumpy, making it nearly impossible to fold cleanly into the batter and causing the cake to crack violently in the oven.
Folding and Combining the Textures
Preheat your oven to 320°F (160°C) and prepare your baking pan. Line the bottom and sides of a high-sided, solid 8-inch cake pan with parchment paper. Ensure the parchment paper extends at least two inches above the rim of the pan, as this provides a helpful runway for the cake as it climbs. If you are using a springform pan, wrap the entire exterior securely in three layers of heavy-duty aluminum foil to completely block water from seeping in during the water bath process.
Take approximately one-third of your stable meringue and add it directly to the smooth cream cheese custard base. Use a silicone spatula to gently whisk it in, loosening the thick custard base so it matches the density of the whipped whites. Next, add half of the remaining meringue. Switch to a gentle folding motion, cutting down through the center of the bowl, sweeping around the bottom, and folding the batter over itself while rotating the bowl. Once mostly incorporated, transfer this mixture back into the bowl containing the final third of the meringue. Fold with extreme care until the color is entirely uniform and no white streaks remain. As shown in the top-right quadrant of 1000006046.jpg, the final batter should look thick, voluminous, glossy, and pour like thick ribbons. Tap the bowl firmly against your counter once or twice to burst any oversized air bubbles trapped within the batter.
The Art of Baking in a Water Bath
Pour the velvety batter slowly into your prepared, parchment-lined baking pan from a height of about six inches to help pop large air pockets naturally. Use your spatula to smooth out the top surface gently. Place the cake pan inside a larger, deep baking dish or roasting pan. Carefully slide the assembly onto the middle rack of your preheated oven. Pour hot water (around 140°F / 60°C) into the outer roasting pan until it reaches halfway up the sides of the cake pan. This water bath, known as a bain-marie, creates a humid environment inside the oven and insulates the delicate eggs from harsh direct heat, ensuring the cake bakes uniformly from the edges to the absolute center.
Bake the cheesecake at 320°F (160°C) for approximately 20 to 25 minutes until it expands beautifully and starts to develop a pale golden top. Then, lower the oven temperature down to 285°F (140°C) and continue baking for another 45 to 50 minutes until the top turns a gorgeous, uniform golden brown and the center feels set yet slightly springy to a gentle touch.
Once the baking time is complete, turn off your oven entirely. Do not open the oven door immediately, as a sudden drop in temperature will shock the delicate air cells and cause the cake to deflate instantly. Crack the oven door open slightly, about an inch, and prop it open with a wooden spoon. Let the cake cool down slowly inside the warm oven for 15 to 20 minutes. This controlled cooling phase allows the internal steam to dissipate gently, maintaining the stunning height and structure illustrated in 1000006046.jpg.
Cooling, Depanning, and Serving Suggestions
Remove the pan from the water bath and peel away the aluminum foil. Let the pan sit on a wire cooling rack at room temperature for another 15 minutes. As it cools, you will notice the sides of the cake gently pulling away from the parchment paper. Carefully lift the cake out of the pan using the extended parchment paper flaps, or gently invert it onto your hand covered with a clean kitchen towel, then flip it right-side up onto a serving plate. Peel away the parchment paper from the sides with patience to reveal a flawless, smooth exterior.
While you can absolutely enjoy this soufflé cheesecake while it is still warm, jiggly, and intensely fragrant, its flavors and structural texture mature beautifully after chilling. For the ultimate tasting experience, place the cake inside an airtight container and refrigerate it for at least 3 to 4 hours, or ideally overnight. Chilling transforms the cake into a rich, dense yet miraculously airy mousse-like delicacy. Just before slicing, dust the golden top surface generously with a fine layer of powdered confectioners’ sugar to mimic the beautiful presentation seen in 1000006046.jpg. To achieve perfectly clean, professional slices, dip a sharp knife into hot water, wipe it completely dry with a clean towel, and slice through the cake smoothly, cleaning and reheating the blade between every single cut.
Troubleshooting Common Souffle Cheesecake Issues
Even experienced bakers occasionally face minor setbacks when dealing with delicate egg-foam cakes. Understanding the underlying science behind these issues makes it simple to adjust your technique for future baking sessions.
Why Did My Cheesecake Crack on Top?
Surface cracking is almost always caused by excessive heat or an over-whipped meringue. If your oven runs hotter than its display indicates, the outer layer of the cake cooks and sets before the interior has finished expanding. As the center continues to heat up and rise, it bursts through the rigid top crust, causing deep fissures. To fix this, consider using an independent oven thermometer to verify your actual baking temperatures. Additionally, ensure you only whip your egg whites to soft or medium peaks. Stiff, dry peaks trap massive pockets of air that expand too violently under heat, tearing the delicate surface apart.
Why Did the Cake Deflate and Collapse?
A minor amount of shrinkage is completely normal as the cake cools and steam escapes, but drastic deflation indicates a structural issue. This usually happens if the cake is removed from the hot oven too quickly, causing the sudden drop in ambient temperature to shrink the internal air bubbles before the surrounding egg proteins have fully set. Always utilize the slow-cooling method by cracking the oven door open with a wooden spoon. Alternatively, if the meringue was under-whipped or if you deflated the air while folding the batter, the cake won’t have enough internal support to maintain its structure, leading to a dense, collapsed center.
Why Is There a Dense Layer at the Bottom?
If your finished cake features a beautiful, fluffy top layer but a heavy, rubbery, or custard-like bottom layer, your batter separated before or during baking. This separation happens when the meringue is not fully blended into the dense cream cheese paste, leaving a heavy layer of dairy to sink to the bottom of the pan. Ensure your folding technique is thorough, sweeping all the way to the bottom of the mixing bowl until the batter is perfectly homogeneous. Additionally, starting your baking process with a water bath that is too cold can delay the cooking of the bottom layer, allowing the ingredients time to settle and separate before they heat up enough to solidify.
Frequently Asked Questions
Can I use a springform pan for this recipe?
Yes, you can use a standard springform pan, but you must take absolute care to waterproof it completely. Because springform pans are designed with a removable bottom, water from the bain-marie can easily seep into the base and soak your cake crust. To prevent this, wrap the bottom and outer sides of the pan securely in multiple layers of heavy-duty aluminum foil. If you want to eliminate this risk entirely, a solid, fixed-bottom anodized aluminum cake pan with high sides is highly recommended.
How should I store leftover Japanese cheesecake?
Because of its high dairy and egg content, any leftover Japanese soufflé cheesecake must be stored in the refrigerator. Place the remaining slices inside an airtight container or cover the serving plate tightly with plastic wrap to prevent the cake from absorbing any unwanted refrigerator odors. It will stay fresh, moist, and delicious for up to 3 to 4 days. Freezing is not recommended, as the delicate structural emulsion breaks down upon thawing, causing the cake to lose its signature airy texture and become unpleasantly watery.