Ultimate No Bake Blueberry Cheesecake in a Jar Recipe
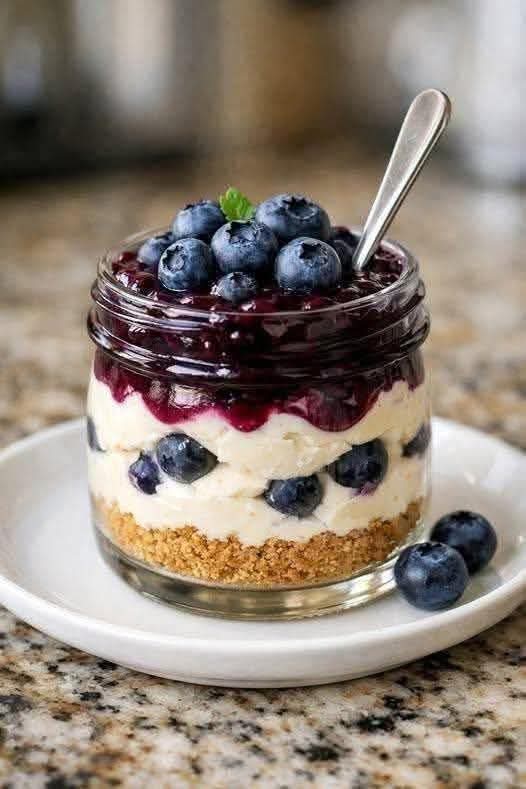
There is something undeniably magical about a dessert that looks like an artisanal bakery creation but requires absolutely zero oven time. When warm weather arrives or when your dinner party schedule leaves little room for complex baking, elegant individual desserts become the ultimate culinary lifesaver. This no-bake blueberry cheesecake in a jar is a spectacular showcase of contrasting textures and vibrant layers. As beautifully demonstrated in 1000006432.jpg and 1000006436.jpg, layering silky cream cheese filling, a buttery graham cracker crust, and a glossy, fruit-forward blueberry compote inside glass jars creates an instant visual triumph. It delivers all the rich, velvety satisfaction of a traditional baked cheesecake with a fraction of the effort and a presentation that is built for easy entertaining or precise meal prep.
By bypassing the finicky nature of springform pans, water baths, and cracked surfaces, this recipe streamlines the dessert-making process into an enjoyable, foolproof assembly line. The individual portioning not only adds a charming, rustic touch to your dessert table but also ensures a perfect crust-to-filling ratio in every single bite. In this comprehensive guide, we will explore the essential components that make a no-bake filling set up beautifully, break down the process of crafting a rich, glossy berry topping from scratch, provide a step-by-step assembly guide, and share expert tips to customize and store these delightful jars for your next gathering.
The Anatomy of a Perfect No-Bake Cheesecake Filling
Achieving the ideal texture in a traditional baked cheesecake relies on eggs and precise oven heat to coagulate the proteins and set the structure. In a no-bake version, we achieve that same dense, velvety mouthfeel through a combination of physical aeration and high-fat structural stability. The base relies heavily on premium full-fat cream cheese, which provides the characteristic tangy flavor and solid framework when chilled. To introduce lightness and prevent the filling from feeling like a heavy block of cream cheese, we fold in whipped heavy cream. The trapped air bubbles within the whipped cream create a mousse-like fluffiness that melts on the tongue, giving you a luxurious dessert experience that feels light yet remarkably indulgent.
The secret to ensuring your filling sets up firmly enough to hold layers of fresh fruit, as seen in 1000006436.jpg, lies in the temperature of your ingredients during preparation. While the cream cheese must be thoroughly softened to room temperature to prevent unsightly lumps, the heavy cream must be ice-cold to achieve maximum volume and stiff peaks when whipped. When these two components are gently folded together with powdered sugar and a touch of fresh lemon juice, they form a stable emulsion that firms up beautifully in the refrigerator without requiring gelatin or stabilizers. This natural setting process preserves a clean, pure dairy flavor that highlights the brightness of your fruit toppings.
Crafting the Ultimate Graham Cracker Crust Base
A great cheesecake is defined as much by its crust as it is by its filling. Because this is a no-bake recipe, the crust needs to be structured well enough to provide a distinct, sandy crunch that contrasts against the silky cream layers. The foundation consists of finely ground graham cracker crumbs, granulated sugar for a hint of sweetness, and melted unsalted butter. The melted butter acts as the primary binding agent; as it cools in the refrigerator, it solidifies, locking the golden crumbs together into a firm, cohesive layer at the bottom of the jar.
To elevate the flavor profile of your base, consider adding a pinch of ground cinnamon or a handful of finely crushed toasted pecans or almonds to the cracker mixture. This introduces an earthy depth that complements the sweetness of the upcoming blueberry layers. When building the jars, pressing the crust mixture firmly and evenly into the bottom using the back of a small spoon or a clean cocktail muddler is essential. A tightly packed base ensures that when you plunge your spoon down into the jar, you get a clean, intact portion of crust rather than loose, floating crumbs.
The Essential Ingredient Checklist
To recreate the stunning dessert layered in 1000006436.jpg, gather these simple, high-quality ingredients. For the golden crust, you will need one and a half cups of finely ground graham cracker crumbs, three tablespoons of granulated sugar, and five tablespoons of melted unsalted butter. For the velvety cheesecake layer, bring two 8-ounce blocks of full-fat brick cream cheese to room temperature, and prepare one cup of sifted powdered sugar, one cup of cold heavy whipping cream, one teaspoon of pure vanilla extract, and one tablespoon of fresh lemon juice. For the vibrant blueberry compote, you will need two and a half cups of fresh or frozen blueberries, one-third cup of granulated sugar, one tablespoon of lemon juice, and one teaspoon of cornstarch dissolved in a tablespoon of cold water to thicken the glossy sauce.
Gathering Your Kitchen Tools
Having your equipment organized ensures a seamless, clean assembly process. Prepare six to eight small 4-ounce or 6-ounce wide-mouth glass mason jars, which provide the ideal window to showcase your beautiful culinary work. You will need a stand mixer or a handheld electric mixer equipped with a whisk attachment to whip the heavy cream and beat the cream cheese efficiently. Gather a couple of medium-sized mixing bowls, a small saucepan for simmering the fresh berry compote, and a silicone spatula for gentle folding. For a tidy assembly without smudging the inside of the glass jars, a large pastry piping bag or a sturdy zip-top bag with the corner snipped off is highly recommended for portioning the cream filling cleanly.
Step-by-Step Assembly and Layering Guide
Step 1: Preparing the Crust and Berry Compote
Begin by combining your graham cracker crumbs, sugar, and melted butter in a medium bowl, tossing with a fork until the mixture resembles wet sand. Divide the mixture evenly among your glass jars, pressing down firmly to establish a solid base, then place the jars in the refrigerator to chill. Next, make your homemade compote by combining the blueberries, sugar, and lemon juice in a small saucepan over medium heat. As the mixture heats up, the berries will naturally burst, releasing their deep purple juices. Once simmering, stir in your cornstarch slurry and let the mixture bubble gently for two minutes until it thickens into a glossy, rich sauce. Remove the pan from the heat and allow the compote to cool completely to room temperature before attempting to layer it, as warm fruit will melt your delicate cream filling.
Step 2: Whipping the Velvety Cream Filling
In a clean, chilled bowl, whip your cold heavy cream on high speed until it forms stiff, stable peaks, then set it aside. In a separate large bowl, beat the room-temperature cream cheese and powdered sugar together for three to four minutes until the mixture is completely smooth, creamy, and free of any lumps. Add the vanilla extract and fresh lemon juice, beating for another minute to incorporate. Using a rubber spatula, add one-third of your whipped cream to the cream cheese mixture, folding it gently to loosen the texture. Slowly fold in the remaining whipped cream in two additions, turning the bowl as you go, until the filling is perfectly uniform, light, and airy. Transfer this filling into a large pastry piping bag to prepare for clean layering.
Step 3: Layering with Precision
Carefully retrieve your chilled jars from the refrigerator. Pipe an even layer of the creamy cheesecake filling directly over the set graham cracker crust, filling each jar about one-third of the way up. To replicate the beautiful presentation in 1000006436.jpg, you can place a few whole, fresh blueberries along the glass edge during this stage, pressing them gently into the cream filling. Pipe another modest layer of cream cheese over the whole berries to secure them. Finally, spoon a generous layer of your completely cooled blueberry compote over the top cream layer, allowing it to pool beautifully from edge to edge. Wipe any stray drips from the rims of the jars with a damp paper towel, cover them securely, and refrigerate for at least three to four hours—or ideally overnight—to allow the cheesecake layer to firm up completely.
Creative Flavor Variations and Substitutions
While the blueberry version highlighted in 1000006436.jpg is an absolute classic, this no-bake framework acts as a versatile canvas for countless flavor adaptations throughout the seasons. If you want to lean into a warmer, autumnal profile, you can easily substitute the blueberry compote with a spiced apple cinnamon reduction or a swirl of pumpkin purée mixed with traditional pumpkin pie spice. For an ultra-indulgent twist, replace the fruit entirely with a rich layer of homemade salted caramel sauce, a drizzle of dark chocolate ganache, and a sprinkling of crushed chocolate sandwich cookies in place of the standard graham cracker crust.
You can also adapt the crust layer to match whatever ingredients you have available in your pantry. Using crushed ginger snap cookies creates a wonderful, spicy contrast that pairs beautifully with lemon or blueberry fillings, while shortbread cookie crumbs offer a rich, buttery elegance. For individuals looking for a lighter option, swapping out a portion of the heavy cream for thick, strained whole-milk Greek yogurt adds a pleasant, probiotic-rich tanginess to the filling while maintaining a wonderfully stable, sliceable texture that holds up beautifully over several days of refrigeration.
Best Practices for Elegant Presentation and Serving
When it comes to serving these individual treasures, presentation is everything. Right before your guests arrive, remove the jars from the refrigerator and add the final touches that transform a simple dessert into a gourmet experience. Top the glossy purple compote layer with a small mound of fresh, plump whole blueberries, a tiny sprig of vibrant green mint for color contrast, and perhaps a delicate dusting of powdered sugar or lemon zest to hint at the bright flavors hidden within.
Serving these desserts in clear glass jars, as illustrated in 1000006436.jpg, not only looks beautiful but also adds a practical element to your hosting duties. You can set them out on a large wooden serving platter or a tiered cake stand alongside small dessert spoons, allowing guests to grab their own individual portions easily. The lack of slicing and plating makes for a stress-free dessert course, leaving you more time to enjoy the company of your family and friends.
| Presentation Element | Visual Benefit | Pro Tip |
|---|---|---|
| Clear Glass Jars | Showcases distinct, colorful layers | Use wide-mouth jars for easier filling and eating |
| Fresh Mint Sprig | Adds a vibrant pop of contrasting green | Slap the mint gently between your hands to release aromas |
| Whole Fresh Berries | Introduces raw textural contrast | Select uniform, matte-blue berries for the top decoration |
| Piping the Filling | Ensures clean, professional borders | Keep the piping tip centered to avoid smudging the glass |
Comprehensive Storage and Make-Ahead Instructions
One of the greatest advantages of no-bake jar desserts is their exceptional lifespan in the refrigerator, making them a perfect candidate for advanced meal prep or busy holiday scheduling. Once assembled, these jars can be covered tightly with their lids or a layer of plastic wrap and stored in the refrigerator for up to four to five days. In fact, they often taste better on day two or three, as the graham cracker crust softens slightly from the moisture of the cream, creating a cohesive, melt-in-your-mouth texture that mimics a traditionally baked dessert perfectly.
If you are planning a large event and want to prepare these far in advance, you can freeze the crust and cream cheese layers together inside the jars for up to two months. Simply wrap the filled jars tightly in plastic wrap and heavy foil before freezing. When you are ready to serve, thaw the jars in the refrigerator overnight, and add the fresh blueberry compote and whole berry garnishes just a few hours before your guests arrive. This keeps the fruit layer looking incredibly shiny, fresh, and vibrant, ensuring a flawless presentation every single time.
Conclusion
Creating a sophisticated, crowd-pleasing dessert does not require hours of meticulous oven monitoring or complex baking techniques. This no-bake blueberry cheesecake in a jar relies on simple culinary mechanics—like balancing temperatures and layering textures—to achieve a professional-grade result with minimal stress. The brilliant interplay of crunchy crackers, tangy cream, and sweet, glossy berries captures the essence of classic comfort food refreshed for modern, easy entertaining.
The beautiful, clear definition of layers shown in 1000006436.jpg is fully achievable in your own kitchen using this straightforward, step-by-step approach. Whether you are treating your family to a special weeknight surprise, preparing individual rewards for a busy week, or setting up a stunning dessert bar for a summer gathering, these individual cheesecakes offer a reliable path to sweet success. Gather your jars, select the freshest berries, and enjoy the effortless elegance of this classic no-bake creation.