The Ultimate 10-Minute Skillet Apple Cake No Oven Required
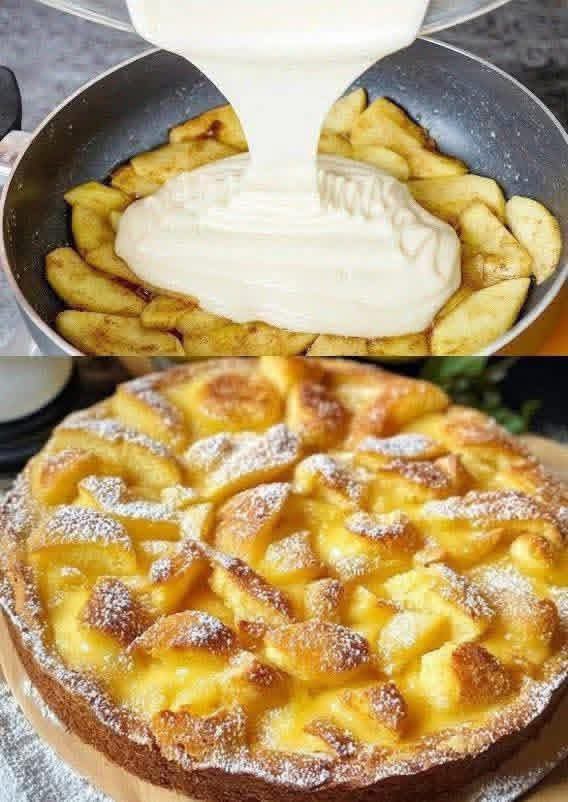
The comforting aroma of spiced apples simmering in butter is one of the most universally beloved culinary scents, instantly evoking a sense of cozy warmth. For generations, traditional baking has associated a great fruit cake with hours of labor, multiple mixing bowls, and a preheated oven. However, modern kitchen innovation has delivered a clever shortcut that achieves bakery-quality results right on your stovetop. Enter the ultimate 10-minute skillet apple cake—a rustic, upside-down dessert that transforms fresh orchard fruit and a simple batter into a tender, golden masterpiece entirely inside a single frying pan. As beautifully demonstrated in the multi-panel image 1000006373.jpg, pouring a smooth, velvety batter directly over seasoned, caramelized apple wedges creates a seamless dessert with a beautifully patterned, custard-like top. Whether you are short on time, looking to skip heating up the entire house with an oven, or looking for an elegant dessert for unexpected guests, mastering this skillet method will completely transform your approach to home baking.
The Historic Legacy of Stovetop and Skillet Desserts
To fully appreciate the convenience of cooking a cake on a stovetop, it helps to explore the historical traditions of pan-baked goods. Long before residential kitchens were outfitted with reliable, temperature-controlled electric ovens, home cooks relied exclusively on open hearths, cast-iron skillets, and wood-burning stoves to prepare sweet treats.
From Hearthside Spider Skillets to Modern Countertops
In early American folklore and European countryside traditions, the “spider skillet”—a cast-iron pan with long legs designed to sit directly over glowing embers—was the primary tool for baking rustic fruit tarts and upside-down cakes. Apples, pears, and berries were tossed into the hot pan with wild honey or crude maple sugar, then topped with a basic biscuit or pancake-style batter. The heavy lid was covered with hot coals to bake the mixture evenly from both sides. This method prioritized efficiency, allowing cooks to create comforting desserts using whatever seasonal orchard fruits were dropping from the trees. The streamlined technique showcased in 1000006373.jpg directly honors this historic legacy, updating the classic hearthside approach for a standard non-stick skillet on a modern stovetop.
Deconstructing the Essential Layers for Textural Perfection
Executing a flawless skillet cake requires an understanding of how fruit sugars and liquid batters interact under direct bottom heat. Because the heat source comes entirely from beneath the pan rather than circulating ambient air, each component must be prepared to prevent burning while ensuring a thorough bake.
Selecting the Best Apples for Roasting
The foundation of your cake rests entirely on your fruit selection, as shown in the top panel of 1000006373.jpg. Avoid soft, starchy varieties like Red Delicious, which break down into a mushy applesauce texture when exposed to direct skillet heat. Instead, look for firm, tart-sweet baking varieties like Granny Smith, Honeycrisp, Braeburn, or Jonagold. These options feature a dense cellular structure that retains its structural integrity, allowing the sliced wedges to develop a beautiful golden caramelization while remaining delightfully tender to the bite.
The Role of Butter and Caramelization
Before any batter enters the pan, the sliced apples must undergo a brief sautéing process. Melting unsalted butter with a spoonful of sugar and a pinch of ground cinnamon creates a rich, bubbling caramel glaze that coats the bottom of the skillet. This glaze prevents the fruit from sticking to the pan while infusing the apple wedges with a deep, buttery sweetness. As the cake cooks, this caramelized base infuses upward into the batter, naturally sweetening the crumb.
Crafting a Smooth, Pourable Batter
The ideal batter for a stovetop cake must strike a precise balance between viscosity and lightness. It should be thick enough to hold its shape around the fruit, yet fluid enough to cascade smoothly over the arranged slices, filling every open crevice without requiring heavy smoothing. The top panel of 1000006373.jpg captures this perfect ribbon-like consistency as the batter is poured. Utilizing a touch of baking powder ensures the cake rises beautifully despite the lack of surrounding oven heat, resulting in a soft, sponge-like matrix that beautifully contrasts with the dense, caramelized fruit toppings featured in the bottom portion of 1000006373.jpg.
Step-by-Step Guide to Making a Flawless Skillet Apple Cake
Ingredients List
- 2 large firm apples (such as Honeycrisp or Granny Smith), peeled, cored, and sliced into 1/2-inch wedges
- 2 tablespoons unsalted butter
- 2 tablespoons brown sugar or granulated sugar (for the pan base)
- 1/2 teaspoon ground cinnamon
- 1 large egg
- 1/3 cup granulated sugar (for the batter)
- 1 teaspoon pure vanilla extract
- 1/4 cup vegetable oil or melted butter
- 1/2 cup whole milk
- 1 cup all-purpose flour
- 1 teaspoon baking powder
- A pinch of salt
- Powdered sugar for final dusting
Step 1: Caramelize the Apple Base
Place a 9-inch or 10-inch non-stick skillet over medium-low heat. Add the 2 tablespoons of unsalted butter, letting it melt completely and coat the bottom of the pan. Sprinkle the brown sugar and ground cinnamon evenly across the melted butter. Arrange your sliced apple wedges in a neat, concentric circle, filling the bottom of the skillet completely, as illustrated in the top panel of 1000006373.jpg. Let the apples cook undisturbed for 4 to 5 minutes until they begin to soften slightly and the butter-sugar mixture is bubbling and fragrant.
Step 2: Whisk the Liquid Batter
While the apples are caramelizing, prepare the quick cake batter in a medium bowl. Whisk together the egg, 1/3 cup of granulated sugar, and vanilla extract until the mixture is pale and slightly frothy. Pour in the vegetable oil and whole milk, whisking continuously until the liquids are fully integrated and smooth.
Step 3: Fold in the Dry Ingredients
Sift the all-purpose flour, baking powder, and a pinch of salt directly into the bowl with your wet ingredients. Using a silicone spatula or a hand whisk, gently fold the mixture together just until the flour disappears and a smooth, lump-free batter forms. Avoid overmixing, which can develop the gluten and result in a dense, rubbery cake texture rather than a light, airy crumb.
Step 4: Enrobe the Fruit and Cover
Reduce the stovetop heat to its lowest possible setting. As shown in the top panel of 1000006373.jpg, slowly pour the smooth batter directly over the hot, caramelized apples, starting from the center and moving outward. Use your spatula to gently guide the batter to the outer edges of the pan so that all the fruit is completely covered. Place a tight-fitting lid over the skillet immediately. The lid is absolutely vital, as it traps the steam generated by the cooking apples, effectively baking the top of the cake while the bottom caramelizes against the pan.
Step 5: The Cook and the Flip
Let the covered cake cook on low heat for 10 to 12 minutes. You will know it is ready to flip when you see tiny bubbles forming on the surface, the edges look dry, and the top feels set to a gentle touch. To flip the cake cleanly without breaking it, slide it onto a large, flat dinner plate. Place the empty skillet upside down directly over the plate, and quickly invert the plate and pan together, dropping the cake back into the skillet with the golden-brown apple side facing upward. Cook uncovered for an additional 2 to 3 minutes to lightly brown the bottom cake layer.
Step 6: Garnish and Serve Hot
Carefully slide the finished cake out of the skillet onto a serving board or plate. Allow it to cool for 5 minutes. To achieve the beautiful, professional presentation shown in the lower panel of 1000006373.jpg, place a small amount of powdered sugar into a fine-mesh sieve and dust it generously across the caramelized apple top. Slice into wedges and serve immediately.
Professional Secrets for Stovetop Baking Success
Controlling the Flame and Avoiding Burns
The single most common mistake when making a skillet cake is using too high a heat source. Because the cake cooks directly on the stovetop burner, a medium or high flame will burn the sugar-butter base long before the thick center of the batter has a chance to bake through. Always use a low, controlled flame, and ensure your pan is centered perfectly over the burner to distribute the heat evenly. If you are using a thin-bottomed pan that develops hot spots, consider using a heat diffuser plate beneath the skillet to soften the direct thermal contact.
Achieving a Clean, Flawless Inversion
Flipping an upside-down fruit cake can feel intimidating, but a few simple precautions ensure a clean release every time. Always use a high-quality, completely scratch-free non-stick skillet. If you are worried about sticking, you can cut a round piece of parchment paper to line the bottom of the pan before adding the butter and apples, ensuring the fruit lifts away cleanly from the metal surface upon inversion.
Creative Flavor Variations to Try at Home
While the classic cinnamon-apple combination is an undisputed favorite, this stovetop baking technique serves as an excellent foundation for experimenting with diverse flavor profiles and seasonal orchard fruits.
The Caramel Pear and Cardamom Twist
For an elegant, sophisticated variation that mimics a classic European tart, replace the apples entirely with firm, thinly sliced Bosc or Anjou pears. Substitute the ground cinnamon with a blend of ground cardamom and a grating of fresh nutmeg. The floral, citrusy notes of the cardamom pair spectacularly with the delicate sweetness of the caramelized pears, delivering a refined dessert that pairs beautifully with Earl Grey tea.
The Spiced Ginger and Pineapple Skillet Cake
Introduce a vibrant, tropical flare by layering thin rings of fresh pineapple across the bottom of your buttered skillet instead of apples. Toss a tablespoon of finely minced candied ginger into the batter along with a teaspoon of ground ginger. As the pineapple rings cook against the bottom of the pan, their natural sugars caramelize intensely, creating a sweet, zesty, and warming flavor profile that is deeply satisfying.
The Berry and Lemon Zest Sponge
During the peak of summer fruit season, transform this recipe into a light berry sponge cake. Scatter a cup of fresh blackberries or blueberries over your melted butter and sugar base, and fold a tablespoon of fresh lemon zest directly into the cake batter. The berries burst during the steaming process, bleeding their rich juices into the light, citrus-scented crumb to form a vibrant, ruby-red topping when inverted onto a plate.
Serving Suggestions to Elevate Your Stovetop Masterpiece
While this skillet apple cake is absolute perfection served plain with a simple dusting of powdered sugar as seen in 1000006373.jpg, you can easily elevate it into a decadent restaurant-worthy dessert with a few classic accompaniments.
The Classic Mode: Vanilla Bean Ice Cream
Placing a large scoop of high-quality vanilla bean ice cream directly onto a warm wedge of the cake creates an irresistible contrast of temperatures. As the cold cream melts into the warm, caramelized crevices of the apples, it forms a rich, velvety sauce that amplifies the buttery notes of the dessert.
Warm Toffee or Crème Anglaise Drizzle
For a luxurious, layered finish, prepare a quick homemade toffee sauce or warm vanilla crème anglaise. Drizzle the silky sauce generously over the top of the powdered sugar layer just before slicing. The extra moisture sinks into the sponge layer of the cake, creating a melt-in-your-mouth texture that mimics a traditional English steamed pudding.
Thick Whipped Crème Fraîche
If you prefer a dessert that isn’t overly sweet, skip the ice cream and serve each slice alongside a generous dollop of unsweetened whipped crème fraîche or heavy Greek yogurt. The subtle, tangy sourness of the cultured dairy cuts through the rich caramel coating of the apples, balancing the overall flavor profile beautifully.
Conclusion: Reclaiming the Simplicity of Homemade Baking
Mastering the simple art of a stovetop skillet cake dismantles the idea that delicious baking has to be a time-consuming, highly complex process. By utilizing a single non-stick pan, focusing on gentle stovetop heat, and pouring a light, balanced batter directly over caramelized fruit as shown in 1000006373.jpg, you elevate basic pantry staples into a comforting kitchen masterpiece. Keep a few crisp apples stored in your fruit bowl for an effortless, budget-friendly dessert that brings the comforting warmth, sweet aroma, and pure luxury of an old-fashioned bakery straight to your table in minutes.