The Ultimate Guide to Perfect Oven Roasted Beets
When it comes to earthy, vibrant root vegetables, beets are undeniably the crown jewel of the autumn and winter harvest. For a long time, many home cooks shied away from preparing fresh beets due to a common misconception that they are difficult to handle, messy to peel, or overly muddy in flavor. Fortunately, mastering the simple culinary art of oven roasting completely transforms this humble root into an incredibly sweet, tender, and luxurious treat. Subjecting fresh beets to the intense, dry heat of a conventional oven caramelizes their natural sugars, mellowing out their robust earthiness and concentrating their flavors in a way that boiling or steaming simply cannot match. Whether you want to toss them into a crisp garden salad with goat cheese, blend them into a vibrant hummus, or enjoy them as a simple, elegant side dish, roasted beets are an invaluable asset to your culinary repertoire. In this comprehensive guide, we will break down the essential steps to select, prep, and roast beets flawlessly, ensuring perfect texture and maximum flavor profile every single time.
Why Roasting Outperforms All Other Cooking Methods
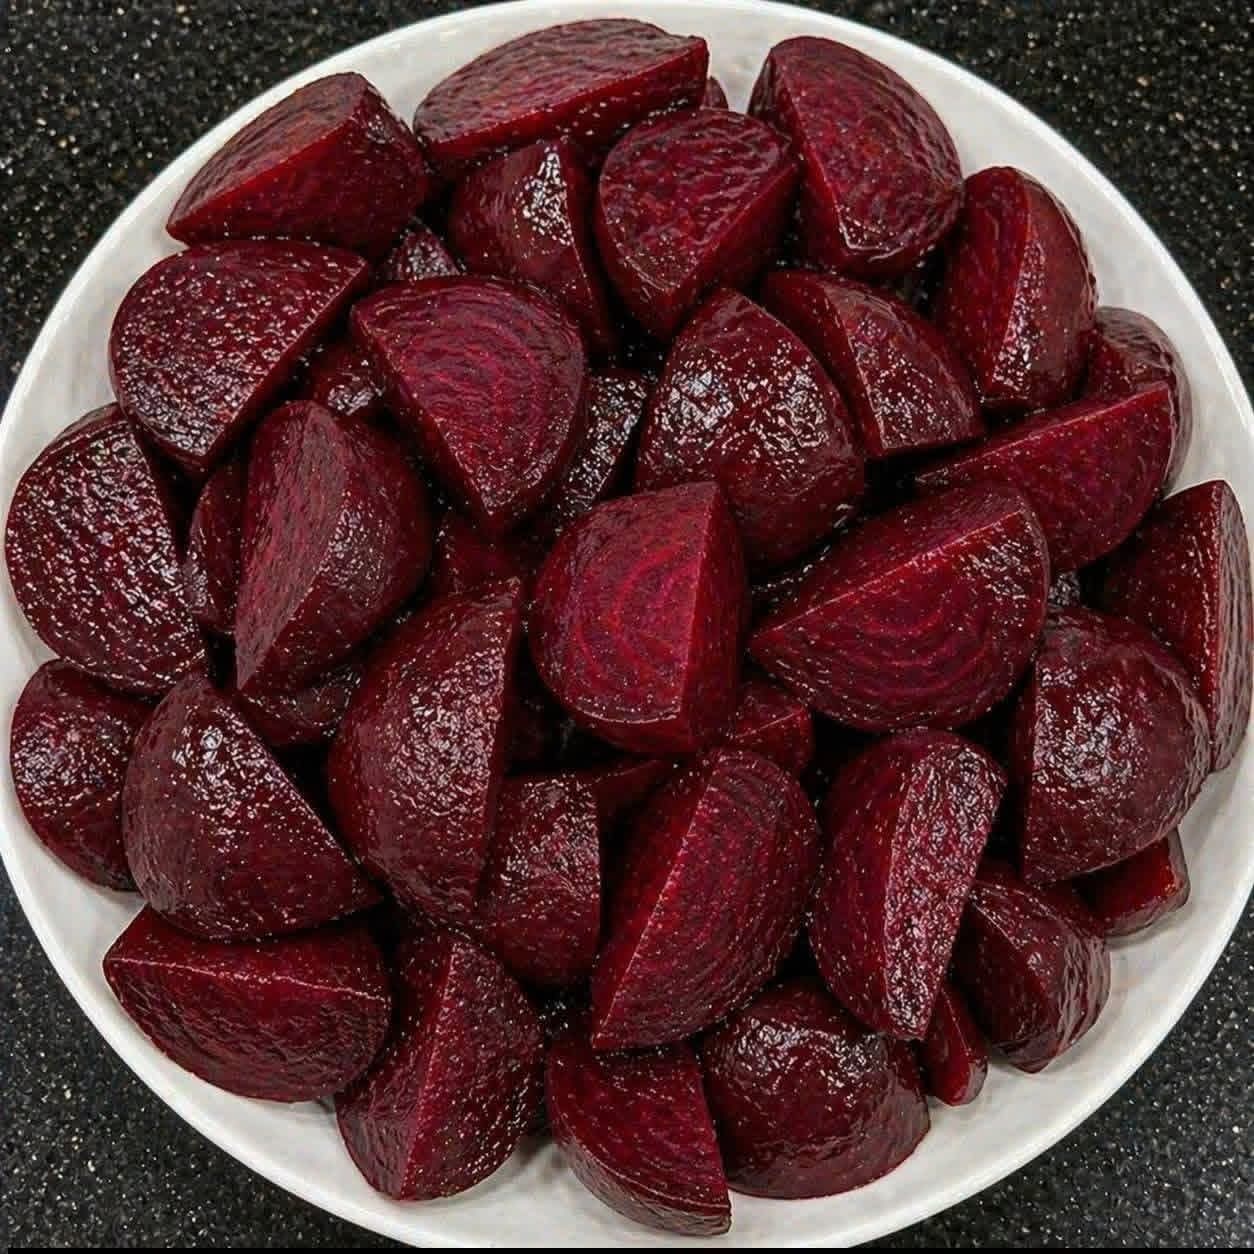
To understand why roasting is the ultimate technique for root vegetables, it helps to examine the physical composition of a beet. Beets contain a high volume of water packed alongside natural sugars and a distinct earthy compound known as geosmin. When beets are boiled in a pot of water, their vibrant water-soluble pigments and natural sugars bleed out into the cooking liquid, leaving behind a diluted, structurally waterlogged vegetable that can taste flat or intensely muddy. Roasting works on an entirely opposite mechanism. The dry heat evaporates the excess internal moisture, drawing the natural sugars outward toward the surface where they undergo beautiful caramelization. This structural change results in a deep, rich sweetness and a tender, buttery mouthfeel that yields smoothly to the fork. As beautifully captured in the vibrant visual from 1000006315.jpg, a properly roasted beet retains its intense, glossy crimson hue and a plump, succulent texture that serves as a stunning centerpiece on any dinner plate.
Selecting and Cleaning Fresh Beets for Peak Quality
Achieving an exceptional roasted side dish begins at the local farmers’ market or grocery store produce aisle, where evaluating the structural integrity of raw beets is paramount.
Choosing the Right Size and Firmness
When browsing for fresh beets, look for specimens that are heavy for their size and completely firm to the touch, with smooth, unwrinkled skins. Avoid beets that feel soft, spongy, or show visible signs of shriveling, as these characteristics indicate that the root has lost its internal moisture and will turn out unpleasantly woody or stringy after cooking. For the most uniform roasting results, aim to select beets that are relatively uniform in size. Mixing massive, baseball-sized beets with tiny golf-ball-sized roots in the same pan will result in an uneven bake, where the smaller pieces burn before the larger cores have a chance to soften. Medium-sized beets are generally the easiest to handle and offer the sweetest, most tender yield.
Managing Greens and Proper Washing Techniques
If you purchase beets with their fresh green tops still attached, cut the stems off as soon as you get home, leaving about an inch of stem intact at the top of the root. Leaving the leafy greens attached during storage will drain moisture directly out of the root, causing the beet to go soft rapidly. Do not throw the greens away, as they are completely edible, highly nutritious, and can be sautéed with garlic and olive oil exactly like fresh spinach. Because beets mature completely underground, their rough skin is naturally covered in fine dirt and peat moss. Wash the roots thoroughly under cold running water, using a firm vegetable brush to scrub away any trapped soil from the crevices and root tails before proceeding to the cooking phase.
Step-by-Step Instructions for Perfect Roasted Beets
Creating this simple, elegant vegetable side dish requires minimal active kitchen prep and very few tools. Following these precise steps ensures a clean, stress-free peeling process and a spectacular, caramelized finish.
Step 1: Wrap and Roast Whole Loaves
Preheat your conventional oven to 400 degrees Fahrenheit. While you can peel and chop raw beets before roasting, roasting them whole in their skins is a professional kitchen secret that simplifies the process immensely. Place your washed, dried whole beets onto a large sheet of heavy-duty aluminum foil. Drizzle the roots lightly with one tablespoon of olive oil and season them with a pinch of coarse sea salt. Wrap the foil tightly around the beets to create a sealed, airtight packet. This packet traps the escaping moisture, allowing the beets to steam gently in their own natural juices while the intense oven heat caramelizes the outer layer. Place the foil packet directly onto a baking sheet and roast for 45 to 60 minutes, depending on the thickness of your beets. The roots are fully cooked when a sharp paring knife slides effortlessly into the very center of the largest beet without resistance.
Step 2: The Clean and Easy Peeling Method
Carefully open the hot foil packet, avoiding the escaping steam, and let the beets rest for 10 minutes until they are cool enough to handle comfortably. Now comes the magical part: because the beets steamed inside the foil, their rough outer skins have completely loosened from the tender flesh beneath. Grab a single paper towel and hold a warm beet in your hand. Using gentle thumb pressure, slide the paper towel across the surface of the root; the skin will glide off effortlessly in large pieces, completely eliminating the need for a traditional vegetable peeler. This method not only saves time but also keeps your hands and cutting boards significantly cleaner, as the paper towel absorbs the excess red juice instantly. Cut away the stem top and the thin root tail with a knife once the skin is fully removed.
Step 3: Chop into Uniform Wedges
Place your beautifully peeled, glowing crimson beets onto a sturdy cutting board. Using a sharp chef’s knife, slice each beet in half vertically, then cut each half into uniform, plump crescent wedges or bite-sized cubes. For a classic, professional presentation that mirrors the gorgeous bowl showcased in 1000006315.jpg, aim for uniform, clean-edged slices that highlight the natural interior rings of the root. Slicing them uniformly ensures a beautiful, satisfying mouthfeel that balances a firm outer structure with a creamy, melt-in-your-mouth interior core.
Step 4: The Final Toss and Seasoning
Transfer your warm, freshly sliced beet wedges into a clean mixing bowl. To elevate their natural sweetness and create a glossy, appetizing sheen, drizzle the warm beets with one to two tablespoons of premium extra virgin olive oil or melted unsalted butter. Toss the wedges gently with a silicone spatula to coat them evenly without breaking the sharp edges of your slices. Sprinkle a final touch of flaky sea salt and a coarse crack of fresh black pepper over the top. As beautifully exhibited in 1000006315.jpg, the result is a clean, stunning bowl of pure vegetable luxury that is ready to be served hot as a comforting side dish or cooled down to build a refreshing salad.
Creative Flavor Pairings and Elegant Serving Ideas
Because roasted beets feature an incredibly balanced sweet and earthy flavor profile, they serve as a spectacular canvas for a wide array of vibrant toppings, acidic dressings, and texturally contrasting elements.
- The Classic Mediterranean Citrus and Herb Toss: Brighten up the deep, robust sugars of the roasted beets by tossing the warm wedges with a tablespoon of fresh orange juice, a splash of red wine vinegar, and a generous handful of finely chopped fresh flat-leaf parsley and mint. The sharp, zesty acidity of the citrus cuts through the rich earthiness beautifully, creating an incredibly refreshing flavor dynamic.
- The Elegant Goat Cheese and Walnut Salad: Arrange a bed of fresh baby arugula or wild spinach on a serving platter. Scatter your cooled roasted beet wedges uniformly over the greens, and top with crumbled, creamy goat cheese or tangy feta. Shower the plate with a handful of toasted, chopped walnuts or candied pecans to introduce a spectacular, buttery crunch that contrasts the velvety texture of the beets.
- The Sweet Balsamic Glaze Reduction: For an intensely rich, dessert-like side dish that pairs phenomenally with roasted pork chops or grilled steak, prepare a simple balsamic reduction. Drizzle a thick, syrupy balsamic glaze generously over the warm, oiled beet slices right before serving, allowing the tangy sweetness of the vinegar to meld with the caramelized outer layer of the roots.
- A Zesty Horseradish Cream Drizzle: If you want to introduce an exciting, sharp contrast to your side dish, whip up a quick cream sauce using sour cream or Greek yogurt blended with a teaspoon of prepared hot horseradish, a squeeze of fresh lemon juice, and chopped fresh chives. Drizzling this cool, pungent white sauce over the hot, sweet crimson beets builds an unforgettable restaurant-quality presentation.
Pro-Tips for Managing Beet Stains and Storage
While the culinary rewards of roasting fresh beets are immense, implementing a few practical household and storage tenets will keep your kitchen pristine and your meal prep incredibly efficient.
Preventing and Removing Crimson Stains
The intense red pigment found in beets, known chemically as betanin, is a powerful natural dye that can easily stain light-colored wooden cutting boards, plastic containers, and skin. To minimize clean-up stress, consider wearing a simple pair of disposable kitchen gloves while peeling and slicing your warm beets. If you prefer to work bare-handed, you can easily remove any temporary red stains from your fingers by rubbing them vigorously with a splash of fresh lemon juice and a pinch of coarse salt before washing with warm soap. Additionally, slicing your beets on a sheet of parchment paper placed over your cutting board or using a dedicated plastic board will protect your beautiful wooden blocks from absorbing the vibrant juices.
Safe Storage and Meal Prepping Strategies
Roasted beets are an absolute dream ingredient for batch cooking and weekly meal prep, as their sturdy structure holds up beautifully to refrigeration without going soft or mushy. Allow your seasoned, roasted wedges to cool completely to room temperature before transferring them into an airtight glass container; glass is highly recommended over plastic, as it will not absorb the red pigment or retain residual aromas. Stored properly in the refrigerator, your roasted beets will remain fresh, flavorful, and ready to use for up to five to six days. When you are ready to enjoy them, you can eat them straight from the fridge as a cold snack, toss them directly into a hot skillet with a touch of butter to reheat them uniformly, or drop them into a morning smoothie for a spectacular boost of color and natural sweetness.
Conclusion: Celebrating the Effortless Luxury of Root Vegetables
Ultimately, mastering the simple art of oven roasting completely redefines our relationship with fresh beets, transforming a humble, soil-grown root into an undisputed star of the dinner table. By rejecting harsh, nutrient-leaching boiling methods and embracing the gentle, flavor-concentrating power of an aluminum foil packet, you unlock an elegant kitchen ritual that rewards you with maximum flavor for minimal physical effort. The incredible balance of deep, caramelized sweetness and velvety texture makes these roots an absolute magnet for creative culinary adaptations, shifting effortlessly from a rustic weeknight side dish to a sophisticated, cheese-studded holiday salad. Gather your fresh ingredients, look to the flawless, glowing inspiration captured in 1000006315.jpg as your visual guide, and enjoy the profound satisfaction of serving a truly spectacular, comforting masterpiece built completely from scratch.