The Ultimate 90 Second Keto Mug Bread Recipe
For anyone embarking on a low-carb, ketogenic lifestyle, the single biggest challenge is almost always missing bread. Whether it is the vehicle for your morning melted butter, the crusty boundary of a lunchtime sandwich, or a simple side to soak up dinner juices, bread plays a foundational role in our daily eating habits. Fortunately, transitioning away from traditional wheat flour does not mean you have to surrender your favorite bakery rituals. Enter the game-changing world of keto mug bread. This revolutionary alternative allows you to whip up a warm, soft, and remarkably convincing loaf of low-carb bread in just 90 seconds using your microwave. By swapping out high-glycemic grains for nutrient-dense almond flour or coconut flour, you can satisfy your deepest carbohydrate cravings instantly without spiking your blood sugar or throwing your body out of ketosis. In this comprehensive guide, we will explore the culinary mechanics of creating the perfect single-serve mug bread, ensuring a light, airy crumb structure that rivals any traditional quick bread.
The Science of Microwave Baking and Why It Works
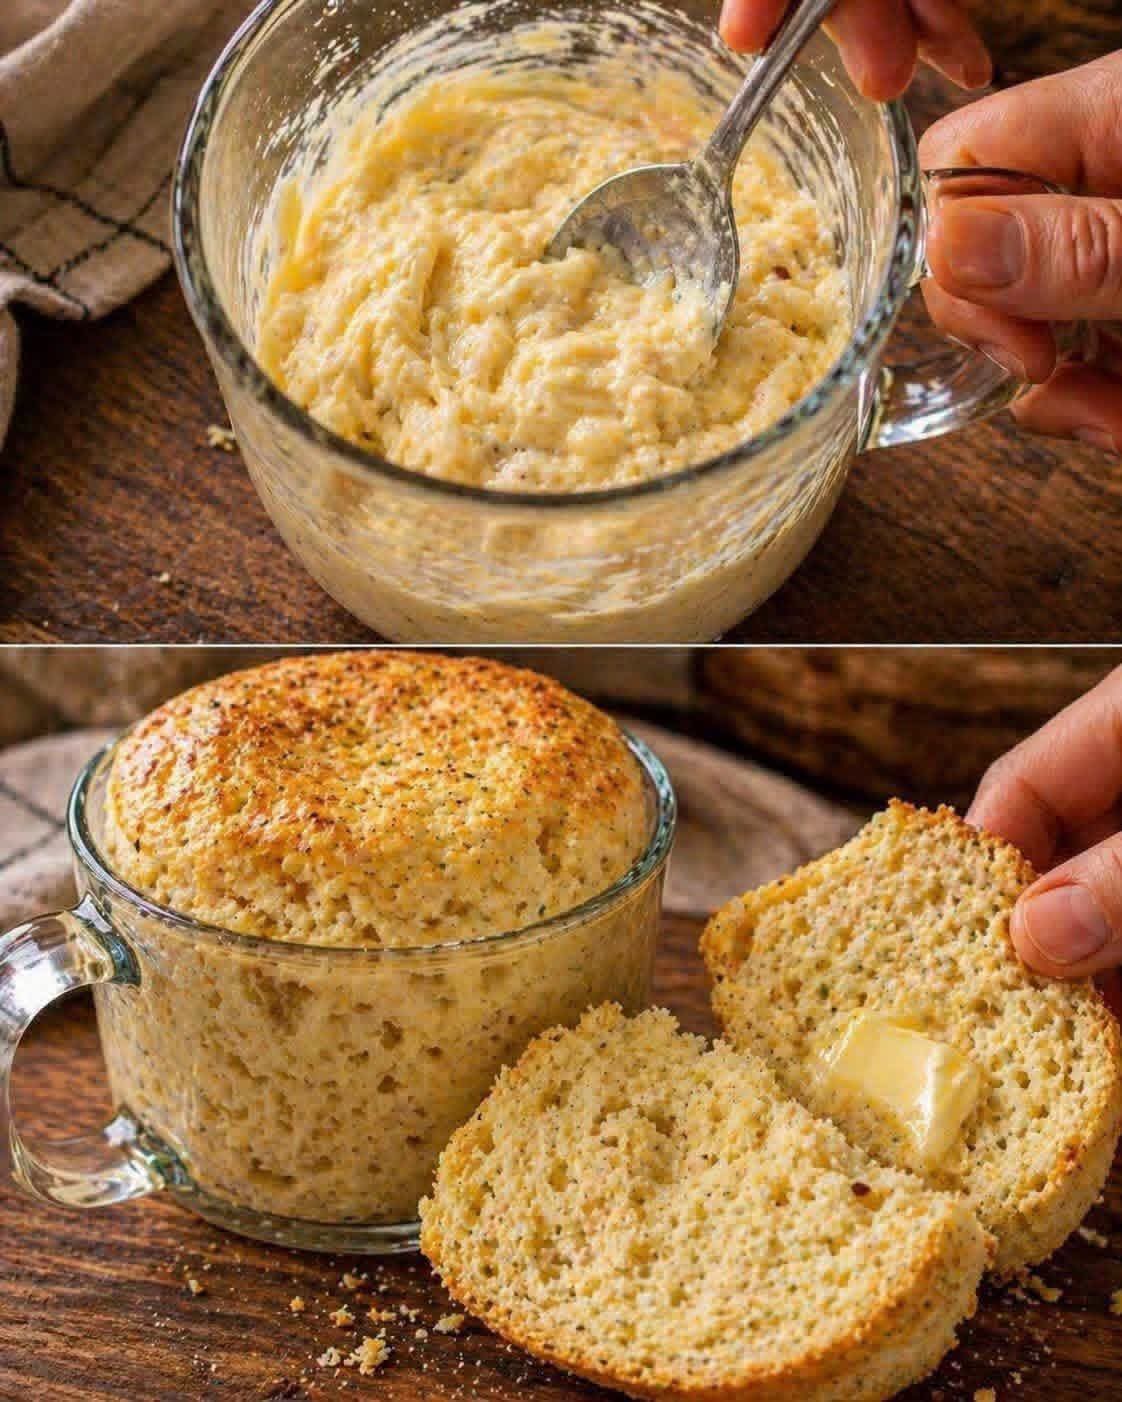
Baking a traditional loaf of bread requires an extended period of time in a conventional oven to allow heat to slowly penetrate the center while building a crust on the exterior. Microwave cooking works on an entirely different physical principle, utilizing radio waves to agitate water molecules inside the food, causing them to vibrate rapidly and generate thermal energy. Because this heat is generated uniformly and instantly throughout the entire batter, a single-serve portion can bake completely in less than two minutes. The fast expansion of air pockets creates an exceptionally light, fluffy internal matrix that mimics the airy texture of classic wheat breads. As demonstrated clearly in the top panel of 1000006294.jpg, the process begins as a simple, thick batter mixed directly inside a glass mug or ramekin. Once subjected to the microwave’s energy, it rises beautifully into a self-contained, golden-domed loaf that can be sliced, toasted, and enjoyed immediately, as captured in the lower panel of the image.
Selecting High-Quality Low-Carb Ingredients
Because a mug bread relies on a very concise list of components, the specific characteristics of each ingredient will heavily dictate the final taste and texture of your loaf. Choosing the correct elements prevents your bread from turning out overly dense, soggy, or excessively eggy.
Almond Flour vs. Coconut Flour
The structural foundation of your keto bread rests entirely on your choice of low-carb flour alternative. Blanched, superfine almond flour is widely considered the gold standard for mug bread due to its mild, neutral flavor and its ability to replicate a traditional whole-wheat crumb structure. It provides healthy fats and a subtle nuttiness that pairs brilliantly with both sweet and savory toppings. Coconut flour is another highly popular option, but it behaves completely differently in recipes. Coconut flour is extraordinarily hygroscopic, meaning it absorbs immense amounts of liquid compared to almond flour. If you choose to substitute almond flour with coconut flour, you generally need to reduce the flour volume to about one-third of the original measurement and increase the liquid content slightly to prevent your bread from turning into a dry, crumbly sponge.
The Critical Role of Fats and Leavening Agents
To ensure your microwave bread stays moist, tender, and pliable, incorporating a healthy source of fat is non-negotiable. Melted unsalted butter, extra virgin olive oil, or unrefined coconut oil all work beautifully to coat the flour particles, preventing them from becoming rubbery during the rapid microwave cooking process. Butter delivers a classic, comforting dairy flavor that makes the bread taste like an authentic bakery roll, while olive oil introduces a delightful Mediterranean savory note. In addition to fat, a reliable leavening agent is required to force the batter to rise inside the mug. A pinch of high-quality baking powder reacts instantly with the heat and moisture, producing tiny carbon dioxide bubbles that lift the heavy nut flour, creating those beautiful, authentic bread pockets visible in the cross-section of 1000006294.jpg.
Balancing the Egg Element
One of the most frequent complaints regarding quick microwave keto breads is that they can sometimes take on an unpleasantly sulfurous or “eggy” texture and aroma. The egg serves as the primary binding agent, replacing the structural network that gluten typically provides in traditional baking. To minimize an overly eggy profile, it is vital to whisk the egg thoroughly with your melted fat before introducing your dry ingredients, ensuring complete emulsification. You can also counteract the egg flavor by adding a tiny pinch of salt, a dash of garlic powder, or a teaspoon of apple cider vinegar, which neutralizes the aroma while helping the baking powder activate for an even loftier rise.
Step-by-Step Instructions for Flawless Mug Bread
Creating this quick loaf is an incredibly straightforward process that takes under five minutes from pantry to plate. Following these precise steps ensures a uniform batter and a perfectly baked result every single time.
Step 1: Prepare the Mug and Emulsify Wet Ingredients
Select a standard-sized ceramic or glass mug with straight sides and a flat bottom, ensuring it has a capacity of at least 8 to 12 ounces to allow ample room for the bread to rise without spilling over the edge. Add one tablespoon of unsalted butter directly to the bottom of the mug and microwave it for 10 to 15 seconds until completely melted. Allow the butter to cool for a moment so it doesn’t accidentally cook the egg on contact. Crack one large, room-temperature egg directly into the melted butter. Using a small fork or mini whisk, beat the mixture vigorously for roughly 30 seconds until the egg and fat are seamlessly combined into a smooth, pale yellow liquid.
Step 2: Incorporate Dry Ingredients and Mix Thoroughly
Measure out three tablespoons of superfine blanched almond flour, half a teaspoon of baking powder, and a generous pinch of fine sea salt. Pour these dry ingredients directly into the wet mixture inside the mug. If you wish to incorporate any additional savory herbs or spices—such as cracked black pepper, onion powder, or dried rosemary—sprinkle them into the vessel now. Using your fork, scrape down the sides of the mug and mix the contents thoroughly. As showcased in the top image of 1000006294.jpg, you want to stir until all dry pockets disappear and you are left with a thick, cohesive, slightly textured batter that holds its shape when stirred.
Step 3: The 90-Second Microwave Bake
Place the mug directly in the center of your microwave turntable. Cook on high power for exactly 90 seconds. Because microwave wattages vary significantly between household models—ranging anywhere from 700 to 1200 watts—your exact cooking time may require slight adjustment. Keep a close eye on the mug through the glass door; you will watch the batter expand rapidly, climbing up toward the rim. At the 90-second mark, the top of the bread should look matte, firm, and springy to the touch. If the center still appears slightly damp or shiny, run the microwave in additional 10-second intervals until fully set.
Step 4: Cool, Slice, and Serve
Carefully remove the hot mug from the microwave using an oven mitt or towel, as the glass will handle a significant amount of heat. Let the bread rest undisturbed inside the mug for one minute; this brief cooling window allows the internal steam to redistribute, setting the crumb structure completely. Take a butter knife and slide it gently around the inner perimeter of the mug to loosen the edges. Invert the mug over a wooden cutting board, and the warm loaf should slide out effortlessly. Using a sharp serrated knife, slice the loaf horizontally into uniform rounds. As beautifully exhibited in the lower portion of 1000006294.jpg, the result is a gorgeously textured, soft bread that is ready to be smeared with a pat of rich salted butter or loaded with your favorite sandwich fillings.
Creative Flavor Variations and Enhancements
Once you have mastered the simple base recipe, you can easily alter the flavor profile of your 90-second bread to accompany specific meals or satisfy unique flavor cravings.
- The Everything Bagel Loaf: After mixing your base batter thoroughly in the mug, stir in one teaspoon of classic everything bagel seasoning blend containing sesame seeds, poppy seeds, dried garlic, dried onion, and flaky salt. Sprinkle an extra pinch of the seasoning directly over the top of the batter just before microwaving to create a crunchy, savory crust on your finished loaf.
- Garlic and Herb Dinner Roll: Transform your mug bread into a gourmet accompaniment for keto-friendly soups and stews. Add a quarter teaspoon of garlic powder, a pinch of dried Italian seasoning, and one tablespoon of finely grated Parmesan cheese into the dry ingredients. This variation fills your kitchen with a heavenly roasted garlic aroma as it bakes.
- Sweet Cinnamon Breakfast Slice: If you are craving a sweet morning treat, omit the savory seasonings from the base recipe. Add one teaspoon of your favorite granular keto sweetener, half a teaspoon of ground cinnamon, and a few drops of pure vanilla extract to the batter. Once sliced and toasted, it tastes exactly like an artisanal cinnamon quick bread.
- Cheesy Jalapeño Popper Bread: For an incredible kick of heat and savory richness, fold one tablespoon of finely diced fresh jalapeños and two tablespoons of shredded sharp cheddar or Pepper Jack cheese directly into the prepared batter. The cheese melts into pockets of gooey goodness throughout the warm crumb structure during the microwave process.
Pro-Tips for Achieving a Bakery-Quality Result
While this microwave method is incredibly rapid and user-friendly, implementing a few professional culinary techniques will help you maximize the aesthetic and structural quality of your single-serve loaves.
Toasting for the Ultimate Texture
While the bread is delightfully soft and ready to eat straight out of the mug, taking an extra minute to toast your slices completely transforms the eating experience. Because almond flour contains natural oils, placing your sliced rounds into a hot skillet with a touch of butter or dropping them into a standard toaster creates an incredibly crisp, golden-brown exterior. This toasted crust provides a spectacular structural contrast to the soft interior, making it sturdy enough to hold up against heavy sandwich toppings like avocado, thick-cut bacon, and juicy sliced tomatoes.
Storing and Meal Prepping Single Loaves
If you want to streamline your busy weekday mornings, you can easily prep this recipe ahead of time. You can mix the dry ingredients together in small jars so they are pre-measured and ready to drop into a mug with your wet ingredients. Alternatively, you can bake several mugs of bread over the weekend, allow the loaves to cool completely to room temperature, slice them, and store them in an airtight container inside the refrigerator for up to five days. When you are ready to eat, simply pop a pre-made slice directly into the toaster to restore its warm, freshly baked texture instantly.
Choosing the Right Baking Vessel
The physical shape of your mug directly dictates the final shape of your bread slices. If you use a narrow, tapered coffee mug, your loaf will be thin at the bottom and wide at the top, resulting in irregularly sized slices. For uniform, round sandwich slices like the ones captured in 1000006294.jpg, look for wide, flat-bottomed glass mugs, small soup bowls, or ceramic ramekins. Greasing the inside of your chosen vessel with a tiny bit of oil or butter prior to adding the batter will guarantee an immaculate release every single time without tearing the delicate sides of your fresh loaf.
Conclusion: Embracing the Convenience of Low-Carb Baking
Mastering the 90-second keto mug bread is a definitive turning point for anyone maintaining a dedicated low-carb or ketogenic lifestyle. It completely demystifies alternative baking by eliminating the need for expensive specialty equipment, complex rising schedules, or hours spent waiting for a conventional oven to heat up. With just a handful of wholesome, pantry-stable ingredients and a standard microwave, you can enjoy a warm, comforting slice of bread whenever the craving strikes. The remarkable adaptability of this recipe means you can transition seamlessly from a savory garlic dinner roll to a sweet morning cinnamon slice with minimal effort. Keep your pantry stocked with high-quality almond flour, embrace the incredible speed of microwave culinary science, and enjoy the blissful return of bread to your daily healthy routine.