The Art of Layered Flatbreads Exploring Culinary History Lamination Science and Traditional Griddle Pastries
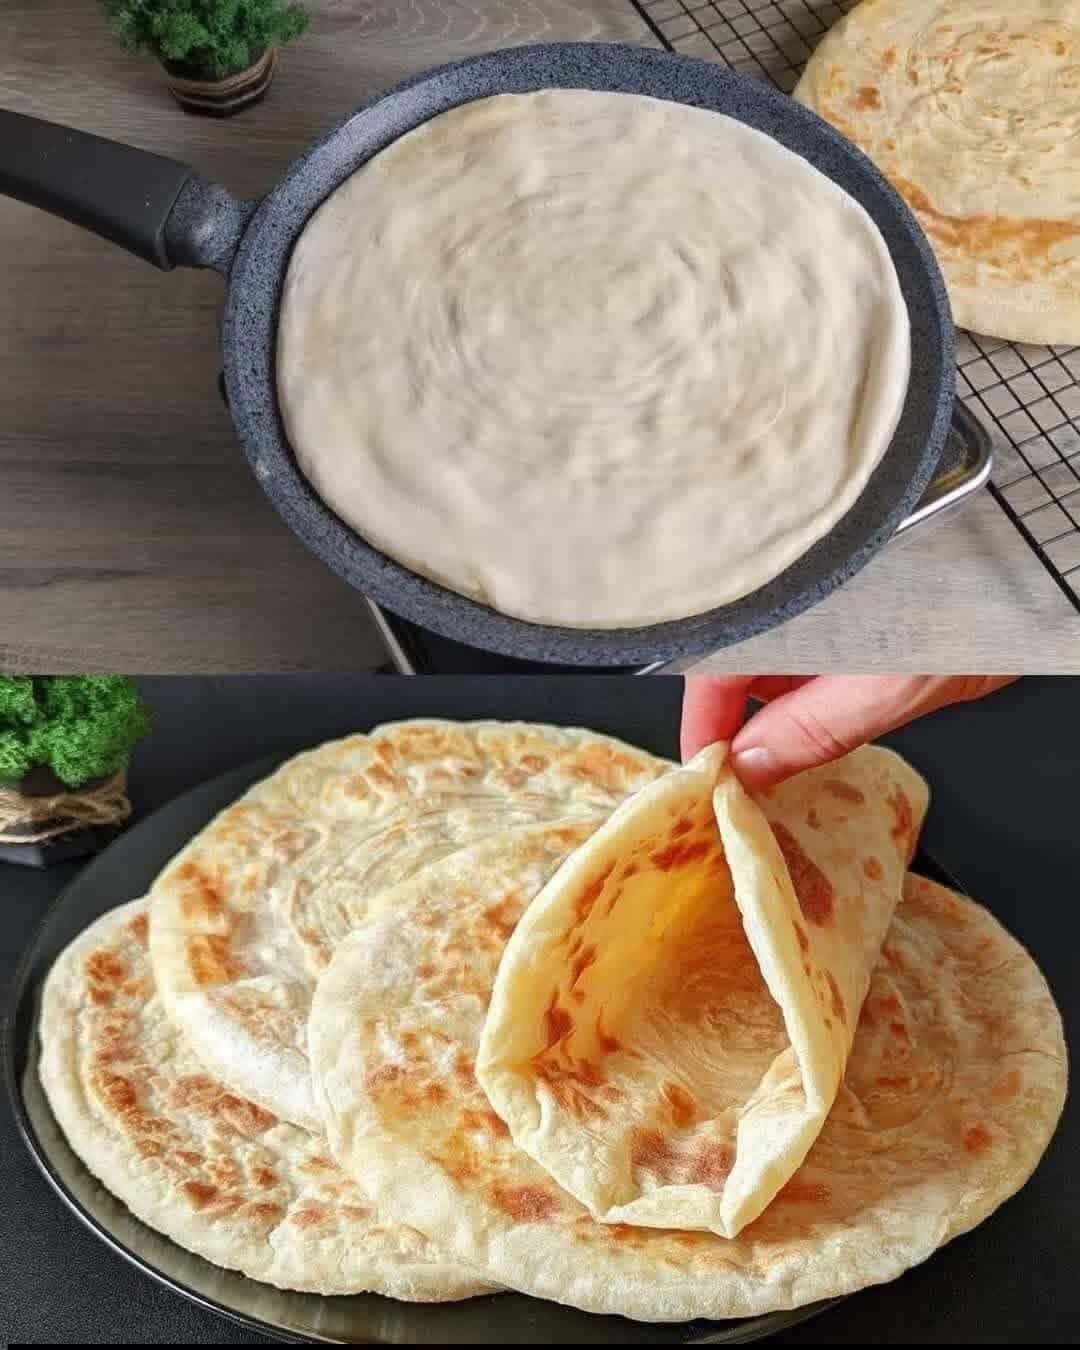
In the world of international bread-making heritage, flatbreads that feature a flaky, multi-layered structure represent a magnificent peak of domestic kitchen craftsmanship. Across global culinary history, master bakers have used simple flour, water, and fat combinations to create comforting staples for early morning and late afternoon gatherings. The image 1000006274.jpg illustrates the preparation and presentation of a classic round, layered flatbread, showcasing a raw, coiled circle of dough cooking evenly inside a dark, speckled non-stick frying pan. The bottom panel of 1000006274.jpg displays a stack of fully cooked, beautifully blistered golden-brown flatbreads resting on a dark platter, with a hand gently lifting one portion to reveal the soft, flaky internal separation of its laminated layers. By stepping back from modern fast-baking convenience metrics and looking closely at North African and Mediterranean pastry context, gluten development, and precise griddle execution, we can discover the authentic culinary value of preparing comforting desserts and breads within a balanced lifestyle context.
The Historical Evolution of Laminated Flatbread Traditions
Long before modern bakeries utilized industrial sheeting machines to create uniform pastry flakes, traditional home cooks relied entirely on the natural elasticity of wheat flour and manual stretching techniques to build structural variety in everyday breads.
Maghrebi Pastoral Kitchens and Regional Flatbread Heritage
The practice of rolling, folding, and pan-frying layered wheat doughs is deeply rooted in the agricultural history of North Africa. In regional traditions, where hard durum wheat was meticulously ground into fine semolina flour, everyday households developed unique methods to transform basic grains into soft, calorie-dense breads capable of sustained storage. Variants of these laminated pan-breads, known historically across regional folklore, were traditionally baked on heavy clay or cast-iron griddles over open wood fires. The beautiful circular shape and coiled pattern of the flatbread in 1000006274.jpg carries on this classic culinary legacy, showcasing the timeless appeal of using simple structural layers to achieve a soft, flexible pastry texture.
The Social Dynamics of the Afternoon Tea Table
During the 19th and 20th centuries, as the availability of refined cooking fats and wild honeys expanded, presenting a hot, freshly blistered layered bread became an essential cornerstone of family hospitality. Because these doughs do not rely on commercial baker’s yeast to rise, they require intensive hand-kneading and resting cycles to maximize structural flexibility. Slicing or tearing a warm flatbread and serving it alongside a steaming teapot remains a comforting ritual that connects modern tables directly to generations of communal cooking, where food was prepared slowly with care and shared with deep pride.
The Science of Multi-Layered Lamination: Gluten and Vapor Barriers
The distinct internal separation and crisp exterior of the bread shown in 1000006274.jpg are governed by precise physical reactions taking place during the kneading and griddle cycles. Understanding how flour proteins and fat layers interact helps home bakers achieve optimal flakiness.
Gluten Elasticity and the Stretching Phase
The foundational architecture of the dough displayed in 1000006274.jpg depends heavily on two primary wheat proteins: gliadin and glutenin. When combined with water and kneaded vigorously, these proteins hydrate and link together to form a highly elastic, stretchable matrix known as gluten. In standard sandwich loaves, this gluten grid traps yeast gases to create a uniform crumb. In a traditional layered flatbread, however, the dough is rested until the gluten network completely relaxes, allowing it to be stretched manually across an oiled surface until it becomes paper-thin without tearing. This incredible thinness is crucial for building the highly detailed internal cross-section highlighted in the bottom image of 1000006274.jpg.
The Steam-Driven Separation Mechanism
To establish a flaky interior, the paper-thin sheets of dough must be coated in a delicate layer of oil, melted butter, or fine semolina flour before being rolled into a long rope and coiled into a tight circle. This creates an alternating structure of dough-fat-dough:
- The Lipid Insulation Layer: The thin film of fat prevents adjacent layers of raw dough from melting back into a single solid block during handling.
- Vapor Expansion: As the coiled circle hits the hot pan, as shown in the top panel of 1000006274.jpg, the water trapped inside the thin dough sheets rapidly heats up and transforms into steam.
- The Lift Force: Because steam cannot easily penetrate the barrier of oil, it forces the individual dough layers apart, causing the bread to puff up dramatically and creating the distinct internal pocket gaps visible when the cooked pastry is torn open.
Incorporating Traditional Breads into a Mindful Lifestyle
Embracing artisanally prepared, scratch-baked flatbreads offers a wonderful path toward an authentic culinary philosophy centered around pure, unadulterated ingredients.
The Value of Single-Batch, Whole-Grain Ingredients
Preparing your layered breads at home allows you to step away from factory-processed commercial tortillas and wrapped wraps that are frequently loaded with industrial dough conditioners, chemical shelf-extenders, and hydrogenated trans fats. By utilizing high-quality wheat flour, pure filtered water, a touch of fine sea salt, and clean fats, you create a rustic bread with a wholesome flavor profile that satisfies the palate completely. This purity means a smaller, freshly made portion delivers genuine satisfaction, helping you maintain a balanced, intentional relationship with food without relying on ultra-processed alternatives.
Systemic Vitality and Wholesome Context
Achieving long-term physical well-being involves looking beyond strict dietary restrictions to cultivate a balanced, stress-free lifestyle. Serving a beautifully finished flatbread encourages a conscious break from the frantic pace of modern schedules, turning a simple breakfast or afternoon snack into a shared, grounding ritual for friends and family. Pairing a warm, layered portion with fresh honey and a hot cup of sugar-free herbal tea helps maintain steady hydration, encouraging a mindful approach to eating that values quality, heritage, and culinary craftsmanship.
Step-by-Step Recipe: Traditional Golden Layered Flatbreads
Recreating the beautiful, multi-layered pastry captured in 1000006274.jpg requires gentle dough integration, ample resting periods, and careful monitoring of your griddle temperature.
Core Dough Ingredients
- 2 cups of unbleached all-purpose flour or high-protein bread flour
- 1 cup of fine durum wheat semolina flour (to provide traditional texture and structure)
- 1 teaspoon of fine sea salt
- 1 1/4 cups of lukewarm filtered water (adjust slightly based on flour hydration)
Lamination and Frying Fats
- 1/4 cup of high-quality vegetable oil (for stretching)
- 1/4 cup of unsalted butter, melted and cooled slightly (for layering)
- 2 tablespoons of fine semolina flour (for dusting between folds)
Mixing and Kneading Instructions
- In a large ceramic mixing bowl, whisk together the unbleached all-purpose flour, fine durum semolina flour, and fine sea salt until fully integrated.
- Make a small well in the center of the dry ingredients and pour in the lukewarm water in a steady stream. Using your hands or a sturdy wooden spoon, gradually draw the flour inward until a rough, sticky dough ball begins to take shape.
- Turn the dough out onto a clean, lightly floured work surface. Knead the mixture vigorously for 8 to 10 minutes, stretching it forward with the palms of your hands and folding it back over itself until the surface turns completely smooth, elastic, and supple.
- Divide the kneaded dough into 4 equal, smooth balls. Lightly coat each ball with a thin film of vegetable oil to prevent a dry skin from forming, place them on a tray, and cover with a clean kitchen towel. Let the dough rest undisturbed for 30 to 45 minutes to allow the gluten network to fully relax.
Lamination and Coiling Phase
- Generously grease your clean countertop with a tablespoon of vegetable oil. Place one rested dough ball in the center and flatten it gently with your palm.
- Using well-oiled hands, carefully stretch the dough from the center outward, working in a circular motion until it transforms into a massive, translucent rectangle or circle. The dough should be thin enough that you can see the outline of your counter through it.
- Dip your fingers into the melted butter and splash it evenly across the surface of the stretched dough, then scatter a light pinch of fine semolina flour over the fat.
- Fold one-third of the dough rectangle inward toward the center, then fold the opposite third over the top to create a long, narrow multi-layered strip of dough. Brush the top of this strip with an extra touch of melted butter.
- Starting from one narrow end, gently roll the strip inward into a tight, spiral roll, tucking the loose outer end securely under the base to form a neat, coiled circle. Repeat this process with the remaining dough balls and let the coiled circles rest under a cloth for 15 minutes.
Shaping and Griddle Cooking Phase
- Heat a heavy, high-quality non-stick frying pan or cast-iron griddle over medium heat until a drop of water dances across the surface, matching the setup in the top panel of 1000006274.jpg.
- Take one coiled dough spiral and place it on a lightly oiled surface. Using the flats of your fingers, press down evenly from the center outward to flatten the coil into a neat, round circle approximately 8 to 9 inches in diameter and 1/4-inch thick. Avoid flattening it too thin, or the internal layers will fuse together.
- Carefully lift the round flatbread and lay it flat into the hot pan. Cook for 2 to 3 minutes on the first side until the dough begins to puff up slightly and small bubbles appear on the surface.
- Flip the flatbread over using a wide spatula. Cook for an additional 2 to 3 minutes on the second side, adjusting the heat downward if the crust browns too rapidly. Continue to turn the bread occasionally until both sides feature a beautiful, spotted golden-brown pattern, as illustrated in 1000006274.jpg.
- Remove the cooked flatbread from the pan and place it on a clean cloth. Immediately use your hands to gently bunch up and “shock” the hot bread from the sides toward the center; this physical movement releases the trapped internal steam, freeing the laminated sheets to produce maximum flakiness. Stack the finished breads on a dark plate, as shown in 1000006274.jpg, and serve warm with honey or cheese.
Conclusion
A classic traditional layered flatbread stands as a wonderful example of how simple, unadulterated kitchen staples can be transformed into elegant, multi-textured pastries through the beauty of basic food science and manual skill. By analyzing the visual concepts in 1000006274.jpg with an objective, educational perspective, we can appreciate the rich history of North African culinary arts, the delicate physics of gluten elasticity, and the importance of steam-driven layer separation. Cultivating a healthy lifestyle grounded in mindful cooking practices allows you to enjoy rich, comforting breads safely and sustainably. Whether you share a hot, flaky wedge during an early morning family gathering or display a beautiful golden stack on your breakfast table, mastering this classic lamination technique is a deeply satisfying milestone on a holistic culinary journey.