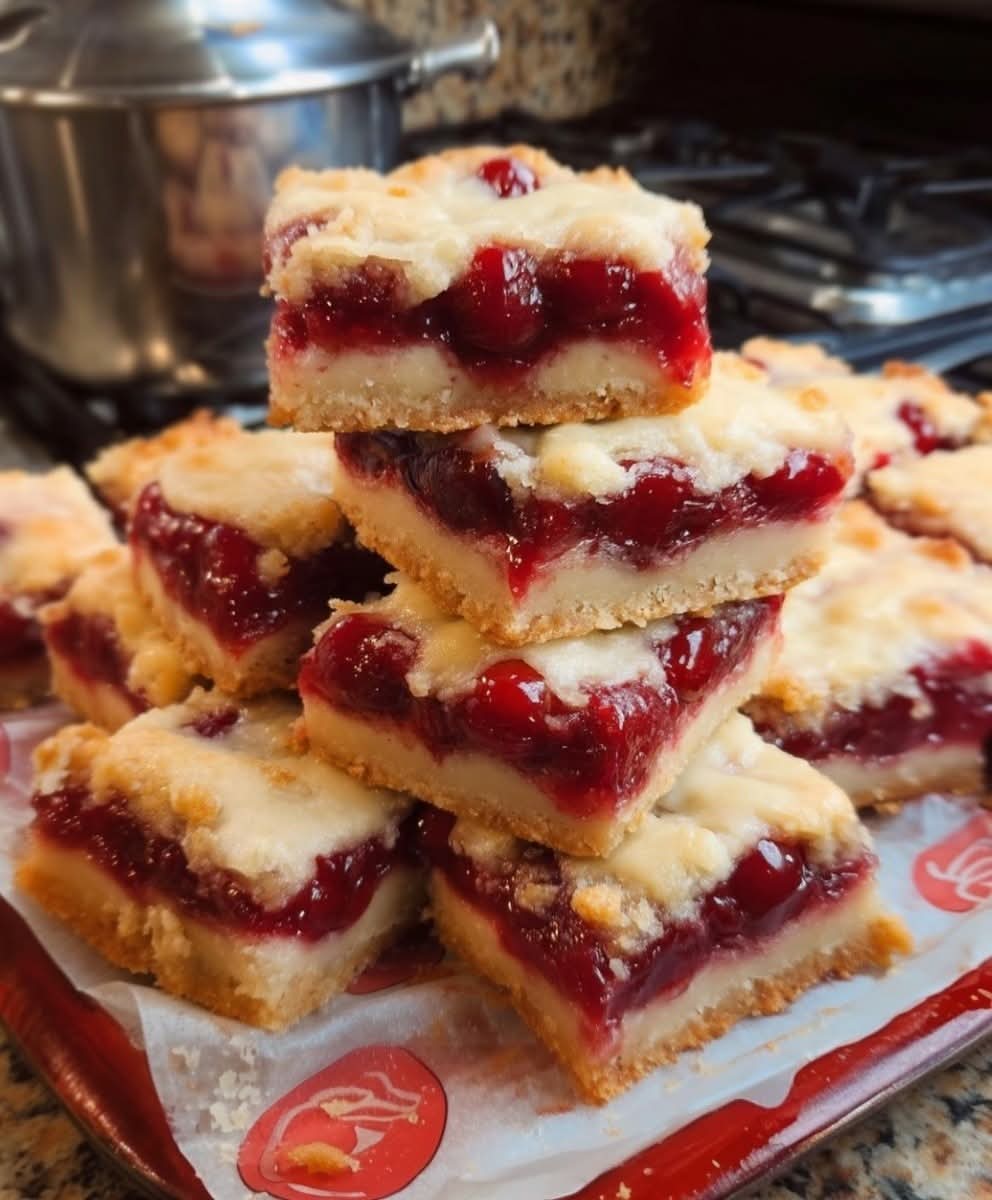
There are bars that are good, and then there are Cherry Crumble Bars – the kind of dessert that makes people hover around the pan, waiting for you to cut the first square. Imagine a tender, buttery shortbread crust, a layer of sweet‑tart cherry filling that bubbles and jams as it bakes, and a golden, crunchy streusel topping that shatters with every bite. These bars are the perfect marriage of a fruit pie and a crumb cake, all in a portable, shareable, bake‑sale‑ready format. They are simple enough for a weeknight treat but impressive enough for holiday dessert tables. If you are searching for a cherry crumble bars recipe that delivers on flavor, texture, and ease, this is the one.
Whether you use fresh cherries, frozen cherries, or a can of cherry pie filling, these bars come together quickly and taste like pure nostalgia. They are naturally adaptable, freezer‑friendly, and always the first to disappear. This homemade cherry streusel bars recipe will become a family favorite.
In this complete guide, you will learn the master recipe for cherry crumble bars, including pro tips for avoiding a soggy bottom, delicious variations (add almond extract, use blueberries, or add a drizzle of glaze), storage and freezing instructions, and why this simple layered dessert is pure baking magic. Let’s preheat that oven.
Why Cherry Crumble Bars Are a Bake Sale Legend
Cherry crumble bars combine the best of several worlds: the buttery, shortbread‑like crust of a bar cookie, the jammy, fruity center of a pie, and the crunchy, streusel‑like topping of a coffee cake. They are sturdy enough to hold in your hand, making them perfect for bake sales, picnics, and lunchboxes. The filling can be made from scratch with fresh or frozen cherries, or you can use canned cherry pie filling for a shortcut. Either way, the result is a dessert that is both rustic and elegant. This is a fruit crumb bar recipe that celebrates cherry season.
Here is why you will love it:
- Only 15 minutes of prep – Then the oven does the work.
- Buttery, tender crust – No rolling required.
- Sweet‑tart cherry filling – Bursting with real fruit flavor.
- Crunchy, golden streusel topping – The perfect finish.
- Customizable – Use any fruit or pie filling you like.
- Freezer‑friendly and great for meal prep
- Perfect for bake sales, potlucks, and holiday dessert tables
Once you try these easy cherry pie bars, you will never bring a box of cookies again.
The Complete Cherry Crumble Bars Recipe
This recipe makes one 9×13 inch pan of bars (about 16-24 squares). It can easily be doubled.
Ingredients – For the Crust and Crumble Topping:
- 2 ½ cups (300g) all‑purpose flour
- 1 cup (200g) granulated sugar
- 1 teaspoon baking powder
- ½ teaspoon salt
- 1 cup (226g, 2 sticks) cold unsalted butter, cut into small cubes
- 1 large egg, lightly beaten
- 1 teaspoon vanilla extract
Ingredients – For the Cherry Filling:
- 3 cups fresh or frozen sweet or tart cherries, pitted and halved (about 1 lb / 450g)
- ½ cup (100g) granulated sugar (adjust depending on cherry sweetness)
- 2 tablespoons cornstarch
- 2 tablespoons fresh lemon juice
- 1 teaspoon vanilla extract
- ¼ teaspoon almond extract (optional, but highly recommended)
Shortcut option: Use 1 can (21 oz) cherry pie filling instead of fresh cherries. Omit the sugar, cornstarch, and lemon juice if using pie filling.
Optional Glaze:
- ½ cup (60g) powdered sugar
- 1‑2 tablespoons milk or cherry juice
- ¼ teaspoon vanilla extract
Equipment:
- 9×13 inch baking pan
- Parchment paper or non‑stick spray
- Large mixing bowl
- Pastry blender or two forks
- Rubber spatula
- Cooling rack
Step‑by‑Step Instructions
Step 1 – Preheat and Prepare the Pan
Preheat your oven to 375°F (190°C). Grease a 9×13 inch baking pan with butter or non‑stick spray, then line the bottom with parchment paper (leaving overhangs on two sides for easy removal). Set aside.
Step 2 – Make the Crumb Dough (Crust + Topping)
In a large bowl, whisk together the flour, sugar, baking powder, and salt. Add the cold butter cubes. Using a pastry blender or two forks, cut the butter into the dry ingredients until the mixture resembles coarse crumbs with pea‑sized butter pieces. You should have a crumbly mixture. Add the beaten egg and vanilla extract, and mix with a fork until the dough begins to clump together. It will still be crumbly – that is perfect.
Step 3 – Reserve Topping and Press Crust
Set aside 1 ½ cups of the crumb mixture for the topping. Press the remaining mixture firmly and evenly into the bottom of the prepared pan. Use the back of a measuring cup or your fingers to create a compact, even layer. This will be the crust.
Step 4 – Prepare the Cherry Filling
In a medium saucepan (if using fresh/frozen cherries), combine the cherries, sugar, cornstarch, lemon juice, vanilla, and almond extract (if using). Cook over medium heat, stirring constantly, until the mixture thickens and becomes glossy, about 5‑7 minutes. The cherries will release their juices and the cornstarch will activate. Remove from heat and let cool slightly. If using canned cherry pie filling, simply stir it in a bowl to loosen.
Step 5 – Assemble the Bars
Spread the cherry filling evenly over the prepared crust. Use a spatula to cover all the way to the edges. Sprinkle the reserved crumb mixture evenly over the cherry filling, gently pressing it down so it adheres.
Step 6 – Bake
Bake at 375°F for 30‑35 minutes, until the topping is golden brown and the filling is bubbling around the edges. Rotate the pan halfway through for even baking. Let the bars cool completely in the pan on a wire rack – at least 2 hours. Cooling allows the filling to set, making clean cuts possible.
Step 7 – Optional Glaze
Once cooled, whisk together the powdered sugar, milk (or cherry juice), and vanilla until smooth. Drizzle over the bars. Let the glaze set for 10‑15 minutes before slicing.
Step 8 – Slice and Serve
Use the parchment overhangs to lift the bars out of the pan. Place on a cutting board and cut into squares or rectangles. Wipe the knife clean between cuts for neat edges. Serve at room temperature.
Pro Tips for the Best Cherry Crumble Bars
Follow these expert tips for perfect fruit crumb bars every time:
- Use cold butter – Cold butter is essential for a flaky, tender crust and crumbly topping. Warm butter will melt into the flour and create a dense, greasy texture.
- Do not overmix the crumb dough – You want pea‑sized butter pieces. Overmixing will make the crust tough.
- Press the crust firmly – A compact, even crust prevents the filling from seeping underneath. Use the bottom of a measuring cup for even pressure.
- Thicken the filling properly – If using fresh cherries, cook the filling until it is thick and jammy. A runny filling will make the bars soggy.
- Let the bars cool completely – This is the hardest step but the most important. Warm bars will fall apart when cutting. Patience yields clean, beautiful squares.
- Add almond extract – Almond extract amplifies the cherry flavor like magic. Do not skip it if you have it.
- Use parchment paper – Lifting the entire slab out of the pan makes cutting much easier and prevents damage.
Delicious Variations (Same Crumb Base)
Once you master the classic cherry crumble bars, try these fun twists. These crumble bar variations will keep your baking exciting.
1. Blueberry Crumble Bars
Substitute fresh or frozen blueberries for the cherries. Add 1 teaspoon of lemon zest to the filling. The blueberry version is equally delicious.
2. Raspberry Crumble Bars
Use raspberries instead of cherries. Reduce sugar slightly (raspberries are more tart, but they also have less natural sugar – taste and adjust).
3. Peach Crumble Bars
Use 3 cups of peeled, diced fresh peaches. Add ½ teaspoon of cinnamon to the filling. Peach crumble bars taste like summer.
4. Apple Cinnamon Crumble Bars
Use 3 cups of peeled, diced Granny Smith apples. Add 1 teaspoon of cinnamon and ¼ teaspoon of nutmeg to the filling. These are perfect for fall.
5. Cherry Almond Crumble Bars
Add ½ cup of sliced almonds to the crumb topping. Use almond extract in the filling (already included). The nutty crunch is wonderful.
6. Lemon Cherry Crumble Bars
Add 1 tablespoon of lemon zest to the crust mixture and 2 tablespoons of lemon juice to the filling. The bright citrus complements the cherries.
7. Gluten‑Free Cherry Crumble Bars
Use a 1:1 gluten‑free flour blend (like King Arthur). Add ¼ teaspoon of xanthan gum if your blend does not already contain it. The texture will be slightly more delicate but still delicious.
Replace the butter with vegan butter (cold). Replace the egg with ¼ cup of unsweetened applesauce. Use a plant‑based milk for the glaze. The vegan version is surprisingly close to the original.
How to Store, Freeze, and Make Ahead
Room Temperature
Store bars in an airtight container at room temperature for up to 4 days. The crumb topping will soften slightly but the flavor remains excellent.
Refrigerator
If you prefer a firmer bar or if your kitchen is warm, store in the refrigerator for up to 1 week. Bring to room temperature before serving.
Freezer (Baked Bars)
Cool completely, then wrap the whole slab or individual bars tightly in plastic wrap, then foil. Freeze for up to 3 months. Thaw at room temperature for 1‑2 hours. Do not freeze with glaze – add glaze after thawing.
Freezer (Unbaked)
Assemble the bars completely (without glaze) but do not bake. Cover tightly and freeze for up to 2 months. Bake from frozen at 375°F for 40‑45 minutes (add 10 minutes to baking time).
Make Ahead for a Party
Bake the bars 1‑2 days ahead, cool, cover, and store at room temperature. Add glaze the day of serving for the freshest look.
What to Serve with Cherry Crumble Bars
- Vanilla ice cream – Classic pairing.
- Whipped cream – Light and airy.
- A dusting of powdered sugar – Simple elegance.
- A cup of hot coffee or black tea – Perfect afternoon treat.
- Alone – they are complete on their own.
Frequently Asked Questions
Can I use canned cherry pie filling?
Yes. This is a great shortcut. Use one 21‑oz can of cherry pie filling. You do not need to add sugar, cornstarch, or lemon juice. Simply spread the pie filling over the crust and proceed with the recipe.
Can I use frozen cherries?
Yes. Do not thaw them first. Cook them with the sugar and cornstarch as directed; frozen cherries will release more liquid, so you may need to cook a minute or two longer to thicken.
Why are my bars soggy on the bottom?
A soggy bottom usually means the crust was not pressed firmly enough or the filling was too runny. Press the crust very firmly, and make sure your cherry filling is thick and jammy. Also, avoid adding extra liquid to the filling.
How do I get clean, even cuts?
Let the bars cool completely (at least 2 hours). For the cleanest cuts, refrigerate for 30 minutes before slicing. Use a sharp chef’s knife and wipe the blade clean between cuts.
Can I reduce the sugar?
You can reduce the sugar in the crust to ¾ cup (150g) without significantly affecting texture. The filling sugar can be reduced based on the sweetness of your cherries – tart cherries need more sugar, sweet cherries need less.
How many calories are in a cherry crumble bar?
One bar (1/16 of the recipe) contains approximately 280‑350 calories, 14g fat, 44g carbohydrates, and 4g protein. This is a satisfying fruit dessert – perfect for bake sales and special occasions.
Can I use other fruits?
Absolutely. This recipe works beautifully with blueberries, raspberries, blackberries, peaches, nectarines, or apples. Adjust sugar and cooking time based on the fruit’s water content.
The History of Fruit Crumble Bars
Fruit crumble bars (also called fruit slab pies or streusel bars) are a beloved American dessert that gained popularity in the mid‑20th century. They combine the comfort of a fruit pie with the portability of a bar cookie, making them ideal for bake sales, picnics, and lunchboxes. The cherry version is especially popular in the Midwest and Pacific Northwest, where cherry orchards thrive. This recipe honors that tradition, using simple, wholesome ingredients and a buttery, crumbly topping that has stood the test of time.
Why You Should Make These Cherry Crumble Bars This Week
You probably have flour, sugar, butter, and eggs in your kitchen. Fresh or frozen cherries are easy to find (or you can use pie filling). In under 20 minutes of active prep, you can create a dessert that will impress everyone. They are perfect for:
- Bake sales and school fundraisers – Always a top seller.
- Potlucks and family reunions – Portable and feeds many.
- Holiday dessert tables (Fourth of July, Thanksgiving, Christmas) – Red and festive.
- Weekend baking with kids – They can help press the crust and sprinkle topping.
- When you need a simple, impressive dessert – Looks complicated, but it is not.
The first time I made cherry crumble bars, I had a bag of frozen cherries that needed using. I was skeptical about how they would turn out. The bars were gone within an hour – my family devoured them. Now I make them every summer with fresh cherries from the farmer’s market, and they never last more than a day.
So pit those cherries, crumb that topping, and get ready to bake the most delicious, buttery, fruit‑filled cherry crumble bars of your life.
Final Thoughts
Cherry Crumble Bars are proof that the best desserts are often the simplest. A buttery crust, a jammy cherry filling, and a crunchy streusel topping come together in a bar that is portable, shareable, and utterly addictive. Whether you keep the classic recipe or experiment with blueberries, peaches, or apples, these bars will earn a permanent spot in your baking rotation. This truly is the best fruit crumb bar recipe for any occasion.
So go ahead – make them this weekend. Cut them into generous squares. Share them with people you love. And enjoy every buttery, cherry‑filled, crumbly bite.
Have you made cherry crumble bars? What’s your favorite twist – almond extract, a drizzle of glaze, or using a different fruit? Share your photos and tips in the comments below. And if this recipe became a bake sale hero, save it for later or send it to a friend who loves easy, delicious desserts.