The Ultimate Guide to No Knead Seeded Glass Jar Bread A Revolution in Home Baking
The aroma of freshly baked bread is one of the most comforting and universally loved scents in the culinary world, instantly evoking feelings of warmth, home, and wholesome nourishment. For many aspiring bakers, however, the traditional bread-making process can feel incredibly intimidating, often requiring intense physical kneading, precise countertop space, and specialized baking vessels like heavy cast-iron Dutch ovens. Fortunately, the culinary world is constantly evolving, and a brilliant, unconventional life hack has emerged that simplifies artisanal baking down to its absolute essentials. By using everyday heat-resistant glass jars as both the mixing bowl and the final baking vessel, you can create a perfectly portioned, high-fiber loaf with minimal effort. This innovative approach eliminates the mess of a flour-dusted kitchen countertop and streamlines the entire process into a fun, highly rewarding project suitable for beginners and seasoned professionals alike.
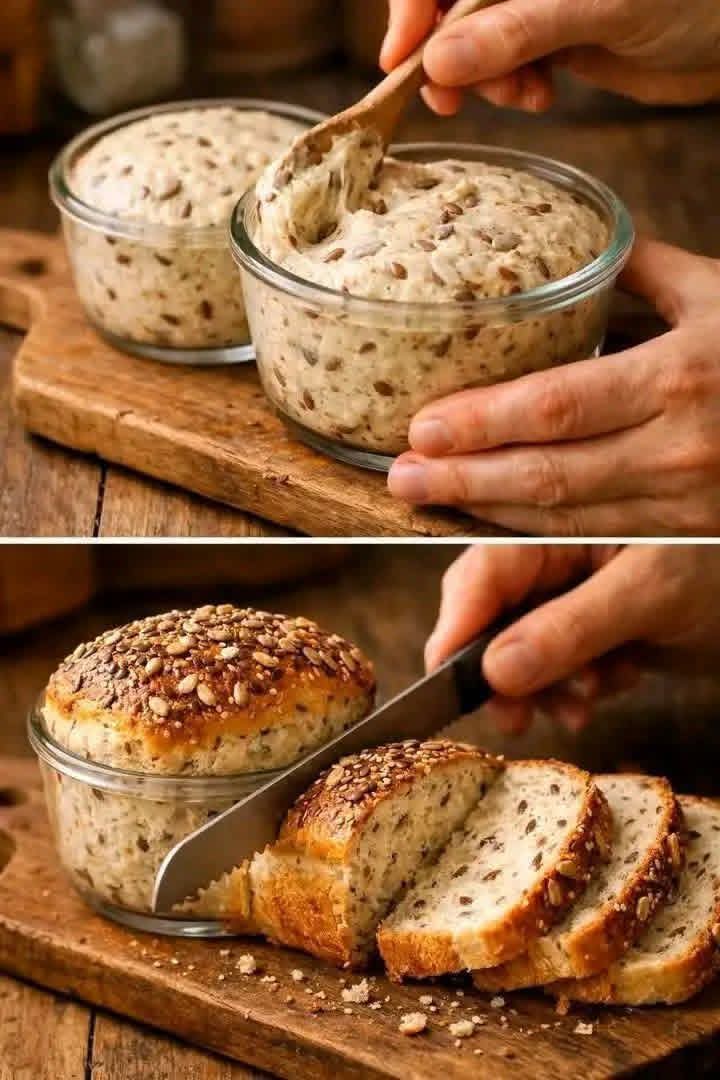
As beautifully demonstrated in the provided image 1000006230.jpg, this unique technique showcases the entire transformation of the dough from a simple, wet seed mixture into a perfectly risen, golden-brown loaf that is sliced directly alongside its baking vessel. The top panel of image 1000006230.jpg captures the ease of handling the sticky, high-hydration dough using a simple wooden spoon directly inside a compact glass bowl, completely bypassing the need for hand-kneading or surface shaping. The bottom panel illustrates the magnificent final result: a beautifully structured, crusty loaf packed with a dense distribution of wholesome garden seeds, yielding uniform, clean slices that are perfect for your morning routine or healthy afternoon snacks. Mastering this straightforward, no-mess methodology allows you to enjoy the unparalleled taste and texture of premium, house-made whole-grain bread without any of the traditional stress or extensive clean-up.
The Fascinating History and Science of No-Knead Baking
To truly appreciate the brilliance of baking bread inside a small glass jar, it helps to understand the historical evolution and scientific principles that make no-knead doughs work so spectacularly well. For centuries, traditional baking relied heavily on mechanical kneading to develop gluten, the structural network of proteins that traps gas bubbles and allows dough to rise into a light, airy loaf. However, the modern no-knead revolution proved that time and high hydration could accomplish the exact same goal without any physical labor. When flour is combined with a relatively large volume of water and allowed to rest for an extended period, the protein molecules naturally align themselves and bond automatically, forming a strong, elastic gluten network entirely on their own.
Baking this high-hydration dough inside a closed or semi-enclosed heat-resistant glass vessel adds another layer of scientific magic to the process, closely mimicking the environment of a professional steam-injected bakery oven. As the wet dough heats up inside the glass jar, the moisture rapidly evaporates, creating a localized pocket of intense steam trapped directly around the surface of the bread. This steam keeps the outer skin of the dough flexible and soft during the initial phase of baking, allowing the loaf to expand fully and rise to its maximum potential without cracking prematurely. As the baking continues, the starches on the exterior gelatinize and eventually caramelize into a beautifully thin, ultra-crispy, and professional-grade golden crust, as clearly visible in the finished product shown in image 1000006230.jpg.
Selecting Premium Ingredients for Taste, Texture, and Nutrition
Because this recipe relies on a highly simplified technique, the flavor, aroma, and overall quality of your final loaf will depend entirely on the specific ingredients you choose to incorporate into your mixing jar. Creating a deeply satisfying, rustic loaf requires balancing structural strength with rich, nutty textures and wholesome dietary elements. Selecting the right combination of grain bases and natural botanical additions ensures that your homemade bread is not only delicious but also serves as a hearty, satisfying component of a balanced, active lifestyle.
Choosing the Ideal Flour Base
The foundation of any great loaf of bread is the flour, which provides the necessary proteins required for structural integrity. For a no-knead jar bread, a high-quality unbleached bread flour or a premium unbleached all-purpose flour is ideal, as these options contain a higher percentage of gluten-forming proteins compared to standard pastry flours. To enhance the rustic charm, depth of flavor, and nutritional profile of your bread, you can easily substitute up to one-third of the white flour with stone-ground whole wheat flour, dark rye flour, or spelt flour, which adds a beautiful earthy undertone and a darker coloration to the crumb.
The Magic of Garden Seeds and Visual Texture
What truly elevates this glass jar bread from a simple loaf into an artisanal masterpiece is the generous incorporation of premium, oil-rich garden seeds. Combining flaxseeds, sunflower seeds, sesame seeds, and chia seeds directly into the wet dough adds an incredible multi-textured crunch and a rich, nutty flavor profile that pairs beautifully with the natural sweetness of the grain. Furthermore, pressing an extra layer of these mixed seeds onto the exposed top surface of the dough right before it enters the oven creates a stunning, visually appealing speckled crust, an aesthetic quality brilliantly captured in the lower section of image 1000006230.jpg.
Activating the Yeast and Managing Hydration
To achieve a reliable, effortless rise within the compact confines of a glass vessel, utilizing instant yeast or rapid-rise yeast is highly recommended, as it can be mixed directly with the dry ingredients without requiring a separate foaming or proofing step in warm water. Sea salt is another indispensable component, acting not only as a crucial flavor enhancer that prevents the bread from tasting flat but also as a natural gluten stabilizer that controls the rate of fermentation. Finally, ensuring your water is lukewarm—ideally around room temperature—keeps the yeast active and happy without risking overheating, which could inadvertently stall the rising process.
Step-by-Step Jar Preparation and Mixing Methodology
The absolute greatest advantage of this modern baking hack is that the entire mixing process takes place within a single container, keeping your hands, countertops, and rolling pins completely clean. To begin, select wide-mouthed, heat-resistant glass jars or small Pyrex-style bowls that are explicitly rated for oven use, ensuring they can safely withstand standard baking temperatures without cracking. Thoroughly coat the entire interior surface of each glass vessel with a thin, even layer of softened butter, neutral cooking oil, or non-stick baking spray, then lightly dust the interior with a tablespoon of flour or cornmeal to guarantee the baked bread slips out effortlessly later on.
Combining the Dry and Wet Elements
In a separate bowl, or directly inside your prepared wide-mouth glass jars if they are large enough, whisk together your flour, instant yeast, sea salt, and your vibrant assortment of raw garden seeds until thoroughly combined. Next, pour the lukewarm water directly into the center of the dry mixture, using a sturdy wooden spoon or a small silicone spatula to stir the components together. As demonstrated in the top panel of image 1000006230.jpg, you are not looking to create a smooth, elastic, or rollable dough; instead, work the ingredients just until all the dry patches of flour disappear, leaving you with a thick, sticky, and noticeably shaggy wet dough mixture.
The Crucial Resting and Fermentation Phase
Once the shaggy dough is uniformly mixed and neatly scraped down into the bottom half of your prepared glass jars, tightly cover the opening of each vessel with a piece of bees-wrap, plastic wrap, or a damp kitchen towel to prevent the surface from drying out and forming a hard skin. Place the covered jars in a warm, draft-free location in your kitchen—such as the inside of an turned-off oven with the interior light switched on, or near a sunny window—and allow the dough to ferment undisturbed for approximately one to two hours. During this crucial resting phase, the yeast will consume the natural sugars in the flour, releasing carbon dioxide gas that expands the sticky dough until it doubles in volume, filling the glass jar with a beautiful, web-like network of tiny air bubbles.
Baking to Golden Perfection and Storing Your Individual Loaves
Once the fermentation period is nearing its end and the dough has risen beautifully near the top rim of the glass vessels, preheat your kitchen oven to 400°F (205°C) to ensure a perfectly steady, high-heat environment for the initial bake. Carefully remove the protective plastic or cloth covers from your jars, and if desired, gently mist the top of the exposed dough with a tiny splash of water before sprinkling an additional handful of mixed garden seeds over the surface, pressing them down very lightly so they adhere to the sticky dough. Place the uncovered glass jars directly onto a sturdy baking sheet, leaving ample space between each container to allow the hot oven air to circulate uniformly around the glass walls.
Monitoring the Bake and Testing Doneness
Bake the jar breads in the center rack of your preheated oven for approximately 35 to 45 minutes, keeping a close eye on the dramatic visual changes taking place through the glass. You will see the top of the dough spring up significantly during the first ten minutes, eventually forming a beautifully rounded, deeply browned, and seed-encrusted dome that looks incredibly appetizing. To ensure the dense center of the loaf is fully baked through, you can insert a digital kitchen thermometer into the middle of the bread; it should read between 195°F and 205°F (90°C to 96°C), or you can gently tap the top crust, which should sound hollow and feel remarkably firm to the touch.
Cooling Techniques and Slicing Secrets
Once fully baked, carefully remove the hot glass containers from the oven using heavy-duty oven mitts and place them onto a wooden cutting board or a wire cooling rack to rest for at least 15 minutes. While it is incredibly tempting to slice into the steaming bread immediately, allowing it to cool slightly is a vital step, as the internal starches are still settling and finishing their cooking process from the residual heat. After a brief cooling period, you can easily slide a thin, sharp serrated bread knife directly down into the jar to cut uniform, beautiful slices as shown in the bottom panel of image 1000006230.jpg, or you can gently invert the jar to let the entire individual loaf slide out cleanly onto your board for traditional crosswise slicing.
Creative Serving Inspirations and Everyday Meal Integration
These individual, seed-packed glass jar loaves are as versatile as they are visually stunning, providing the perfect canvas for a wide array of delicious combinations throughout your daily routine. Because the crumb is dense, incredibly hearty, and structurally resilient, a toasted slice of this bread holds up beautifully under heavy, flavorful toppings without folding or becoming soggy. For a wholesome, energizing morning option, try spreading a thick layer of creamy, ripe avocado over a warm, toasted slice, finishing it off with a delicate sprinkle of sea salt flakes, cracked black pepper, and a few fresh microgreens from your garden.
If you prefer a sweeter flavor profile, this nutty bread pairs absolutely magnificently with a generous smear of raw almond butter, a light drizzle of local organic honey, or a layer of homemade berry compote, where the deep, earthy crunch of the seeds perfectly balances the vibrant sweetness of the fruit. These compact loaves also make an incredible accompaniment to a comforting bowl of warm vegetable soup or a crisp summer salad, allowing you to tear off bite-sized, crusty pieces to soak up savory broths and dressings. No matter how you choose to enjoy it, this ingenious glass jar baking method proves that creating delicious, premium-quality artisanal bread can be a simple, joyful, and completely stress-free addition to your contemporary lifestyle.