The Ultimate Guide to Crafting Perfectly Flaky Golden Lemon Scones
There is an undeniable magic that happens when bright, zesty citrus notes meet the rich, buttery layers of a traditional baked pastry. As captured in the beautiful progression of 1000006207.jpg, creating the perfect homemade scone is an art form that transforms simple pantry staples into elegant, golden treasures. A truly exceptional scone boasts a delicate, crisp exterior that gives way to a tender, flaky interior, perfectly balancing rich creaminess with the refreshing bite of natural citrus. These classic lemon scones are designed to elevate your morning coffee ritual or afternoon tea gathering, offering a vibrant burst of flavor that feels both comforting and sophisticated.
Across global baking traditions, scones have long held a cherished position as a symbol of hospitality, warmth, and culinary craftsmanship. While classic versions often lean strictly into neutral, buttery profiles, incorporating fresh citrus zest and natural color highlights the evolution of modern garden-to-table baking. By understanding the core science behind pastry dough manipulation and selecting high-quality, vibrant ingredients, any home baker can master the technique required to achieve an impressive rise and beautiful, flaky layers. In this comprehensive culinary guide, we will explore the timeless folklore of afternoon tea pastries, break down the role of key ingredients, provide a detailed step-by-step master recipe based on the techniques visualized in 1000006205.jpg and 1000006207.jpg, and reveal expert secrets for achieving the perfect golden bake every single time.
The Heritage and Traditional Folklore of Tea Pastries
The history of the scone is deeply intertwined with the early baking traditions of the United Kingdom, specifically originating in Scotland during the early 15th century. Originally, these quick breads were made with oats, shaped into a large round flatbread, cooked on a griddle, and cut into triangular wedges for serving. With the widespread availability of baking powder and the introduction of domestic ovens in the 19th century, the scone evolved into the individual, beautifully risen, oven-baked pastry that we recognize and celebrate today.
The tradition truly skyrocketed in popularity during the Victorian era, when Anna Russell, the Duchess of Bedford, popularized the concept of “afternoon tea.” Seeking a light, satisfying snack to bridge the gap between luncheon and dinner, she requested sweet and savory quick breads to accompany her daily tea service. In historical culinary folklore, serving beautifully risen, golden scones to guests was considered a direct reflection of a baker’s skill and care. Incorporating fresh botanical elements and citrus fruits like lemons became a highly sought-after variation, representing a connection to sun-drenched orchards and bringing a refreshing brightness to the traditional, heavy winter tea tables.
Selecting Essential Ingredients for Peak Lift and Zest
Achieving the majestic height and delicate crumb structure shown in the final panel of 1000006207.jpg requires an understanding of how your ingredients interact. Scone baking is a delicate balance of fat, flour, and moisture, where temperature control plays a vital role. Let us examine the purpose of each key component to understand how they work together to create the perfect pastry.
The Role of Flour and Leavening Agents
High-quality, unbleached all-purpose flour provides the perfect structural base for scones. It contains just enough protein to form a stable network that holds the pastry together while keeping the final texture light and tender rather than tough or bread-like. Combined with a generous amount of baking powder, this creates the powerful chemical reaction necessary to push the dough upward during the initial minutes of baking, resulting in those iconic, split sides and impressive vertical growth.
The Science of Cold Butter and Dairy
The secret to the flaky, layered texture seen in artisanal scones lies entirely in the condition of your fat. Using unsalted butter that is completely chilled—or even frozen—is an absolute non-negotiable rule. When the cold pieces of butter hit the high heat of a preheated oven, the water trapped inside the butter rapidly evaporates, creating pockets of steam. These steam pockets lift the flour layers apart from the inside, generating the coveted flaky texture. For the liquid element, choosing a thick, rich dairy product like heavy cream, whole milk, or plain Greek yogurt adds a luxurious richness and provides the necessary moisture to bind the flour without overworking the gluten.
Harnessing Natural Citrus Aroma
To achieve an authentic, bright lemon profile, we rely on the power of fresh lemon zest rather than artificial flavorings. The outer yellow skin of a lemon contains concentrated essential oils that release a powerful, pure aroma when rubbed into the dry ingredients, as demonstrated in the first panel of 1000006207.jpg. Combining this aromatic zest with a touch of natural color ingredients, such as a hint of pure vanilla or a splash of egg yolk, helps create that stunning, deep-golden interior dough that looks as vibrant as it tastes.
The Master Recipe: Step-by-Step Golden Lemon Scones
This master recipe utilizes a clean, methodical bowl technique to keep your ingredients cool and ensure a perfect, uniform shape. By matching your actions to each phase of the process, you will ensure a flawless execution from raw flour to the baked platter.
Ingredients List
- 3 cups unbleached all-purpose flour
- 1/3 cup granulated sugar
- 1 tablespoon baking powder
- 1/2 teaspoon baking soda
- 1/2 teaspoon salt
- 3 tablespoons fresh lemon zest (finely grated from about 2-3 organic lemons)
- 3/4 cup unsalted butter, cut into small cubes and thoroughly chilled
- 1 large egg yolk (plus 1 whole egg for the final egg wash)
- 3/4 cup heavy cream or whole milk
- 2 tablespoons fresh lemon juice
- Optional finish: A coarse sanding sugar for sprinkling on top before baking
Step 1: Infusing the Dry Ingredients and Cutting the Fat
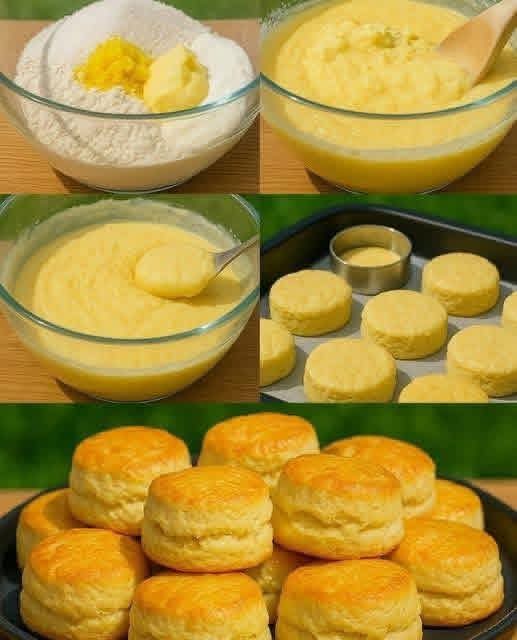
In a large glass mixing bowl, whisk together the all-purpose flour, granulated sugar, baking powder, baking soda, and salt. Add the fresh lemon zest directly into the flour mixture. Using your fingertips, gently rub the zest into the dry ingredients for about 30 seconds to release the natural oils and maximize the citrus fragrance. Add the ice-cold cubed butter to the bowl. Using a pastry cutter, two knives, or your cold hands, cut the butter into the flour until the mixture resembles a coarse cornmeal consistency with some pea-sized pieces of butter still visible, just like the initial stage shown in 1000006207.jpg.
Step 2: Incorporating Liquids and Binding the Dough
In a separate smaller container, whisk together the heavy cream, egg yolk, and fresh lemon juice until smooth and uniformly yellow. Pour the liquid mixture directly into the center of your dry ingredients. Using a wooden spoon or a sturdy silicone spatula, gently fold the mixture together using a circular motion, as illustrated in the second and third panels of 1000006207.jpg. Stir just until the dough begins to clump together into a soft, cohesive mass. Avoid overmixing at this stage, as excessive handling will melt the butter and develop too much gluten, resulting in a dense, tough scone.
Step 3: Shaping, Cutting, and Formatting
Turn the soft dough out onto a lightly floured work surface. Gently press the dough together into a uniform disk that is roughly 1 inch to 1.5 inches in thickness. For perfectly circular, bakery-style results, use a sharp, circular metal pastry cutter to stamp out individual portions from the dough mass, as shown in the fourth panel of 1000006207.jpg. When cutting, press the tool straight down into the dough and lift it directly up without twisting. Twisting the cutter seals the delicate edges of the dough, preventing the steam from lifting the layers and stunting the pastry’s rise in the oven. Place the shaped dough rounds onto a baking sheet lined with parchment paper, leaving about 2 inches of space between each piece.
Step 4: The Golden Bake
Place the entire baking sheet containing the shaped scones into your refrigerator or freezer for 10 to 15 minutes to re-chill the butter before it enters the oven. While the dough rests, preheat your oven to 400°F (204°C). In a small dish, beat a whole egg with a tablespoon of water to create a smooth egg wash. Brush the top surfaces of the chilled scones lightly with the egg wash, ensuring it does not drip down the sides, which can glue the layers together. If desired, sprinkle a light layer of coarse sugar over the top. Slide the sheet into the center rack of your preheated oven and bake for 15 to 18 minutes, or until the scones have risen majestically and developed a deep, lustrous golden-brown crust, matching the final presentation plate in 1000006207.jpg. Remove from the oven and let them cool slightly on a wire rack.
Professional Kitchen Secrets for Achieving Maximum Rise
The difference between an average home-baked scone and a spectacular, award-winning pastry comes down to a few critical techniques utilized by professional pastry chefs. Incorporating these subtle habits into your baking routine will completely transform the quality of your output.
The Straight-Down Cutting Rule
As mentioned during the shaping process, the physical motion of your hand when cutting the dough dictates how high the pastry can expand. A clean, vertical downward cut shears through the flour and butter layers cleanly, leaving them wide open to receive the intense heat of the oven. A twisting motion smears the flour across the edges, forming an accidental barrier that forces the scone to expand unevenly or rise at an angle. If you do not have a circular cutter, using a sharp bench scraper or chef’s knife to slice the disk into traditional triangular wedges using clean, singular downward motions works beautifully.
The Importance of the Pre-Bake Chill
Never underestimate the power of chilling your shaped dough right before it enters the hot oven. The friction of your hands and the room temperature of your kitchen naturally begin to soften the butter while you work. If soft butter enters a hot oven, it melts instantly and leaks out onto the baking sheet, leaving behind a flat, greasy pastry. Re-crystallizing that butter in the freezer for just a few minutes ensures that it remains solid until the starch network of the flour has a chance to set around it, trapping the expanding steam perfectly inside.
Styling and Serving Suggestions for an Elegant Presentation
A beautifully baked batch of lemon scones deserves a presentation that highlights its golden color and delicate texture. Arrange your fresh, warm scones on a large dark ceramic platter or a classic tiered cake stand to mirror the striking visual contrast displayed in the final shot of 1000006207.jpg. The rich, golden tops provide an incredibly appetizing center point for any breakfast table or brunch spread.
Accompaniments and Spreads
While these scones are incredibly flavorful and moist on their own, offering traditional spreads allows your guests to customize their dining experience. Pair the warm pastries with a bowl of rich, velvety Devonshire clotted cream or a dollop of high-quality, tangy house-made lemon curd to accentuate the citrus theme. A light smear of sweet unsalted butter or a jar of wild berry jam also provides a lovely contrast to the refreshing brightness of the lemon zest.
The Perfect Beverage Pairings
To complement the vibrant citrus profile of these pastries, select beverages that harmonize with lemon. A hot pot of classic Earl Grey tea, with its natural notes of bergamot citrus, makes for a timeless and sophisticated pairing. If you prefer a lighter herbal option, a fresh infusion of garden-grown mint or lemon verbena complements the pastry beautifully. For coffee lovers, a clean, bright pour-over coffee with fruit-forward undertones provides a wonderful, energizing balance to the rich, buttery layers of the scone.
Conclusion: Elevating Your Home Baking Practice
Mastering the classic lemon scone is a fulfilling accomplishment that fills your home with an intoxicating aroma and brings joy to everyone at your table. This recipe shows how patience, proper temperature management, and simple structural cutting choices can result in a truly magnificent pastry. By following the clear visual milestones demonstrated throughout 1000006207.jpg—from the initial blending of citrus oils into the flour to the final cutting and baking stages—you can confidently produce an artisanal bake that rivals the finest professional bakeries. Keep your ingredients cold, handle your dough with care, and savor every bite of these delightfully flaky, sun-kissed golden treats.