The Ultimate Guide to Traditional Homemade Sesame Brioche Buns
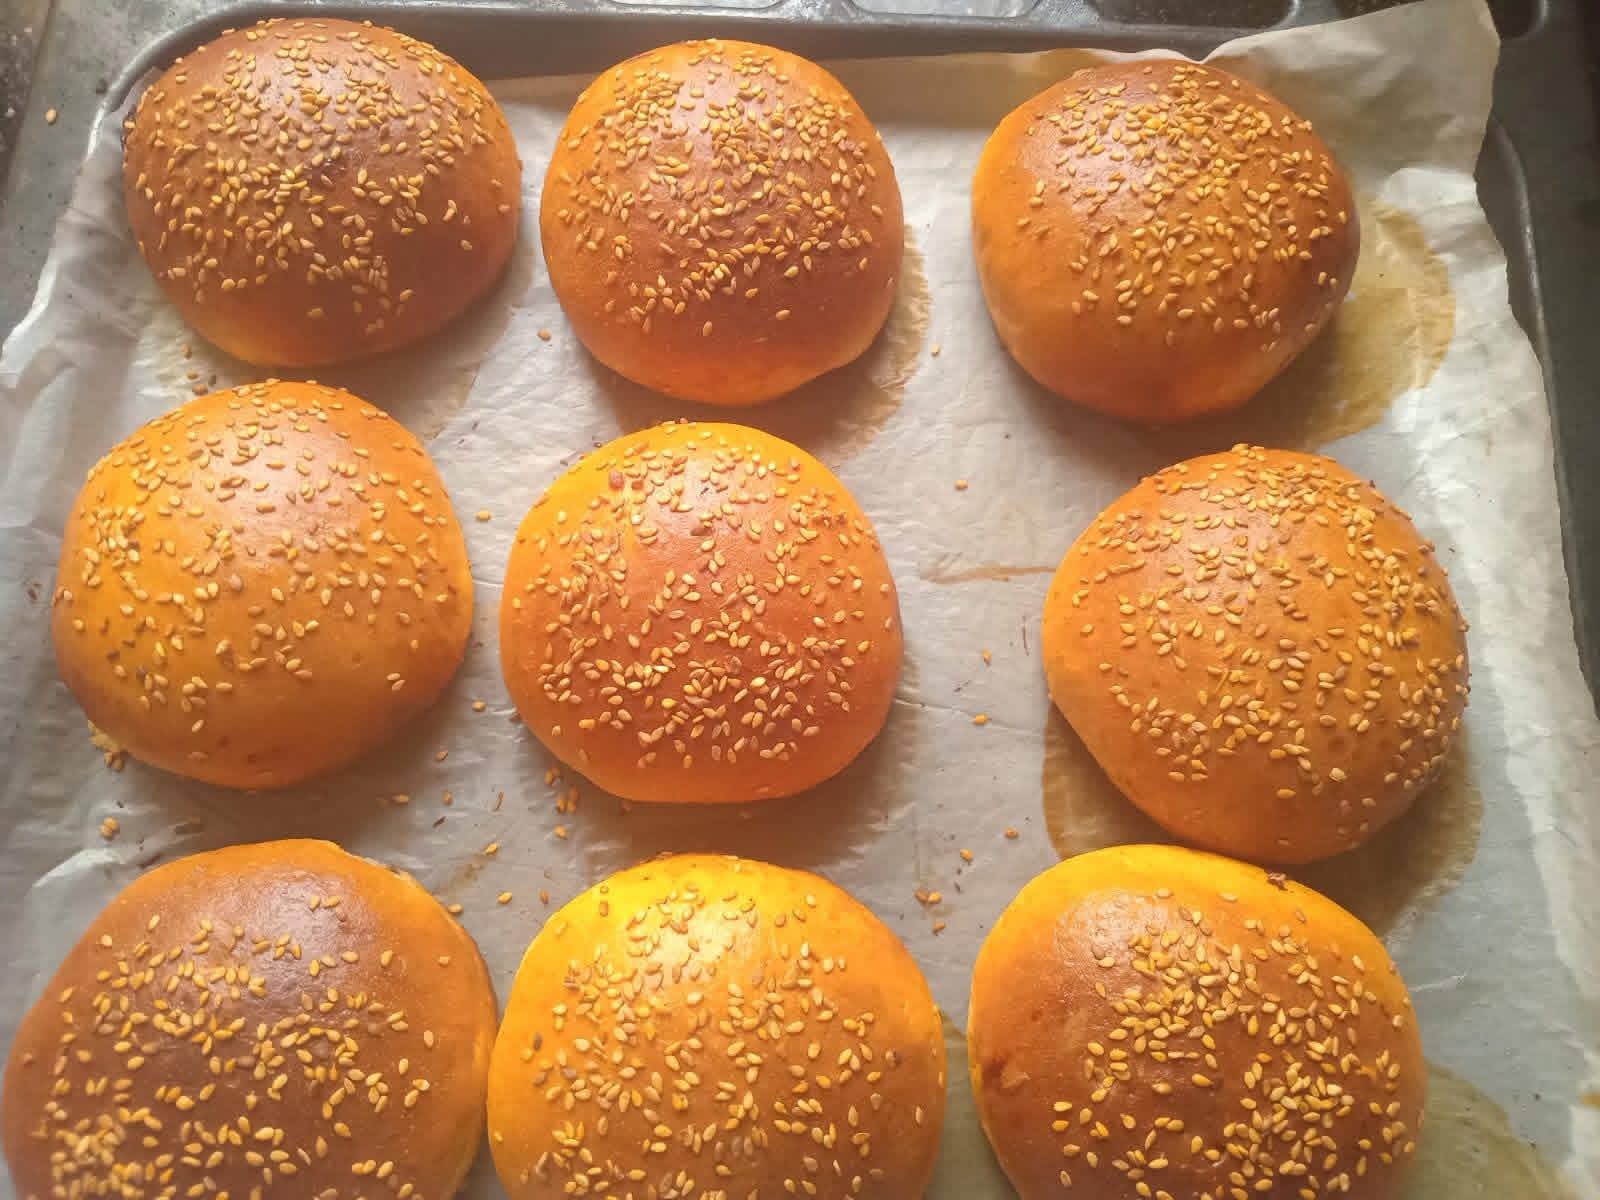
Few culinary experiences match the simple joy of baking fresh, warm bread right in your own kitchen. Among the world’s most beloved artisanal breads, traditional enriched brioche stands out as a pillowy, golden masterpiece that has elevated sandwich and burger experiences across global culinary cultures. The magic of a perfectly prepared batch relies entirely on high-quality ingredients, proper dough development, and a beautiful golden bake. When looking at a perfectly executed version, such as the uniformly risen, golden-brown rolls featured in 1000006153.jpg, it becomes immediately clear why this artisan staple remains a favorite in modern households. This comprehensive guide will take you through the traditional history, essential ingredients, and an incredibly detailed step-by-step baking process to help you master homemade sesame brioche buns from scratch.
What makes a traditional brioche bun so exceptional is its unique combination of textures: a soft, thin exterior crust covered in toasted seeds and a rich, buttery interior crumb structure. Unlike standard store-bought buns that often turn dry or crumble under the weight of juices, fresh enriched dough made from scratch remains incredibly supple and structurally sound. The entire baking process is an accessible, deeply rewarding science experiment. By understanding how fats interact with yeast and flour, you can witness flat, shaped rounds puff up dramatically during proofing and baking. As shown clearly in 1000006153.jpg, the dough bakes into uniform, deeply bronzed spheres laid out carefully on a parchment-lined baking sheet. Whether you are an experienced baker looking to refine your technique or a beginner working with enriched doughs for the very first time, this recipe offers a reliable path to artisan success.
Beyond the incredible flavor profile and soft texture, incorporating scratch-made buns into your cooking routine allows you to control the quality of what goes onto your table. Free from chemical softeners, artificial preservatives, and shelf-stable additives, this traditional recipe celebrates the beauty of whole, foundational ingredients. The physical act of kneading the dough, watching it rise, and shaping each individual roll provides a meditative connection to generations of bakers who came before. This dish honors that heritage, turning basic flour, butter, and eggs into a comforting centerpiece that elevates any meal. Let us explore the traditional elements and specific methods required to achieve the perfect rise, golden color, and seed distribution visible in 1000006153.jpg.
Essential Ingredients for Artisan Brioche Success
To replicate the incredibly soft, beautifully domed brioche buns depicted in 1000006153.jpg, selecting the right combination of high-quality ingredients is key. Because this recipe relies on rich, classic components, the quality and freshness of each element play a definitive role in building the dough’s strength, flavor, and elasticity. Gathering fresh ingredients beforehand ensures a smooth workflow and guarantees a spectacular final presentation.
The Structural Foundation: High-Quality Flour
The undisputed anchor of any great bread dough is flour, and choosing the right variety determines the ultimate texture of your finished bun. For a traditional, soft brioche that retains an excellent chew and can support a rich percentage of fat, premium unbleached bread flour or high-quality all-purpose flour is the ideal choice. These flours possess the optimal protein content necessary to develop a strong, elastic gluten network. This structural web acts as a balloon, trapping the expanding gases during fermentation and proofing, allowing the rolls to inflate beautifully into the neat rounds seen in 1000006153.jpg without collapsing.
The Rich Enrichment: Butter and Eggs
What separates brioche from standard lean doughs is the generous addition of high-quality fats. Unsalted butter, softened to room temperature, is incorporated slowly into the dough to coat the gluten strands, resulting in an extraordinarily tender, melt-in-your-mouth crumb. Whole eggs provide additional fat, moisture, and emulsifiers, helping to bind the ingredients together while imparting a beautiful, signature yellow hue to the interior crumb. Together, these elements deliver a luxurious richness that pairs beautifully with savory fillings, while contributing to the beautiful oven-spring visible in 1000006153.jpg.
The Leavening and Hydration Matrix
To achieve a light, airy crumb and an enticing, complex aroma, a reliable leavening agent is absolutely critical. Active dry yeast or instant yeast works by consuming the natural sugars present in the flour and liquid, releasing carbon dioxide gas that creates tiny pockets of air throughout the dough matrix. Warm whole milk acts as the primary hydrating agent, activating the yeast while adding subtle sugars and proteins that enhance the crust’s caramelization. A small touch of granulated sugar feeds the yeast and balances the savory elements, while fine sea salt regulates fermentation and strengthens the gluten structure.
The Decorative Crown: Egg Wash and Sesame Seeds
The final touch that defines the classic aesthetic of these artisanal rolls is the meticulous topping applied right before they enter the oven. A simple egg wash, made by whisking a whole egg with a splash of water or milk, is brushed gently over the surface of the proofed dough. This wash creates a glossy, deep amber lacquer during baking, as beautifully illustrated in 1000006153.jpg. A generous sprinkling of raw sesame seeds is then applied over the damp egg wash. As the buns bake, these seeds toast in the heat, releasing their natural oils and introducing a delicate, nutty crunch that perfectly contrasts the pillowy soft bread beneath.
Step-by-Step Guide to Kneading and Shaping Enriched Dough
Mastering the art of enriched bread requires patience and an understanding of how gluten strength is built progressively when dealing with high percentages of fat. Rushing the mixing phase or adding the butter too quickly will result in a greasy, heavy dough; following a sequential method allows the ingredients to integrate smoothly. Follow these detailed steps to craft a spectacular batch that mirrors the uniform arrangement visible in 1000006153.jpg.
Activating Yeast and Combining Ingredients
Begin by warming one cup of whole milk to roughly 105°F to 110°F, ensuring it is cozy but not hot enough to damage the yeast. In a small bowl, combine the warm milk with two and a quarter teaspoons of active dry yeast and one tablespoon of granulated sugar, stirring gently to dissolve. Let the mixture sit undisturbed for five to ten minutes until a frothy, bubbly layer develops on top. In the bowl of a stand mixer fitted with a dough hook, combine three and a half cups of flour and one and a half teaspoons of fine sea salt. Pour in the frothy yeast mixture along with two large, room-temperature eggs. Mix on low speed for three to four minutes until a cohesive, slightly sticky dough forms around the hook and clears the sides of the bowl.
Incorporating Butter and the Initial Rise
With the mixer running on medium-low speed, begin adding one stick (eight tablespoons) of softened unsalted butter, one tablespoon at a time. Ensure each piece of butter is fully absorbed into the dough before adding the next. This slow integration allows the gluten structure to accept the fat without breaking down. Once all the butter is incorporated, increase the speed to medium and knead for an additional eight to ten minutes. The dough will transform into a silky, shiny, and highly elastic mass that pulls away from the bowl cleanly. Shape the dough into a smooth ball, place it into a lightly greased bowl, cover with a damp kitchen cloth, and let it rise in a warm corner of your kitchen for one to two hours, or until it doubles in size.
Portioned Dividing and Final Shaping Technique
Once the initial rise is complete, gently punch down the center of the dough to deflate the built-up gases. Transfer the dough to a very lightly floured workspace and use a bench scraper to divide it evenly into eight to nine equal portions. To shape each portion into a perfect, taut sphere, flatten a piece of dough slightly with your palm, fold the outer edges inward toward the center, and flip the dough over so the seam faces downward. Cup your hand loosely over the dough ball and move it in a tight circular motion against the countertop, using the natural friction to pull the skin taut on top. Arrange these smooth spheres neatly onto a large baking sheet lined with premium parchment paper, spacing them evenly apart as displayed in 1000006153.jpg. Cover loosely with a cloth and let them proof for a final forty-five to sixty minutes until they look beautifully puffy.
Baking Secrets for Achieving the Ultimate Golden-Brown Crust
The striking visual appeal of the buns in 1000006153.jpg comes down to the application of the egg wash and precise heat management. Enriched doughs contain a higher level of sugars and fats, which means they brown significantly faster than lean breads. Achieving a deep, uniform coloration without burning the bottom requires a careful eye and a properly calibrated oven.
Perfecting the Egg Wash and Seeding Process
Preheat your oven to 375°F (190°C) with the baking rack positioned firmly in the center. In a small ramekin, whisk together one whole egg and one tablespoon of whole milk until completely smooth and free of streaks. Using a soft pastry brush, apply a thin, even layer of the egg wash over the top and sides of each proofed bun. Use a incredibly gentle touch to avoid deflating the delicate, airy rounds. Immediately after brushing, generously scatter raw sesame seeds over the wet surface, ensuring an even distribution across the entire dome as showcased in 1000006153.jpg. The egg wash acts as a secure culinary glue, holding the seeds in place as the bread expands rapidly in the oven.
Oven Management and Evaluating Doneness
Slide the loaded baking sheet onto the middle rack of your preheated oven. Bake for approximately fifteen to eighteen minutes. Keep a close watch through your oven window around the twelve-minute mark; if the tops are browning too rapidly due to the rich egg wash, you can loosely tent a sheet of aluminum foil over the entire pan to protect the crowns while allowing the centers to bake through completely. The buns are perfectly done when they display a deep, uniform mahogany color and sound hollow when gently tapped on the bottom, matching the professional visual standard set in 1000006153.jpg. Carefully slide the parchment paper with the hot buns onto a wire cooling rack to prevent condensation from softening the bottom crusts.
Expert Storage, Slicing, and Serving Suggestions
To ensure your handcrafted brioche rolls remain as fresh, tender, and delicious as the moment they left the heat, implementing proper handling and serving techniques is highly important. Fresh bread begins to change texture as soon as it cools, but simple storage methods can extend its premium quality for days to come.
Keeping Buns Soft and Supple
Allow the buns to cool completely to room temperature on your wire rack before storing or slicing. Cutting into a hot bun releases essential steam prematurely, which can cause the internal crumb to collapse and turn gummy. Once completely cool, the buns will retain an incredibly soft, compressible texture. If you plan to use them for burgers or artisanal sandwiches, using a sharp serrated bread knife is essential to cut through the delicate crust and airy interior cleanly without squishing the beautiful geometric dome visible in 1000006153.jpg.
Long-Term Storage and Reheating Methods
Because homemade brioche contains no artificial shelf-stable additives, it should be stored in an airtight plastic zip-top bag at room temperature, where it will remain perfectly soft and delicious for up to three days. If you wish to preserve them for an extended period, this recipe freezes exceptionally well. Place the cooled buns in a single layer inside a heavy-duty freezer bag and store securely for up to three months. To reheat, thaw at room temperature, split the buns in half, and place the interior faces down on a hot skillet with a small pat of melted butter. Toasting the interior creates a crisp, golden barrier that prevents sauces or juices from soaking into the crumb, while warming the entire roll back to its original bakery-fresh glory.
Conclusion: Celebrating the Magic of Home Enriched Baking
Baking traditional sesame brioche buns completely from scratch is a deeply satisfying culinary experience that turns basic, unpretentious pantry staples into an elegant, comforting centerpiece for any meal. By understanding the balance of gluten elasticity, progressive butter integration, and high-heat caramelization, you can consistently achieve the magnificent rise, distinct deep color, and beautiful seed distribution illustrated in 1000006153.jpg. It is a foolproof recipe that rewards a patient touch, fills your home with a rich, buttery scent, and delivers a wholesome, versatile roll that your family will absolutely love. Bring these classic techniques into your kitchen today, and enjoy the authentic taste of freshly baked, artisan home cooking.