The Ultimate Decadent Homemade Chocolate Bundt Cake Recipe
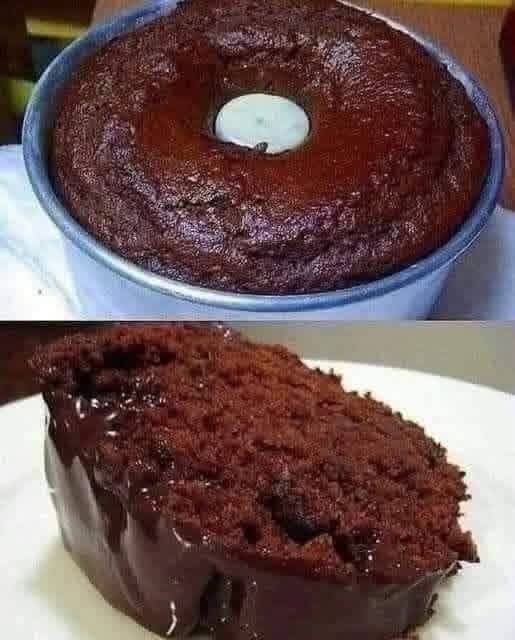
Few desserts carry the same universal appeal and nostalgic charm as a perfectly baked homemade chocolate cake. When looking for a dessert that balances visual elegance with deep, comforting flavor, a rustic chocolate ring cake stands out as an exceptional choice. Unlike complex layered cakes that require hours of meticulous assembly and delicate frosting work, a traditional ring or bundt cake relies on its beautiful silhouette and internal moisture to make an impression. As clearly illustrated in the stunning visual reference 1000006147.jpg, this style of baking yields a deeply colored, beautifully risen crumb with a rustic top that sets the stage for a luxurious finish. Paired with a smooth, glossy chocolate glaze that pools beautifully along the curved sides, this recipe is designed to satisfy the most intense sweet cravings while celebrating the joy of baking completely from scratch.
What makes a traditional chocolate ring cake so special is its incredible texture and rich aromatic depth. The design of a tube or bundt pan ensures that heat is distributed evenly throughout the batter, allowing the center to bake through perfectly without drying out the exterior edges. This results in an incredibly tender, soft crumb structure that holds its shape beautifully when sliced, as demonstrated in the detailed cross-section shown in 1000006147.jpg. By combining high-quality cocoa powder with specific hydrating agents, you create a cake that remains moist and delicious for days. Whether you are hosting a festive weekend gathering, celebrating a special family milestone, or simply looking to elevate your afternoon coffee routine, mastering this classic recipe provides a foolproof addition to your home baking collection.
Beyond the incredible flavor profile, preparing a scratch-made cake allows you to focus entirely on high-quality, whole ingredients, avoiding the chemical stabilizers and artificial preservatives found in commercial boxed mixes. This recipe leans into traditional baking heritage, relying on simple pantry staples to achieve a professional-grade finish that feels both comforting and luxurious. The process of whisking the dry ingredients, creaming the base, and watching the glaze cascade down the freshly baked surface is a deeply rewarding culinary ritual. Let us explore the essential ingredients, science-backed methods, and step-by-step techniques required to achieve the perfect rise, deep color, and luxurious texture visible in 1000006147.jpg.
Essential Ingredients for the Perfect Chocolate Ring Cake
To replicate the moist, tender crumb and rich, glossy coating depicted in 1000006147.jpg, selecting the right combination of high-quality ingredients is crucial. Baking is a precise science, and each component plays a definitive role in balancing structural integrity, moisture, and flavor development. Gathering the correct items beforehand ensures a seamless workflow and guarantees a spectacular final presentation.
The Structural Foundation: All-Purpose Flour and Sugars
The structural backbone of this cake relies on high-quality all-purpose flour, which provides just enough gluten structure to support the rise without making the crumb heavy or dense. To complement the flour and add essential moisture, a combination of granulated white sugar and light brown sugar is utilized. While white sugar aids in the creaming process and helps create a fine, uniform crumb, brown sugar introduces natural molasses notes and a gentle acidity. This acidity works in perfect harmony with the leavening agents, ensuring a spectacular, even rise within the tube pan, as seen in the top portion of 1000006147.jpg.
The Cocoa Foundation: Choosing Quality Chocolate
The intense chocolate flavor and dramatic dark color of this cake come down to the selection of your cocoa powder. For this traditional recipe, a premium unsweetened natural cocoa powder or a Dutch-processed variety is highly recommended. Dutch-processed cocoa has been treated with an alkalizing agent to reduce its natural acidity, resulting in a smoother, mellower flavor profile and a deep, dark ebony hue. Natural cocoa powder offers a slightly more vibrant, fruitier chocolate punch. Whichever variety you choose, sifting the cocoa powder with your flour is a crucial step to eliminate any stubborn lumps and ensure an entirely smooth, uniform batter.
The Hydration and Crumb Enhancers: Fats and Liquids
To achieve the luxurious, melt-in-your-mouth interior texture highlighted in the sliced portion of 1000006147.jpg, a thoughtful blend of fats and liquids is required. Unsalted butter provides a classic, rich flavor base, while a small addition of neutral vegetable oil ensures the cake remains incredibly moist even after cooling. For the liquid element, incorporating room-temperature buttermilk or sour cream introduces a mild tanginess and tenderizes the gluten strands, resulting in an exceptionally soft crumb. Finally, adding a cup of hot brewed coffee or boiling water to the final batter dissolves the cocoa powder completely, blooming the chocolate notes to their absolute maximum potential without leaving any coffee taste behind.
The Glossy Finish: Ingredients for the Chocolate Glaze
A rustic ring cake is truly complete only when crowned with a spectacular, glossy chocolate coating. As shown in 1000006147.jpg, a traditional chocolate ganache or rich glaze coats the exterior beautifully, creating a stunning contrast with the airy cake interior. To prepare this finishing touch, you will need high-quality semi-sweet or dark chocolate chips, heavy whipping cream, and a touch of light corn syrup or butter to provide that mirror-like sheen. This glaze acts as a protective barrier, sealing in the cake’s internal moisture while delivering a concentrated burst of luxurious chocolate flavor with every bite.
Step-by-Step Baking Guide for Culinary Success
Achieving the perfect rise and texture requires a careful sequential process that protects the air pockets within the batter while ensuring all ingredients are thoroughly integrated. Grab your favorite ring or tube pan, preheat your oven to 350°F (175°C), and follow these detailed steps to create a beautiful dessert that mirrors the exceptional quality seen in 1000006147.jpg.
Preparing the Pan and Mixing Dry Ingredients
Before mixing your batter, proper pan preparation is absolutely critical to ensure your ring cake releases cleanly without sticking. Generously coat the interior of your tube pan with softened butter or non-stick baking spray, making sure to reach every curve and the center core. Dust the greased surface with a thin layer of cocoa powder rather than flour, which prevents an unsightly white residue on the exterior of your dark chocolate cake. In a large mixing bowl, sift together two cups of all-purpose flour, one-half cup of cocoa powder, one and a half teaspoons of baking powder, one and a half teaspoons of baking soda, and one teaspoon of fine sea salt, whisking thoroughly to distribute the leavening agents evenly.
Creaming the Base and Integrating the Batter
In a separate large bowl or the bowl of a stand mixer fitted with the paddle attachment, beat one stick of softened unsalted butter with one cup of granulated sugar and one-half cup of packed brown sugar until the mixture is light, fluffy, and pale in color. Add two large, room-temperature eggs one at a time, beating thoroughly after each addition to ensure proper emulsification. Stir in two teaspoons of pure vanilla extract. Next, alternate adding your dry ingredient mixture and one cup of room-temperature buttermilk into the creamed base, starting and ending with the dry ingredients. Mix on low speed just until combined, taking care not to overmix, which could develop too much gluten and make the cake tough. Slowly stream in one cup of hot brewed coffee or hot water, stirring gently by hand until the batter is completely smooth and liquid.
Baking to Perfection and Cooling
Pour the smooth, glossy chocolate batter into your prepared ring pan, smoothing the top surface with a spatula. Place the pan on the center rack of your preheated oven and bake for approximately forty-five to fifty-five minutes. To check for doneness, insert a long wooden skewer into the thickest part of the cake; it should come out clean or with a few moist crumbs attached, exactly like the perfectly baked structure visible in the top image of 1000006147.jpg. Remove the pan from the oven and place it on a wire cooling rack for exactly ten to fifteen minutes. Run a thin knife gently around the outer edges and the center core, then carefully invert the cake onto your serving platter, allowing it to cool completely to room temperature before applying the glaze.
Crafting and Applying the Luxurious Chocolate Glaze
The hallmark of an exceptional homemade chocolate ring cake is the velvety, cascading glaze that flows smoothly over its contours. Applying the glaze correctly requires the cake to be completely cool, preventing the warm coating from soaking directly into the crumb or sliding off the edges entirely. Follow these simple steps to achieve the picture-perfect finish seen in 1000006147.jpg.
Preparing the Ganache Coating
To create the sleek, professional-looking glaze shown in the lower portion of 1000006147.jpg, place four ounces of finely chopped high-quality dark chocolate into a heatproof bowl. In a small saucepan, heat one-half cup of heavy whipping cream over medium heat just until it begins to gently simmer around the edges; do not allow it to come to a rolling boil. Pour the hot cream directly over the chopped chocolate and let it sit undisturbed for three minutes to allow the heat to melt the chocolate evenly. Using a spatula or small whisk, stir the mixture slowly from the center outward until a smooth, glossy, and completely uniform emulsion forms. Stir in one tablespoon of softened butter or light corn syrup to add a spectacular, mirror-like sheen.
Mastering the Perfect Pouring Technique
Once your chocolate glaze has cooled slightly and thickened to a rich, pourable consistency, it is time to dress your cake. Slowly pour the warm glaze directly over the top crown of the cooled ring cake, allowing it to cascade naturally down the inner and outer curved walls. You can use the back of a spoon to gently guide the glaze, creating beautiful, thick drips along the sides, just like the decadent finish highlighted in 1000006147.jpg. Allow the glaze to set at room temperature for about twenty minutes before slicing, which ensures clean, sharp cuts that beautifully showcase the contrast between the dark, glossy exterior coating and the soft, aerated interior crumb.
Expert Storage, Slicing, and Serving Tips
To ensure every slice of your chocolate masterpiece tastes just as spectacular as the day it was baked, proper handling and storage techniques are highly important. Cake is a delicate balance of moisture and air, and simple adjustments can preserve its premium quality for extended enjoyment.
Optimal Storage for Lasting Freshness
Because of the high moisture content provided by the buttermilk and sugars, this chocolate ring cake stores beautifully without drying out. Keep the cake at room temperature under a glass cake dome or loosely covered with plastic wrap for up to three days. The chocolate glaze acts as a natural seal, keeping the inner crumb wonderfully tender, as seen in the slice of 1000006147.jpg. If you need to store it for a longer period, place the cake in an airtight container in the refrigerator for up to one week. When serving from the refrigerator, always allow individual slices to sit at room temperature for fifteen to twenty minutes before eating to let the butter soften, unlocking the full depth of the chocolate flavor.
Slicing Technique for the Perfect Presentation
To achieve the clean, restaurant-quality slice shown in 1000006147.jpg, the choice of tool and technique makes a significant difference. Use a long, sharp, non-serrated chef’s knife to cut through the glaze and crumb cleanly. Before making each slice, dip the knife blade into a tall container of hot water, then wipe it completely dry with a clean kitchen towel. The warmth of the metal blade glides through the glossy chocolate glaze effortlessly, preventing it from sticking or smearing across the beautiful, delicate interior crumb structure of the cake.
Conclusion: Celebrating the Joy of Scratch-Made Baking
Baking a decadent chocolate ring cake from scratch is a deeply satisfying culinary experience that brings timeless warmth and joy to any kitchen. By utilizing simple, high-quality pantry staples and following a careful, sequential method, you can consistently achieve the spectacular rise, tender crumb, and glossy finish illustrated in 1000006147.jpg. It is a foolproof dessert that honors traditional baking principles while delivering a rich, chocolate-forward experience that looks entirely elegant on a serving platter. Bring these classic techniques into your home today, and share a beautifully crafted, deeply comforting slice of homemade luxury with the people you love.