Master Golden Savory Roll Ups The Complete Guide to Pillowy Flaky Pastry Stuffed with Savory Beef
Few aromas from the kitchen can match the comforting smell of freshly baked dough rising in a hot oven. Whether you are prepping for a festive family gathering, updating your weekend brunch rotation, or looking to add a special touch to your meal planning, a batch of warm savory rolls is a guaranteed crowd-pleaser. While sweet pastries often dominate the bakery counter, savory filled roll-ups combine the comforting flake of a tender dough with a rich, savory filling to provide complete culinary satisfaction.
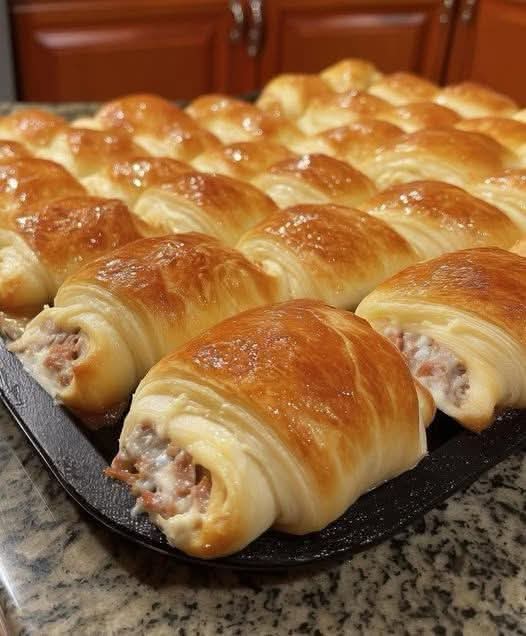
As beautifully showcased in the image 1000006137.jpg, these golden savory roll ups bake together on a large tray into a stunning display of uniform, pillowy pastries. Each roll features a deeply caramelized, glistening golden-brown top crust that gives way to soft, visible layers of laminated dough. Peeking from the open ends of each roll-up is a generous, succulent stuffing of seasoned minced beef combined with a creamy melted binder, creating a beautiful contrast between the crisp pastry exterior and the juicy savory core.
This comprehensive guide walks you through every step required to replicate these professional-bakery results in your home kitchen. From the underlying food science of achieving a laminated rise to essential yeast and flour mastery, we provide a reliable, step-by-step recipe, expert shaping secrets, and proper storage strategies to ensure your savory rolls turn out perfectly soft, flaky, and delicious every single time.
The Science of Lamination: Achieving Flaky Layers and a Pillowy Rise
The magnificent volume and distinct structural layers visible in the pastries within 1000006137.jpg are not accidental; they are the direct result of basic food science principles at work. This recipe utilizes a simplified laminated yeast dough technique, which combines the light, airy lift of a traditional yeast fermentation with the flaky layers of a classic puff pastry.
When you roll out a yeast dough and fold it over thin layers of cold solid fat, such as high-fat butter or solid shortening, you create hundreds of alternating micro-layers of dough and fat. As the tray slides into the intense heat of a preheated oven, two scientific phenomena occur simultaneously:
- Steam Expansion: The water naturally trapped within the fat layers reaches its boiling point and rapidly converts into steam. This steam expands with significant physical force, pushing the upper layers of dough upward and creating distinct gaps before the fat fully melts into the surrounding starch matrix.
- Yeast Activation and Protein Set: The heat causes the trapped carbon dioxide bubbles generated during yeast fermentation to expand to their absolute maximum volume. As the internal temperature continues to climb, the gluten proteins and starches in the flour coagulate and set permanently, trapping those delicate air pockets and creating a wonderfully light, pillowy, and tender crumb structure.
Flour and Yeast Mastery: The Foundation of Structure
To build a dough capable of stretching thinly around a heavy meat filling without tearing or collapsing, you must select your foundational ingredients with precision:
- The Power of Unbleached Bread Flour: While all-purpose flour can work in a pinch, unbleached bread flour is highly recommended for savory rolls. Bread flour contains a significantly higher protein content (typically 12% to 14%) than standard flour. When mixed with liquid and kneaded, these proteins develop a dense, highly elastic gluten network that provides the superior structural elasticity required to hold deep layers of steam and heavy fillings.
- Yeast Activation Secrets: This recipe uses active dry yeast, which requires proper rehydration before mixing. Always bloom your yeast in warm liquid precisely between 105°F and 115°F (40°C to 46°C). Liquid that is too cold will fail to wake the yeast from its dormant state, while liquid hotter than 120°F (49°C) will instantly kill the living yeast cells, resulting in a flat, dense pastry. Adding a small pinch of sugar to the warm liquid provides immediate food for the yeast, causing it to produce a thick, frothy foam within 5 to 10 minutes, which confirms your yeast is alive and ready to perform.
Deconstructing the Premium Savory Filling
Because the pastry dough is naturally rich and buttery, the filling needs to be deeply savory, perfectly seasoned, and properly balanced in texture to ensure the finished roll ups are neither dry nor excessively greasy.
Selecting and Browning the Minced Beef
For the ultimate juicy bite, select a high-quality minced beef with an 80/20 lean-to-fat ratio. While ultra-lean beef might seem like a healthier alternative, the natural fats present in an 80/20 blend are essential to keep the meat incredibly tender and succulent during the intense double-cooking process (first browning in the skillet, then baking inside the dough).
When browning your minced beef in a hot skillet, break it apart aggressively with a wooden spoon into tiny, uniform crumbles, mirroring the fine texture visible in the ends of the rolls in 1000006137.jpg. Once the beef is fully cooked and deeply browned, pour the contents of the skillet into a fine-mesh strainer or onto a plate lined with paper towels to drain off all excess rendered grease. Leaving too much liquid fat in the meat will compromise the raw dough, melting into the bottom layers during baking and resulting in a soggy, heavy pastry bottom.
The Creamy Melted Binder and Aromatic Seasonings
To keep the fine crumbles of beef securely inside the pastry rolls during slicing, shaping, and eating, a creamy binder is absolutely essential. Mixing a small amount of low-moisture cream cheese or a velvety Béchamel sauce directly into the warm browned beef binds the meat together into a cohesive, spreadable paste.
Enhancing this meat base with a robust blend of finely grated yellow onions, minced garlic, sea salt, cracked black pepper, and a touch of onion powder creates a deep savory complexity. The natural sugars in the grated onion caramelize alongside the beef, cutting through the buttery richness of the dough and ensuring a satisfying, well-rounded flavor profile in every single bite.
Complete Recipe: Golden Savory Beef Roll Ups
This reliable, professional-grade recipe yields approximately 20 to 24 uniform savory rolls, perfectly sized to fill a standard half-sheet baking pan as showcased in 1000006137.jpg.
Essential Kitchen Equipment
- Large mixing bowl and a sturdy wooden spoon (or a stand mixer fitted with a dough hook)
- Large skillet for preparing the beef filling
- A long rolling pin and a large, clean work surface
- A sharp chef’s knife or a rolling pizza cutter
- A large rimmed baking sheet (half-sheet pan)
- A pastry brush for applying the egg wash
Ingredients List
For the Pillowy Laminated Dough:
- 4 cups unbleached bread flour (plus extra for dusting)
- 1 packet (2 1/4 teaspoons) active dry yeast
- 1 cup whole milk, warmed to 110°F (43°C)
- 1/4 cup warm water, warmed to 110°F (43°C)
- 1/4 cup granulated sugar (divided)
- 1 large egg, room temperature
- 1/2 cup (1 stick) unsalted butter, softened to room temperature (for the dough)
- 1/2 cup (1 stick) unsalted butter, chilled (for rolling and laminating)
- 1 teaspoon fine sea salt
For the Succulent Savory Beef Filling: - 1 pound minced beef (80/20 blend)
- 1 small yellow onion, very finely grated or minced
- 2 cloves garlic, minced
- 4 ounces low-moisture cream cheese, softened
- 1/2 cup shredded mozzarella or mild cheddar cheese
- 1 teaspoon fine sea salt
- 1/2 teaspoon freshly cracked black pepper
- 1/2 teaspoon garlic powder
For the Ultimate Glistening Finish: - 1 large egg yolk
- 1 tablespoon whole milk or heavy cream
Step-by-Step Preparation and Baking Instructions
1. Bloom the Yeast: In a small bowl, combine the 1/4 cup of warm water, 1 tablespoon of the granulated sugar, and the yeast. Stir gently and let it sit undisturbed for 5 to 10 minutes until a thick, frothy layer of foam forms across the surface.
2. Knead the Dough Base: In a large mixing bowl or the bowl of your stand mixer, combine the bread flour, remaining sugar, and sea salt. Pour in the frothy yeast mixture, the warm whole milk, the single large egg, and the 1/2 cup of softened room-temperature butter. Stir until a shaggy dough forms. Using your stand mixer dough hook or your hands on a lightly floured surface, knead the dough vigorously for 8 to 10 minutes. The dough is ready when it transitions into a perfectly smooth, silky, elastic ball that springs back instantly when pressed with a finger. Place the dough in a greased bowl, cover with a damp cloth, and let rise in a warm spot for 1 hour until doubled in size.
3. Prepare the Beef Filling: While the dough rises, place your minced beef and finely grated onions into a large skillet over medium-high heat. Cook for 6 to 8 minutes, breaking the meat into fine crumbles, until no pink remains. Add the minced garlic and cook for 1 additional minute until fragrant. Pour the meat into a fine strainer to drain away all excess fat completely. Return the hot drained meat to the warm skillet, turn off the heat, and stir in the sea salt, black pepper, garlic powder, softened cream cheese, and shredded mozzarella. Stir continuously until the cheeses melt completely, transforming the beef into a thick, uniform, cohesive savory filling. Let the filling cool completely down to room temperature before proceeding.
4. Laminate and Roll the Dough: Punch down your risen dough to release excess gas. On a lightly floured surface, use your rolling pin to roll the dough out into a large rectangle roughly 1/2-inch thick. Take your half-cup of chilled butter and grate it evenly across two-thirds of the dough’s surface. Fold the un-buttered third of the dough over the middle third, then fold the remaining buttered third on top (like folding a business letter). Turn the dough 90 degrees, roll it back out into a large rectangle, and repeat the folding process one more time without adding extra butter. Wrap the folded dough securely in plastic wrap and chill it in the refrigerator for 20 minutes to firm up the internal butter layers.
5. Stuff and Shape the Roll Ups: Remove the chilled dough from the refrigerator and slice it in half. Work with one half at a time, keeping the other half chilled. Roll the dough out into a long, thin rectangle roughly 1/4-inch thick. Using a sharp chef’s knife or a pizza cutter, cut the dough into uniform long strips or triangles roughly 3 inches wide. Place a generous tablespoon of the cooled savory beef filling at one end of a strip. Carefully roll the dough snugly around the meat filling, working from one end to the other to form a compact, multi-layered roll-up, ensuring the open ends show the beautiful meat stuffing just like the rolls in 1000006137.jpg.
6. The Final Rise: Place the shaped roll-ups onto a large, generously greased rimmed baking sheet. Arrange them in neat parallel rows, leaving roughly 1/2 inch of space between each roll. Because they expand significantly as they bake, arranging them tightly allows them to bake together gently into a beautiful pull-apart cohesive tray, as seen in 1000006137.jpg. Cover the tray loosely with a clean kitchen towel and let them rise a final time for 20 to 30 minutes until puffed and pillowy. Preheat your oven to 375°F (190°C).
7. Apply the Golden Egg Wash: In a small prep bowl, whisk together the single egg yolk and 1 tablespoon of milk or heavy cream. Using your pastry brush, gently paint a thin, even coat of the egg wash across the top and sides of each risen roll-up. Do not skip this step; the proteins and fats in the egg yolk caramelize rapidly under the oven’s dry heat, producing that signature brilliant, glistening deep-golden crust visible in 1000006137.jpg.
8. Bake to Perfection: Slide the tray onto the center rack of your preheated oven. Bake for 22 to 25 minutes. Keep a close watch during the final 3 minutes of baking. The savory roll ups are fully cooked when they have expanded into a uniform network of pull-apart pastries, the tops are a stunning deep golden-brown, and the savory beef filling at the ends is bubbling gently. Remove from the oven and let them cool on the hot tray for 10 minutes before serving.
Nutritional Profiles and Satiety Factors
These savory beef roll ups provide a highly satisfying, energy-dense option that delivers exceptional fullness and sustained physical fuel.
High-Quality Complete Proteins
Minced beef serves as an exceptional source of complete biological protein, offering all nine essential amino acids required for cellular repair, immune maintenance, and muscle synthesis. Combining this high-quality meat with the protein structures found within the unbleached bread flour and whole milk creates a nutrient-dense pastry that delivers an immediate feeling of fullness, making it an excellent option for fueling long, active days.
Essential Micronutrients and Minerals
In addition to macronutrient satiety, a single serving of these savory roll ups provides a rich array of vital micronutrients. Minced beef is naturally packed with highly bioavailable heme iron, which is essential for healthy oxygen transport throughout the bloodstream, as well as significant stores of zinc and B-complex vitamins (especially Vitamin B12), which support nervous system function and cellular energy metabolism.
Pro-Tips for Advanced Baker Customizations
Once you have mastered the foundational technique of laminating the yeast dough and rolling the beef filling, you can easily alter the components to create exciting new flavor variations.
The Zesty Mediterranean Variation
Transform the flavor profile by swapping out the minced beef for ground lean lamb or shredded chicken. Omit the cream cheese and bind the meat with a combination of crumbled feta cheese, finely chopped sun-dried tomatoes, minced kalamata olives, and a generous sprinkle of dried wild oregano. This variation offers a bright, tangy, and herbaceous bite that pairs beautifully with a hot cup of mint tea.
The Spicy Tex-Mex Twist
Give your savory roll ups a bold, warming kick by adding a tablespoon of taco seasoning, a small can of drained fire-roasted green chilies, and a handful of sweet corn kernels directly into the minced beef while browning. Replace the mozzarella with a spicy, shredded Pepper Jack cheese, and serve the baked roll ups warm alongside fresh salsa and avocado sour cream for dipping.
Streamlined Storage, Freezing, and Reheating Strategy
Because this recipe makes a large, generous batch of pastries, knowing how to store, freeze, and reheat your leftovers properly is the absolute key to enjoying that fresh-baked, pillowy texture days or even weeks later.
Proper Refrigeration Practices
Allow any leftover savory roll ups to cool down completely to room temperature on a wire rack or clean counter. Storing hot pastries inside a closed container traps steam, causing condensation to form on the lid which will drip down and turn your beautifully flaky, laminated crust soggy. Once cooled, place the rolls in a single layer inside an airtight glass container or a heavy-duty storage bag. Stored properly in the refrigerator, they will remain exceptionally fresh, moist, and safe to consume for up to 3 to 4 days.
Advanced Freezing and Meal-Prep Instructions
These savory beef roll ups are incredibly freezer-friendly, allowing you to stock your freezer with homemade, ready-to-bake or ready-to-eat comfort food:
- Freezing Fully Baked Rolls: Let the baked rolls cool completely. Place them in a single layer on a clean baking sheet and freeze for 1 hour until solid. Transfer them into a heavy-duty freezer bag, press out all excess air, and freeze for up to 2 months. Thaw in the refrigerator overnight before reheating.
- Freezing Raw, Shaped Rolls: Shape the rolls completely and place them on a parchment-lined tray before the final rise. Freeze them immediately until solid, then store them in a freezer bag for up to 1 month. When ready to bake, place them on a greased tray, let them thaw and rise at room temperature for 1.5 to 2 hours, then brush with egg wash and bake as directed.
The Best Ways to Reheat Pastries
To bring your refrigerated roll ups back to life without losing their signature flaky exterior or making the inner dough rubbery, avoid aggressive reheating methods:
- The Oven or Toaster Oven Method (Highly Recommended): Place your savory roll ups on a baking sheet, cover them loosely with a small piece of aluminum foil to prevent the tops from over-browning, and warm them in a preheated oven at 350°F (175°C) for 8 to 10 minutes. This rapidly re-melts the fats within the laminated layers, restoring the crisp outer crunch and pillowy interior beautifully.
- The Fast Air Fryer Method: Place the refrigerated roll ups directly into your air fryer basket at 320°F (160°C) for 3 to 4 minutes. The circulating hot air crisps the exterior instantly while heating the savory beef core uniformly, providing a perfect on-the-go snack.
Conclusion
The beautifully aligned, glistening pastries showcased in 1000006137.jpg demonstrate that crafting bakery-quality savory comfort food at home is entirely achievable with the right techniques. By pairing a simplified laminated yeast dough with a succulent, perfectly bound minced beef filling, you create an elegant savory roll up that perfectly balances textures and rich flavors.
Whether pulled apart warm straight from the oven baking tray on a cozy Sunday morning or pulled from the freezer for a quick, satisfying weekday lunch, these rolls offer a wholesome, home-cooked alternative to processed store-bought snacks. Master this simple baking technique, treat your kitchen to the incredible aroma of fresh bread, and fuel your family with the comforting nourishment they deserve.