The Ultimate Homemade Orange Jelly Slices Recipe Classic Vintage Candy
Few confections evoke the immediate sense of sweet nostalgia as a bowl of classic orange jelly slices. With their vibrant mandarin-orange hue, sugar-dusted exterior, and distinctly soft, chewy center, these retro treats have held a special place in candy jars for generations. They balance a bright, citrusy tang with an old-school sugary finish that melts delightfully on the tongue.
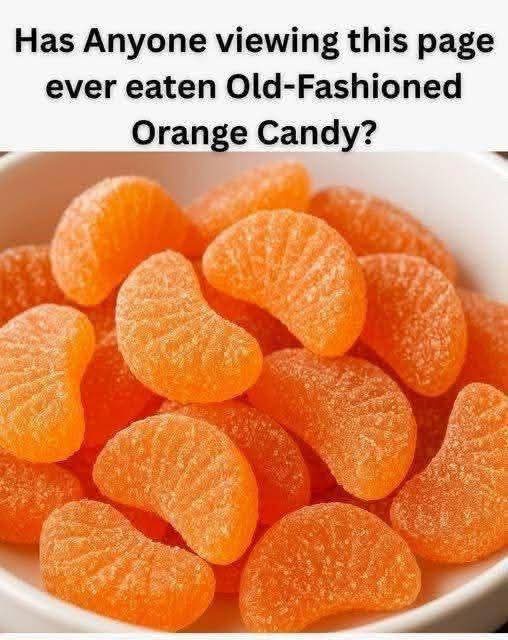
If you have ever come across online forums asking “Has Anyone viewing this page ever eaten Old-Fashioned Orange Candy?”, as highlighted by the text in 1000006059.jpg, you know that this vintage dessert still triggers incredible memories. While store-bought versions are often packed with artificial preservatives, high-fructose corn syrup, and synthetic food dyes, making them from scratch using real citrus extracts changes everything. In this comprehensive recipe guide, we will break down the precise confectionery techniques needed to make professional, vintage-style orange jelly wedges that look exactly like the beautiful bowl featured in 1000006059.jpg.
Why Making Old-Fashioned Jelly Candy at Home Works
The key to achieving the perfect, semi-translucent structure and signature gummy bounce shown in 1000006059.jpg lies in understanding the setting agent and managing the sugar syrup temperature. Many amateur candy makers end up with jelly slices that are either unpleasantly rubbery or far too runny to hold their shape once sliced. This recipe overcomes those issues by using a carefully measured gelatin-to-liquid ratio, combined with a touch of corn syrup to naturally prevent unwanted sugar crystallization.
Furthermore, by blooming our gelling agent properly and simmering the citrus base to a specific, controlled temperature, we build a stable protein matrix. This matrix traps moisture perfectly, creating a jelly candy that is structurally firm enough to be sliced into elegant, realistic citrus wedges while retaining that soft, cloud-like chew. Rolling the finished pieces in granulated sugar right at the end doesn’t just replicate the vintage aesthetic; it forms an essential dry barrier that keeps the candies from sticking together in storage.
Essential Ingredients for Vintage Confectionery
To create a batch of vibrant candies that mirror the bright color and sugary dusting visible in 1000006059.jpg, you need a few fundamental baking and confectionery staples.
- Fresh Orange Juice and Zest: Provides the authentic, bright citrus flavor baseline. Squeezing fresh oranges ensures a lively acidity that artificial flavorings simply cannot replicate.
- Natural Orange Extract: Intensifies the citrus aroma, cutting through the sweetness of the sugar to mimic traditional candy-shop varieties.
- Unflavored Gelatin Powder: The structural anchor of the recipe, responsible for giving the candy its traditional, soft, chewy bounce.
- Granulated Sugar: Used inside the jelly mixture to sweeten and structure the candy, and extra is used for coating the outside of the finished slices.
- Light Corn Syrup: A crucial component in vintage candy making. It acts as an interfering agent, ensuring the sugar syrup stays completely smooth and glossy without turning grainy or crystalline.
- Citric Acid: Adds a sharp, sour tang that balances the heavy sweetness, making the orange flavor pop.
- Natural Yellow and Red Food Colorings (Optional): A couple of drops of natural coloring help achieve that rich, iconic neon-orange look beautifully captured in 1000006059.jpg.
Step-by-Step Production Guide
Creating homemade jelly candy is an precise, highly rewarding process. Follow these step-by-step instructions to bloom, simmer, set, and coat your vintage confections cleanly.
Blooming the Gelatin and Prepping the Base
Begin by blooming your gelling agent, which ensures a smooth, lump-free dissolve. In a medium glass bowl, pour a half-cup of cold water or strained, fresh orange juice. Sprinkle your unflavored gelatin powder evenly over the surface of the liquid. Let it sit undisturbed at room temperature for 5 to 10 minutes. The powder will gradually absorb the moisture, expanding into a thick, wrinkled, sponge-like consistency.
While the gelatin is blooming, prepare your molds. To create realistic slices like those in 1000006059.jpg, you can use specialized crescent-shaped silicone candy molds. Alternatively, line a standard 8×8-inch metal baking pan with parchment paper, leaving a generous overhang on the sides, and lightly grease the paper with a flavorless vegetable oil spray.
Simmering the Hot Sugar Emulsion
In a heavy-bottomed stainless steel saucepan, combine your granulated sugar, light corn syrup, and another half-cup of fresh orange juice. Set the pan over medium heat and stir continuously with a heatproof silicone spatula until the sugar crystals are completely dissolved. Stop stirring once the mixture begins to boil.
Attach a digital candy thermometer to the side of your pan, ensuring the bulb sits in the center of the liquid without touching the hot metal bottom. Let the syrup boil undisturbed until it reaches approximately 220°F to 225°F (104°C to 107°C)—just below the traditional thread stage. Remove the pan from the heat immediately. Gently whisk in your bloomed gelatin sponge, stirring smoothly until it has completely melted into the hot syrup. Stir in the natural orange extract, fresh orange zest, citric acid, and food coloring until the liquid turns a clear, uniform, vibrant orange.
Setting, Slicing, and Sugar-Dusting
Pour the hot liquid mixture carefully into your prepared pan or silicone molds. If using a square pan, pour it to a depth of roughly a half-inch to mimic the thickness of the wedges in 1000006059.jpg. Use a spoon to quickly skim off any white foam or air bubbles floating on the surface to ensure crystal-clear candies. Let the pan cool to room temperature, then transfer it to the refrigerator to chill and set firmly for at least 4 to 6 hours, or ideally overnight.
Once completely firm, dust your cutting board with a thin layer of granulated sugar. Lift the set jelly block out of the pan using the parchment paper handles and flip it onto the sugared board. Slice the jelly into thin strips, and then cut those strips into small, realistic half-moon crescent wedges.
Fill a shallow bowl with extra granulated sugar. Drop each orange wedge into the sugar, tossing it gently with your fingers to ensure every side is entirely coated in a sparkling, sweet jacket, exactly like the presentation shown in 1000006059.jpg. Place the coated candies on a wire rack at room temperature for 1 to 2 hours to let the sugar shell dry and cure completely.
Creative Presentation and Storage Dynamics
Arrange your finished old-fashioned orange jelly slices overlapping neatly inside a clean ceramic or clear glass serving bowl to highlight their brilliant colors, mimicking the iconic presentation layout seen in 1000006059.jpg. These candies make a spectacular addition to vintage-themed dessert tables, holiday gift tins, or afternoon tea spreads.
Because homemade jellies do not contain heavy commercial chemical stabilizers, they must be stored properly to retain their dry, sugary crunch. Place the cured candies inside a clean, airtight container, separating any stacked layers with a sheet of wax paper or parchment paper to prevent them from fusing together. Store the container in a cool, dry pantry or cupboard away from direct sunlight and heat sources; they will stay fresh, chewy, and intensely flavorful for up to 2 to 3 weeks. Avoid storing them in the refrigerator after coating, as the ambient humidity inside the fridge can cause the outer sugar dusting to dissolve into a sticky syrup.
Troubleshooting Common Candy Pitfalls
- Managing Sticky or Melting Sugar Coats: If your sugar coating turns wet, sticky, or liquefies a day after making the candy, your environment is likely too humid, or the jelly slices didn’t dry long enough before being packed away. Always let the sliced candies air-cure on a rack in a dry room before storing, and consider tossing them in a tiny pinch of cornstarch mixed with the sugar to help absorb stray atmospheric moisture.
- Correcting a Tough or Rubbery Texture: If your orange slices turn out unpleasantly stiff or hard to chew, the sugar syrup was likely boiled to a temperature that was too high, or too much gelatin was added. Make sure to use an accurate candy thermometer and remove the pot from the burner the moment it reaches the target temperature to keep the core texture incredibly soft and tender.
- Preventing Lumps in the Jelly: If you notice small, rubbery threads or lumps inside your finished candy, the gelatin wasn’t fully bloomed or was added to a syrup that had cooled down too much. Always ensure the gelatin sits in cold liquid until fully expanded, and whisk it immediately into the hot sugar syrup while it is fresh off the stove so it melts smoothly and distributes evenly.
Frequently Asked Questions
Can I use this recipe to make other citrus flavors?
Absolutely. This vintage confectionery recipe is incredibly adaptable. You can easily substitute the fresh orange juice and extract with fresh lemon juice and lemon extract to create bright yellow lemon slices, or use lime juice for a vibrant green key-lime variation. Combining different colors and flavors together inside a single serving bowl creates a visually stunning, multi-colored display that captures the ultimate old-school candy shop aesthetic.
Why do old-fashioned recipes use corn syrup?
Corn syrup consists primarily of glucose, which behaves differently under heat than standard table sugar (sucrose). When sucrose is boiled with water, the sugar molecules naturally want to lock back together into tight, gritty crystals as they cool down. Adding a small amount of corn syrup physically blocks these sucrose molecules from binding together, guaranteeing that your hot candy mixture cools down into an incredibly smooth, clear, and uniform jelly matrix without any crunchy, grainy patches.
Conclusion: Honoring the Art of Vintage Candy Making
Old-fashioned orange jelly slices are a timeless testament to the beauty of classic confectionery. By relying on simple kitchen tools and understanding basic sugar chemistry, you can easily bypass processed, store-bought sweets and create a superior homemade version. These candies deliver a burst of authentic, sun-ripened citrus flavor balanced by a soft, comforting chew that respects the heritage of traditional candy-making methods.
When you look past the modern convenience of manufactured sweets and take the time to craft your own treats, you create something far more valuable than a simple dessert. Packing a glass jar full of these glittering, sugar-dusted gems—just like the iconic display illustrated in 1000006059.jpg—is a wonderful way to preserve sweet culinary traditions, surprise loved ones with a thoughtful handmade gift, and enjoy a genuine taste of old-school nostalgia right from your own kitchen.