The Fine Art of Traditional Southern Butter Biscuits A Masterclass in Scratch Baking
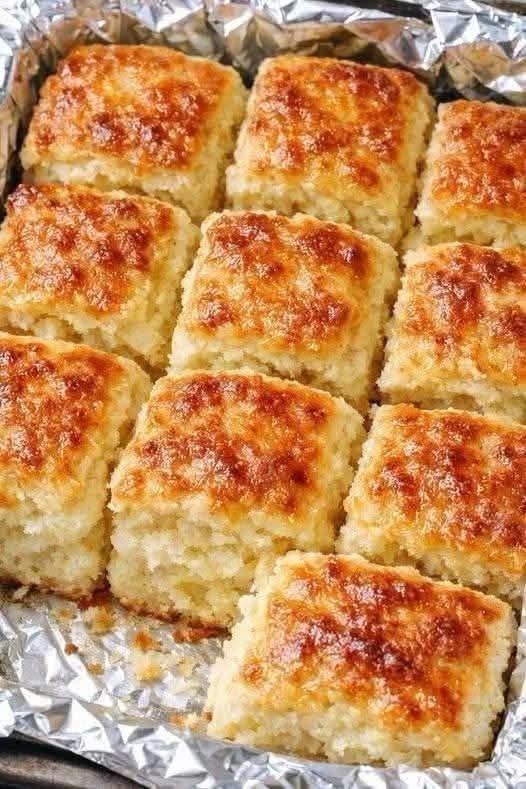
The pursuit of the perfect Southern biscuit is a culinary journey defined by precision, structural understanding, and an appreciation for traditional baking science. A truly exceptional biscuit is not merely a side dish; it is a masterpiece of textures, balancing a deeply caramelized, crisp exterior with a soft, cloud-like, multi-layered interior. Achieving the beautiful presentation showcased in 1000005985.jpg requires more than just mixing basic ingredients together; it demands a thorough understanding of how fats, liquids, and starches interact under the influence of heat. In traditional American culinary history, biscuit making was considered an essential measure of a baker’s skill, relying heavily on tactile intuition and a mastery of thermal dynamics. This comprehensive guide explores the molecular foundations of biscuit structure, provides an exact technical protocol for replicating the golden, square-cut biscuits pictured in 1000005985.jpg, and delves into the historical folklore and nutritional contexts that define this timeless comfort food. By treating the baking process as both a science and a ritual, home cooks can elevate simple kitchen staples into an artisanal experience that honors centuries of culinary heritage.
Deciphering the Visual Indicators of a Perfect Bake
A detailed analysis of 1000005985.jpg reveals several critical visual cues that signal an flawlessly executed baking process. The most prominent feature is the deep, mottled, golden-brown crust stretching across the surface of each individual biscuit. This rich coloration is the direct result of the Maillard reaction and sugar caramelization, enhanced by a strategic wash applied to the dough just before it enters the high-heat environment of the oven. Furthermore, the biscuits in 1000005983.jpg are arranged in a tight, uniform grid formation within a baking pan lined with aluminum foil. This “touching” method is a deliberate baking strategy that forces the expanding dough to rise vertically rather than spreading outward, resulting in maximum height and ultra-tender side walls. The distinct square cuts demonstrate precise knife or bench-scraper work, which prevents the outer edges of the dough from sealing, allowing the trapped moisture to escape uniformly and push the layers upward to create a light, airy crumb structure.
Texture Dynamics: Balancing Crispness with Tenderness
The ultimate measure of a premium butter biscuit lies in its dual-textural contrast. The exterior crust must possess enough structural integrity to offer a distinct, shattering crunch upon the first bite, yet it must remain delicate enough to melt away quickly without feeling tough or leathery. Beneath this golden shell, the interior should display an open, irregular crumb structure filled with soft pockets of trapped air and steam. It must be intensely moist and rich due to the butter content, yet light enough to pull apart into distinct sheets or layers. Achieving this perfect balance requires a disciplined hand during the mixing and folding stages, as over-manipulation of the dough will activate gluten networks, turning a tender pastry into a tough, bread-like structure. By monitoring ingredient temperatures and handling the dough with minimal friction, you can consistently achieve the soft, pillowy interior illustrated in 1000005985.jpg.
The Molecular Foundations of Pastry Structure and Chemistry
Gluten Regulation and the Selection of Low-Protein Flour
At the heart of biscuit chemistry is the regulation of gluten, a structural protein network formed when water mixes with the wheat proteins gliadin and glutenin. In yeast bread production, a strong, elastic gluten network is desirable to trap gas and create a chewy texture; in pastry and biscuit baking, however, gluten formation must be strictly minimized to preserve tenderness. To achieve the delicate crumb structure shown in 1000005985.jpg, selecting the correct flour is paramount. Traditional Southern biscuits rely on extra-fine, low-protein soft white winter wheat flour, which typically contains a protein content between 7.5% and 8.5%. This is significantly lower than standard all-purpose flour, which ranges from 10% to 12%, or bread flour at 12% to 14%. The lower protein threshold of soft wheat flour ensures that even when liquid is introduced and the dough is laminated, the resulting gluten sheets remain thin and fragile, ensuring an ultra-tender bite that breaks down effortlessly on the palate.
The Science of Solid Fat Lamination and Steam Expansion
The signature height and flaky layers of an artisanal biscuit are driven entirely by a physical process known as solid fat lamination. When cold, solid butter is cut into the dry flour mixture, it should not be rubbed into a homogeneous paste; instead, it must remain as distinct, visible flakes or pea-sized nuggets distributed throughout the starch matrix. As the dough is flattened, folded, and turned, these flattened pockets of solid fat create physical barriers between the layers of flour. When the pan is placed into a hot oven, the solid butter melts rapidly, releasing its inherent water content into the surrounding dough. This trapped water instantly converts into gaseous steam, expanding violently and pushing the overlying layers of flour upward before the starch structure can fully set. This steam-driven expansion is what creates the distinct horizontal layers and magnificent height visible in the biscuits of 1000005985.jpg, while the fat solids coat the flour particles, waterproofing them against excess liquid absorption and further preventing gluten elasticity.
Chemical Leavening Mechanics: The Dual-Action Response
While steam provides the mechanical lift for lamination, chemical leavening agents deliver the foundational volume and airy crumb structure necessary for a cloud-like texture. Traditional biscuit recipes utilize double-acting baking powder, a sophisticated chemical compound containing sodium bicarbonate and two distinct acid salts: one that reacts immediately upon contact with moisture, and another that activates only when exposed to temperatures exceeding 140°F (60°C) in the oven. When liquid is introduced to the dry ingredients, the primary acid dissolves, reacting with the sodium bicarbonate to release carbon dioxide gas bubbles into the wet batter, creating an initial lift. Once inside the oven, the heat-activated acid triggers a secondary release of carbon dioxide, expanding the pre-existing air pockets just as the starch walls begin to solidify. This dual-action response ensures a consistent, high rise and a uniform cell distribution within the crumb, preventing the biscuits from sinking or becoming dense and heavy during the bake.
Step-by-Step Technical Protocol: Crafting the Square-Cut Golden Biscuits
Phase 1: Dry Ingredient Integration and Cryo-Preparation
The journey to replicating the premium baking results seen in 1000005985.jpg begins with careful temperature control and thorough dry-ingredient integration. Sift four hundred grams of low-protein soft winter wheat flour into a large, chilled glass mixing bowl. Add two tablespoons of double-acting baking powder, one teaspoon of fine sea salt, and one tablespoon of superfine sugar to balance the savory notes. Whisk the dry ingredients vigorously for thirty seconds to ensure the leavening agents are perfectly distributed throughout the flour matrix. To maintain structural integrity, place the bowl of dry ingredients and one hundred and fifteen grams of high-quality unsalted butter into the freezer for exactly fifteen minutes prior to mixing. This cryo-preparation ensures that the fat remains completely solid and resilient against the ambient heat generated by your hands during the subsequent blending phase.
Phase 2: Cutting the Fat and Hydration Dynamics
Remove the chilled components from the freezer. Using a sharp box grater or a specialized pastry blender, cut the ice-cold butter directly into the flour mixture. If using a grater, toss the butter shreds gently in the flour every few seconds to ensure each piece is fully coated and remains isolated. The mixture should resemble coarse cornmeal interspersed with pea-sized flakes of solid butter. Next, make a deep well in the center of the dry ingredients and pour in two hundred and forty milliliters of ice-cold, full-fat cultured buttermilk. Using a chilled rubber spatula, fold the ingredients together gently using a sweeping motion from the bottom of the bowl upward. Stop mixing the exact moment the flour is fully hydrated and a shaggy, uneven dough begins to pull away from the sides of the bowl. Over-mixing at this stage will warm the butter and ruin the delicate texture.
Phase 3: Lamination, Squaring, and Geometric Cutting
Turn the shaggy dough out onto a lightly floured, chilled work surface or a sheet of parchment paper. Using floured hands, gently press the dough into a rough rectangle approximately one inch in thickness. Fold the outer third of the dough over the center, then fold the opposite third over that, precisely mirroring the method used for making classic puff pastry. Rotate the dough ninety degrees, pat it down gently to its original thickness, and repeat this folding process a total of four to five times. This manual lamination creates dozens of alternating layers of cold butter and hydrated flour. After the final fold, pat the dough into a neat, uniform square shape exactly one inch deep. Using a very sharp chef’s knife or a bench scraper, trim the four outer edges to expose the internal laminated layers. Cut the remaining dough block into a perfect grid of nine equal squares, pressing straight down through the dough in a single, fluid motion without twisting the blade, which would seal the edges and inhibit the rise.
Phase 4: Pan Configuration, Thermal Execution, and Finishing
Line an eight-inch square baking pan with high-grade aluminum foil, leaving a slight overhang on the sides, matching the configuration shown in 1000005985.jpg. Lightly brush the bottom of the foil with melted butter. Arrange the nine square dough portions in a tight three-by-three grid, ensuring their side walls are touching one another firmly. This configuration forces the biscuits to support each other as they expand, channeling all thermal energy into a dramatic vertical rise. Using a pastry brush, coat the tops of the biscuits generously with a layer of heavy cream or melted butter to provide the proteins and sugars needed for an intense crust coloration. Place the pan into an oven preheated to 425°F (218°C) and bake for fifteen to eighteen minutes. Monitor the oven closely; the biscuits are perfectly executed when the tops display the deep, continuous golden-brown crust captured in 1000005985.jpg. Remove the pan from the oven, brush the surfaces with an additional layer of melted clarified butter, and allow them to rest for five minutes before lifting the foil liner to serve the hot pastries.
Historical Context and Traditional Baking Folklore
The Evolution of Quick Breads in the Domestic Sphere
The traditional Southern biscuit occupies a revered position in American culinary history, charting the evolution of domestic technology and ingredient availability across the eighteenth and nineteenth centuries. Before the widespread commercial manufacturing of chemical leavening agents like baking powder and baking soda, traditional households relied on labor-intensive methods to introduce air into flatbreads. This early era gave rise to “beaten biscuits,” a preparation where dough was vigorously struck with an axe or a heavy rolling pin for hours to physically force microscopic air pockets into the dense flour matrix. The introduction of refined soft wheat flours from coastal mills, combined with the invention of double-acting baking powder in the mid-nineteenth century, revolutionized home baking. It transformed biscuit making from an exhausting physical task into a rapid, accessible kitchen ritual, allowing quick breads to become a daily staple of agrarian households across the American South.
The Ritual of the Shared Hearth and Comfort Traditions
Beyond its technical evolution, the process of baking hot biscuits has historically been intertwined with concepts of hospitality, familial bonding, and community solidarity. In many traditional rural communities, the morning ritual of preparing a batch of fresh biscuits was a grounding act that marked the beginning of the daily labor cycle. A pan of hot, golden biscuits served as a universal symbol of welcome for visitors, neighbors, and travelers alike, representing comfort and warmth. The knowledge of biscuit lamination was rarely written down in formal manuals; instead, it was passed down through generations via oral tradition and hands-on demonstrations, with mothers teaching children the exact tactile feel of the dough, cementing the dish as an enduring cultural touchstone of domestic comfort.
Food Safety, Storage Mechanics, and Regulatory Compliance
Allergen Management and Kitchen Cross-Contamination Standards
While traditional butter biscuits are built upon simple, unrefined kitchen staples, they contain two of the most prominent universal food allergens: gluten (derived from wheat flour) and lactose/casein (derived from cultured buttermilk and butter). When preparing food for individuals with known dietary sensitivities, celiac disease, or dairy allergies, strict sanitization protocols must be maintained within the kitchen workspace. All mixing bowls, pastry blenders, graters, and countertops must be thoroughly cleaned with hot, soapy water to remove trace proteins from previous baking sessions. If you choose to modify this classic recipe using gluten-free flour blends or plant-based fat alternatives, ensure that your raw ingredients are certified allergen-free and avoid utilizing wooden rolling pins or porous cutting boards that may retain microscopic gluten particles from historical use.
Thermodynamic Cooling, Storage, and Reheating Protocols
To preserve the premium quality and prevent microbial degradation of your baked goods, proper storage mechanics must be strictly observed. Once removed from the oven, allow any leftover biscuits to cool completely to room temperature on a wire wire rack to prevent moisture condensation along the bottom crust. Storing warm biscuits in a sealed environment will trap residual steam, softening the crisp exterior and accelerating the development of surface molds. Once cooled, wrap the biscuits tightly in aluminum foil or place them into an airtight glass container. They can be safely stored at ambient room temperature for up to two days, or refrigerated for up to five days. For extended preservation, biscuits can be wrapped individually in plastic wrap, placed in a heavy-duty freezer bag, and frozen for up to three months. When reheating, avoid the use of microwave ovens, which agitate water molecules rapidly and cause the starch structures to become tough and rubbery; instead, place the biscuits onto a foil-lined baking sheet and warm them in a conventional oven preheated to 350°F (177°C) for six to eight minutes to restore the original crisp crust and tender interior texture seen in 1000005985.jpg.
General Educational and Informational Disclaimer
The comprehensive technical instructions, chemical analyses, historical commentaries, and culinary insights presented throughout this article are intended strictly for general educational, informational, and domestic baking purposes. This content should not be used as a source of professional dietary planning, clinical nutritional counseling, or regulatory agricultural guidance. The metabolic effects of consuming processed starch products and saturated dairy fats can vary significantly based on an individual’s unique health status, metabolic rate, and activity levels. Home bakers are encouraged to practice personal discretion, maintain a balanced approach to nutrition, and consult with a certified clinical dietitian or a registered medical professional to address specific long-term wellness goals or complex dietary requirements.
Conclusion: Reclaiming the Values of Scratch Baking
Mastering the disciplined execution of traditional Southern butter biscuits offers a powerful opportunity to return to the foundational values of mindful scratch cooking and culinary excellence. By selecting high-quality, unrefined ingredients and respecting the precise physical laws of temperature control, fat lamination, and chemical leavening, any home baker can transform basic pantry items into the spectacular, golden-crusted creations displayed in 1000005985.jpg. This rewarding process reminds us that true satisfaction in the kitchen comes from patience, attention to detail, and a deep respect for the time-honored techniques that have sustained families for generations. Whether served as a warm centerpiece for a festive weekend breakfast or shared as a comforting side dish with friends and loved ones around the dinner table, a perfectly executed pan of hot biscuits provides a beautiful, delicious link to our shared culinary past and a deeply satisfying dining experience.